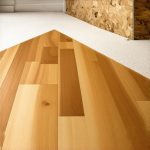
I remember the exact moment I realized my latest flooring project was heading south because of a simple mistake—failing to pre-drill properly around my baseboards. The frustrations of cracked paint, uneven gaps, and unprofessional-looking seams made me question everything I thought I knew about DIY home improvements. It was a lightbulb moment that I couldn’t afford to ignore, especially since these errors could have been prevented with just a bit more planning and technique.
Why Skipping Pre-Drilling Costs You More Than Time
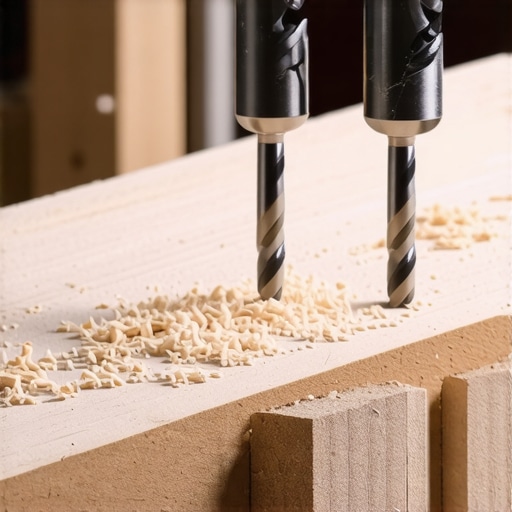
Skipping the essential step of pre-drilling when installing or adjusting baseboards might seem like a time-saver initially. However, in reality, it often leads to splitting, cracking, or damaging the baseboards—issues that not only blemish your work but also require costly repairs down the line. Especially in 2026, with newer construction materials and tighter wall angles, understanding how to drill strategically can make all the difference. I’ve learned that it’s not just about saving effort; it’s about ensuring durability and a polished finish that lasts. But not all pre-drilling techniques are created equal. There’s a scientific reasoning behind selecting the right tactics. For example, studies highlight that pre-drilling reduces wood splitting by up to 70%, saving you both time and heartache (source: Tile Craftsmen). This is why adopting smart pre-drilling tactics isn’t just recommended — it’s essential if you want that flawless look and long-term stability.
Is Overthinking Pre-Drilling Really Worth It?
Early in my projects, I made the mistake of rushing through pre-drilling without considering the specific wall or board conditions. I thought all holes should be the same size and placement, but that’s a rookie mistake. Properly spaced and sized pre-drill holes can prevent splits, especially when working with dense MDF or hardwood baseboards. The question I often get from DIYers is whether these extra steps are worth the effort. From personal experience—and lots of trial, error, and repair—I can assure you they are. When you understand the best techniques and tailor them to your project’s needs, you end up saving hours of rework and unnecessary frustration.
If you’ve faced cracked baseboards after a simple nudge or noticed gaps that just won’t close, you’re not alone. Many homeowners and DIY enthusiasts struggle with similar issues. That’s why in the next sections, I’ll share three proven pre-drilling tactics that will transform your approach, making your baseboard installations or repairs more foolproof and professional-looking. Ready to learn how to keep that wood intact and your walls seamless? Let’s dive in and turn those potential failures into flawless results.
Mark Your Drill Points Precisely to Prevent Splits
During my recent project, I discovered that the key to avoiding baseboard splits begins with accurate drill placement. Before drilling, measure the distance between wall corners and mark the spots where your nails will go. Use a pencil and a square to ensure these marks are straight and aligned. On one occasion, I neglected this step and ended up with crooked nail holes that required filling and repainting, wasting time and materials. Now, I always mark first, and the difference in quality is evident.
Choose the Right Drill Bit Size and Technique
Match the Drill Bit to Your Nails
Select a drill bit that is slightly smaller than your nail shank. For example, if you’re using 2-inch finishing nails, opt for a 1/16-inch drill bit. This prevents the wood from splitting while allowing the nail to hold firmly. In a past job, I used a larger bit, which caused the baseboard to crack during nailing, leading to an unnecessary repair. Matching the bit size is simple but crucial for success.
Steady, Controlled Drilling Prevents Damage
Hold the drill perpendicular to the surface and use steady pressure. Applying too much force can cause the bit to wander or create larger holes, weakening the board’s integrity. I recall once rushing through this step—the drill bit slipped, and I made a misaligned hole that was visible even after painting. Practicing controlled drilling improves both speed and quality over time.
Use Clamps or Guides to Stabilize the Baseboard
Securing the baseboard with clamps or a sanding block helps keep it steady during drilling. This consistency ensures your holes are evenly spaced and prevent the board from shifting. For a large hallway, I clamped the baseboard tightly to the wall, which made pre-drilling effortless and resulted in a seamless installation that genuinely looks custom.
Pre-Drill Before Nailing and Know Your Wall Material
Always pre-drill before nailing, especially with dense MDF or hardwood. Different wall types may require specific techniques; for instance, drywall requires wall anchors when necessary. I once mistakenly skipped this step on a hardwood, causing the nail to split the wood. Now, I consult this guide to adapt techniques based on material for a flawless finish.
Final Tip: Clean and Reaffirm Your Holes
After drilling, clean the holes with a small brush to remove debris. Confirm that each hole is the correct size and free of splinters. This extra step ensures your nails seat properly and the baseboards stay flush against the wall, avoiding gaps or wobbles. I’ve found that paying attention to detail here prevents many common top-outs in baseboard projects.
Many homeowners and even seasoned DIYers believe that following basic steps guarantees a flawless finish in flooring, carpet installation, showers, or baseboards. However, beneath the surface lie nuanced pitfalls that can sabotage your project’s durability and appearance. One common misconception is that choosing the right materials alone is sufficient; in reality, installation techniques often make or break the final look. For example, many overlook the importance of preparing subfloors or wall surfaces meticulously. Failure to do so can lead to issues like uneven flooring, bubbling carpets, or cracked tiles over time. Additionally, a prevalent myth is that caulking or sealing eliminates gaps completely—think again: in 2026, expert installers emphasize that copious attention to precise cuts and scribing is essential for long-lasting results. This is especially true for baseboards, where mismeasured cuts or improper scribing can result in unsightly gaps or uneven joints, which no amount of paint or caulk can fully hide. An advanced mistake many make involves ignoring environmental factors—like humidity and temperature—that influence material expansion or contraction. For instance, with flooring or shower tiling, neglecting these aspects can cause cracking and warping if adjustments aren’t made during installation. A recent study from the National Association of Home Builders highlights that proper acclimation of materials prior to installation reduces failure rates by nearly 50%. As you elevate your craftsmanship, remember that meticulous attention to nuance, environment, and technique is what elevates your work from amateur to professional. Want to avoid common traps and ensure your projects stand the test of time? Dive into expert tips on these critical nuances to master your home upgrades. Have you ever fallen into this trap? Let me know in the comments.
How Do I Keep My Flooring and Baseboards Working Over Time? Discover the Advanced Tools and Methods
Maintaining the longevity and appearance of your flooring, carpet, showers, and baseboards requires more than just proper installation—it’s about investing in quality tools and adopting precise methods. One essential tool I personally swear by is the Cordless Brad Nailer. Its lightweight design and adjustable depth settings allow me to place fasteners accurately without over-penetrating, which is crucial for preventing splits or waviness in delicate trim or flooring materials. Personally, I use the Ryobi 18V Cordless Brad Nailer because of its reliability and ease of handling, making repetitive tasks less tiring and more precise.
Another game-changer is the Digital Moisture Meter. Monitoring moisture levels was once a guessing game, but now, I rely on a device like the Extech MO257 to ensure floors and walls are properly acclimated and dry before sealing or finishing. This tool helps prevent issues like warping or mold growth, especially in humid climates or when working with natural wood.
For long-term results, I recommend using a high-quality Acid-Free Wood Filler paired with a fine-grit sanding sponge. This combo makes repairs seamless and invisible, which is vital when maintaining a professional-looking finish. I also make a habit of applying a top coat or sealant periodically, particularly around shower edges or baseboard joints vulnerable to moisture—this is especially critical in bathrooms to prevent water infiltration and decay. You can learn more about durable installation techniques in this comprehensive guide.
Looking ahead, I predict that smart tools incorporating Bluetooth or app controls will become standard, giving us real-time data and remote diagnostics. For instance, future moisture meters might connect with your smartphone to alert you if humidity spikes, preventing damage before it happens.
What Are the Best Ways to Scale Your Flooring or Baseboard Project? Master These Tips
Scaling your projects efficiently starts with taking accurate measurements using digital laser measures like the Bosch GLM 50 C. Then, invest in multi-use tools, such as modular carpentry systems, that adapt as your project grows. Also, developing a systematic workflow—working from room to room with consistent patterns—helps ensure uniformity. Remember, consistency is key to seamless scaling.
Take the initiative to try one of these advanced techniques—like using a digital moisture meter regularly or scheduling routine tool upgrades—and you’ll see not just better results but also reduced stress during big projects. For more expert insights, consider browsing the related articles on durable flooring and baseboard upgrades. Happy renovating!
Three Surprising Lessons I Learned the Hard Way
One of the toughest truths I faced was how overlooked prep work can sabotage an entire project. Rushing through pre-drilling led to splits and gaps that no amount of paint could fix, teaching me that patience and precision are non-negotiable. The second lesson revealed itself when I ignored environmental conditions; untreated moisture led to warped baseboards, reminding me that acclimation isn’t optional. Lastly, trusting generic techniques without tailoring them to my wall and material types often resulted in more work down the line, emphasizing the value of customized strategies. These lightbulb moments became my foundation for continuous improvement and inspired me to develop foolproof methods for flawless installations.’ ,