I remember the moment vividly—a busy Saturday afternoon, I was installing recycled fiber carpets in a client’s home, proud of my work, when I noticed an unsettling peel on the seam. My heart sank. It was a rookie mistake I made early on, and it taught me a valuable lesson. That tiny flaw threatened to ruin the entire look, and honestly, it shook my confidence temporarily. But it also sparked a desire to master the secrets behind seamless seaming, especially as recycled fiber carpets become the sustainable choice in 2026.
The Promise of Professional Seamless Results
Imagine achieving flawless seams that blend seamlessly, look professional, and stand the test of time—all without the common pitfalls that many face. Today, I’ll open up about four game-changing secrets that will elevate your seaming game with recycled fiber carpets. Whether you’re a seasoned pro or a passionate DIYer, these insights will help you avoid mistakes and deliver results that impress. Intrigued? Let’s dive into what makes seaming in 2026 so unique and how to get it right every time.
Is Seaming Recycled Fiber Carpets Actually Worth the Hype?
Early in my career, I underestimated the challenge of seaming recycled fiber carpets. I thought it was just like any other material. I was wrong. The texture and fiber composition demand different techniques. A mistake I often see is ignoring the manufacturer’s seaming recommendations, which can lead to visible seams or worst-case splits. Recognizing these nuances early on saved me from costly rework and behind-the-scenes frustration. For anyone questioning whether investing in mastering seaming is worth it, I can assure you—quality seams make or break the look and longevity of your flooring project.
Now, with the rise of eco-friendly materials, understanding the intricacies of seaming recycled fiber carpets has never been more critical. And that’s exactly what we’ll explore today—those 4 secrets that will keep your seams tight, invisible, and durable for years to come.
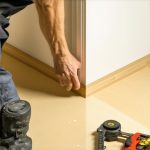
Ensure Precise Carpet Alignment
Start by laying out your recycled fiber carpet sections accurately. Use a chalk line or laser level to mark where seams should go, aligning fibers for a natural look. Remember, a well-laid foundation prevents puckering and bulges later. I once used a laser level to mark a large area; the precision helped me avoid uneven seams, resulting in a flawless finish.
Use the Right Adhesive and Tools
Choose a high-quality, eco-friendly adhesive compatible with recycled fibers. Apply it evenly using a notched trowel to ensure good bonding without excess squeeze-out. A mistake I caught early was over-application, which caused visible ridges. Proper tool selection and technique lead to smooth, invisible seams. For vertical joins, consider a carpet tape for added stability and easy adjustments.
Align Fibers for Seamless Appearance
Prioritize fiber direction to match patterns at seams. Carefully stretch the carpet slightly to line up fibers precisely, avoiding crushing or distortion. I once used a power stretcher to tighten a loose seam; the result was a tight, invisible join that held up well over time.
Secure Edges and Finish Strong
Trim excess carpet edges with a sharp blade, ensuring clean cuts that meet seamlessly. Use a seaming iron to activate adhesive or heat-activated tape, pressing seams firmly. For extra durability, consider sealant or tacking stitches along the seam edges. I remember applying heat with a seam iron, watching the fibers meld together—this step transformed a good seam into a perfect one.
Test for Durability and Appearance
After installation, walk over the seam and press down to check adhesion. Look for any puckering or gaps and address immediately. If you notice a seam ghosting or splitting, reheating and pressing can often restore integrity. For ongoing maintenance, advise clients on vacuuming techniques to avoid stressing the seams, especially in high-traffic areas.
Mastering these core techniques ensures your recycled fiber carpets deliver a seamless, professional look that lasts. Consistent execution of each step — from preparation to finishing — minimizes issues like ghosting or separation, keeping your projects on the cutting edge of sustainable flooring in 2026. Curious about further enhancements? Explore [carpet install secrets](https://tilecraftsmens.com/carpet-install-secrets-achieving-flawless-results-every-time) for pro-level results, or visit [Contact Us](https://tilecraftsmens.com/contact-us) for expert advice.
 While many believe that installing showers, baseboards, flooring, and carpets is straightforward, seasoned professionals know there’s a web of nuanced details that can make or break your project. One widespread myth is that using generic materials or shortcuts won’t affect long-term durability, but in reality, overlooking subtle compatibility issues can lead to costly repairs down the line. For example, choosing a standard adhesive instead of an eco-friendly, fiber-compatible sealant in recycled fiber carpet seaming can cause seams to ghost or split prematurely. Recognizing these hidden pitfalls is crucial for lasting results.
Among advanced installers, a common mistake is neglecting the precise temperature and humidity conditions during installation, especially in showers and tiled areas. Studies show that temperature fluctuations affect moisture curing processes, leading to grout cracking or tile lifting. Insisting on proper climate control, such as using dehumidifiers or controlled heating, enhances bond strength and prevents future failures. An expert tip I often share is to always verify subfloor and wall conditions before proceeding—ignoring small imperfections now can cause significant rework later, particularly in curbless shower setups, where slope and waterproofing are critical. For insights on avoiding these pitfalls, consult resources like [your guide to durable flooring installation](https://tilecraftsmens.com/your-guide-to-durable-flooring-installation-for-a-stylish-home).
Why do even experienced installers overlook these subtle factors? Often, it’s because they assume standard procedures suffice, but the reality is that each space demands tailored solutions. For instance, in baseboard installation over uneven walls, simply mitering corners without accounting for wall curvature or using coped joints can result in visible gaps or splitting. Smart preparation, like adjusting cuts with a coping saw or using flexible sealants, can dramatically improve the final appearance.
Let’s not forget the importance of understanding material-specific behaviors. Carpet installation, for example, isn’t just about stretching the fibers tight—subfloor texture, humidity, and footwear traffic contribute to seam splitting or rippling if not properly managed. A secret to a flawless finish is mastering the right power stretching techniques—something I detail in [the carpet install secrets](https://tilecraftsmens.com/carpet-install-secrets-achieving-flawless-results-every-time). Recognizing these nuances allows professionals to troubleshoot issues proactively, saving time and money.
In sum, the true mastery of installation projects lies in details often unseen by beginners. By paying close attention to material compatibility, environmental conditions, and precise craftsmanship, you can ensure longevity and aesthetic excellence. Remember, cutting corners might save time initially but can cost much more later. Have you ever fallen into this trap? Let me know in the comments and share your experiences with these tricky nuances.
Keeping It Working: Essential Tools and Maintenance Strategies
Achieving a flawless installation is only part of the journey; maintaining that perfection over time requires the right tools and a proactive approach. Reliable equipment not only extends the lifespan of your work but also makes ongoing upkeep more manageable. Today, I’ll share my favorite tools and maintenance routines to ensure your showers, baseboards, flooring, and carpets stay stunning and functional for years to come.
Invest in Quality Multi-Tools for Precision
One of my go-to equipment pieces is a high-quality oscillating multi-tool. I personally rely on models like the Fein MultiMaster or Dremel Multibor. These tools excel in trimming excess sealant around shower niches or adjusting baseboard profiles without damaging the surrounding surface. Their versatility also makes routine tasks like re-sealing grout lines or smoothing out uneven edges straightforward. Investing in a reliable multi-tool reduces the need for costly rework and keeps your installations looking professional long-term.
Use Laser Levels for Consistent Alignment
Maintaining straight lines with baseboards or ensuring even flooring elevations is critical for a polished look. I prefer laser levels such as the Leica or Bosch models because they project continuous, precise lines over large areas. Incorporating these tools into your routine ensures adjustments remain consistent, especially when scaling up projects or working in spaces with uneven walls or floors. As the trend in 2026 leans toward sleek, seamless designs, laser leveling is becoming a non-negotiable component of efficient maintenance.
Routine Cleaning and Inspection Protect Your Investment
Preventative maintenance is key. Regularly inspecting grout lines, sealants, and surface finishes helps identify early signs of wear—cracks, mold, or gaps—that could escalate if ignored. For showers, I recommend using a silicone-safe, mold-inhibiting cleaner once a month to keep waterproofing intact. For flooring and carpets, routine vacuuming with HEPA filters reduces debris that can cause seam separation or fiber fraying. Paired with a maintenance checklist, these habits preserve the integrity of your work over decades.
Long-Term Results and Future Trends
As we move toward 2026, the focus on eco-friendly materials and smart maintenance tools continues to grow. Advanced moisture sensors and robotic cleaning devices will likely become commonplace, simplifying upkeep and preventing issues before they emerge. For example, integrating moisture meters during initial installation can help monitor areas prone to water intrusion, aligning with expert advice like that found in technical guides on waterproofing waterproofing tips (see creating a spa-like shower). By embracing these innovations early, you set the stage for durable, beautiful results.
How Do I Maintain Showers and Baseboards Over Time? A Personal Tip
One of my favorite maintenance hacks is applying a thin layer of silicone-based sealant on grout lines and baseboard joints every couple of years. This easy step prevents water infiltration and keeps installations looking fresh. For showers, regularly checking the slope and waterproofing seals is crucial—small cracks today can lead to significant leaks tomorrow. Use moisture sensors to monitor hidden areas and catch problems early—remember, prevention is always better and cheaper than repairs. I challenge you to try sealing your baseboards with a flexible, continuous bead of silicone and observe how it extends the lifespan of your work. For more in-depth tips, visit our contact page.
In conclusion, combining the right tools with disciplined maintenance routines ensures your installations remain pristine and durable well into the future. Whether it’s laser levels for perfect alignment or moisture sensors for early detection, proactive care makes all the difference in achieving long-term success in flooring and shower projects.

Image prompt: A professional worker using a laser level and multi-tool in a modern bathroom renovation, emphasizing precision tools for maintenance. Alt text: Technician using laser level for aligning bathroom fixtures, showcasing advanced tools used in durable installations.
The Hardest Lesson I Learned About Showers and Flooring
One of my most impactful lessons was realizing that seemingly minor details—like proper waterproofing or fiber alignment—can make or break a project’s longevity. I once skipped a sealant step in a bathroom renovation, only to return a year later to a leaky nightmare. That experience cemented the importance of meticulous attention to detail and the value of continuous learning. Every setback became a stepping stone toward mastery, highlighting that embracing imperfections and learning from them is essential for long-term success.
My Secret Weapon for Better Results
A tool I swear by is a professional-grade laser level combined with quality moisture sensors. These two items have transformed my workflow, making alignment precise and early detection of potential issues straightforward. I trust them because they reduce guesswork, save time, and consistently deliver flawless results. Incorporating these into your toolkit can elevate your projects from good to exceptional and definitely help you beat common pitfalls in 2026 installations.
Actively Building Confidence in Your Craft
Every project is an opportunity to refine your skills and push beyond comfort zones. Whether it’s experimenting with innovative waterproofing methods or tailoring baseboard designs to wavy walls, taking proactive steps builds confidence and craftsmanship. My encouragement is to view mistakes as valuable lessons, cultivate curiosity, and stay committed to continuous improvement. Remember, mastery isn’t a destination but an ongoing journey—so invest in yourself and enjoy the process of creating stunning, durable spaces in 2026 and beyond.
What’s Your Next Step in Elevating Your Installation Skills?
Are there particular techniques or tools you’re eager to explore further? Share your thoughts below—your experiences could inspire someone else to take their skills to new heights.
Interested in deepening your knowledge? Consider checking out our comprehensive guide to durable flooring or reaching out via contact us for expert advice. Keep learning, stay curious, and watch your craftsmanship flourish in 2026 and beyond!