Ever had that sinking feeling when you step back after installing your baseboards, only to see unsightly gaps or uneven miter joints glaring right back at you? I remember the first time I tried to perfect those tight corners on my walls—what a frustration. I’d cut and fit, only to have gaps that seemed almost impossible to hide. That lightbulb moment came when I realized it wasn’t just about the cuts; it was about mastering specific techniques that pros swear by. But let’s be honest—who has time for complicated tools or endless trial and error? The good news is that with just a few pro secrets, you can achieve flawless, tight joints that elevate your space without extra hassle.
Why Precision in Baseboard Mitering Changes Everything
Getting perfect miter joints isn’t just about aesthetics—it’s about making your home look polished and professional. Gaps, crooked cuts, and mismatched corners can ruin even the most well-designed rooms, making everything look rushed or cheaply done. When I finally nailed the angles and learned the tricks, the difference was night and day. It’s like dressing up your walls with a suit that fits just right—suddenly, everything looks more put-together.
Interestingly, inaccurate cuts or improper scribing can cause baseboards to pull away from the wall over time, leading to gaps and unwanted movement. According to home renovation experts, precision in your cuts contributes significantly to durability and visual appeal. For those tackling a big project or simply wanting to upgrade their skills, understanding the nuances of miter joints is a game-changer. Not only does it save you from future headaches, but it also boosts your confidence as a DIYer.
Have you ever faced stubborn gaps or crooked corners that refused to sit right? If so, you’re not alone. It’s a common challenge that can make or break the look of your walls, especially on tricky surfaces like 2026 walls that might have irregularities. Don’t worry—there are simple pro secrets that can help you get those joints tight and seamless. And trust me, once you get the hang of these techniques, you’ll wonder how you ever struggled in the first place.
In the upcoming sections, I’ll share three expert pro secrets—tried, true, and easy to implement—that will help you achieve that professional-quality finish on your baseboards. Whether you’re remodeling a single room or giving your entire home a fresh look, mastering these tricks will turn a frustrating task into a satisfying accomplishment. Ready to transform your space? Let’s dive into the secrets that will make your baseboards look like they were installed by a seasoned pro.
Align Your Cuts Precisely
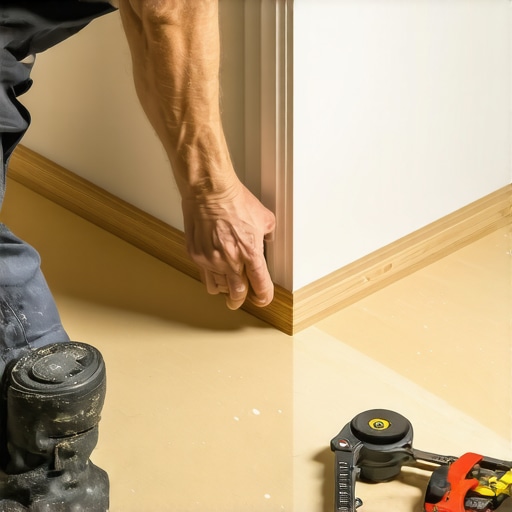
The first step to flawless miter joints is making accurate cuts. Use a high-quality miter saw and set it to 45 degrees for corners. Measure carefully from wall to wall, accounting for any wall irregularities. I once faced a wobbly wall that threw off my measurements, leading to gaps—so double-check your dimensions before trimming.
Use a Corner Block for Consistent Angles
Instead of measuring each time, consider using a corner block jig. It helps maintain consistent angles, especially when working on multiple corners. I fixed my DIY project by creating a simple jig from scrap wood, which significantly reduced mis cuts and saved my time.
Apply Painter’s Tape for Precise Marking
Before cutting, lay painter’s tape along the baseboard where the cut will be made. Mark your cut lines over the tape. This prevents splintering and makes it easier to see your marks clearly. I caught a misalignment in my cuts this way, avoiding a messy gap at the corner.
Tackle Wall Irregularities
Walls aren’t always perfectly straight. For uneven surfaces, scribe the baseboard to the wall using a compass or flexible template. Clamp the baseboard and trace the contour. For example, when installing along an uneven wall, scribing saved me from gaps and ensured a tight fit.
Sealing and Caulking for a Seamless Finish
After fitting the baseboards, run a bead of paintable caulk into the joint gaps. Use a damp finger or caulk finishing tool to smooth the seam. This hides minor imperfections and creates a professional look. I learned the hard way that skipping this step made my joints look rough—caulking is your secret weapon.
Consider Back-Cutting to Prevent Gaps
If your miters still don’t sit flush, try back-cutting the edges slightly. This involves cutting a small bevel on the backside of the joint to help the pieces meet tightly. It’s a small tweak but makes a noticeable difference in the joint’s appearance. I used back-cutting after failing to achieve a perfect joint with just miter angles, and the results were impressive.
Create Custom Jigs for Repetitive Cuts
For multiple identical pieces, build a simple jig that sets your miter saw at the exact angle and length. This consistency ensures all corners match perfectly. When I replaced all baseboards in my living room, this trick prevented cumulative errors and gave my project a polished look. For more upgrade ideas on baseboards, visit baseboard trends in 2025.
Many DIY enthusiasts and even seasoned homeowners often believe that tackling projects like baseboards, flooring, or showers is straightforward if they follow the basic instructions. However, I’ve seen common misconceptions that can trip up even experienced installers. One prevalent myth is that precise cuts are all it takes to ensure a seamless finish. In reality, factors like wall irregularities, material acclimation, and environmental conditions play crucial roles in achieving professional results. For example, many assume that using a standard miter saw guarantees perfect corners, but without accounting for wall irregularities or proper joinery techniques, gaps are almost inevitable. Understanding these nuances can save you from costly rework and frustration.
Maintaining your flooring, baseboards, and shower installations over time is crucial for preserving their appearance and functionality. Investing in the right tools and adopting proper maintenance routines can significantly extend the lifespan of your upgrades. For example, a high-quality corner clamp can help you re-seat baseboards that have developed gaps due to wall shifts, ensuring a lasting fit. Regularly inspecting your shower seals and grout lines, using specialized waterproofing sealants, can prevent leaks and water damage, saving you costly repairs down the line. Updating your shower maintenance routine with professional-grade products ensures durability and a luxurious feel.
On the flooring front, tools like laser levels and floor scrapers keep your surfaces aligned and smooth, especially when dealing with expansion gaps or uneven subfloors. Employing a moisture meter before installing or repairing flooring is vital, as excess humidity can cause warping or buckling over time. Additionally, dust extraction vacuums and precision cutters help maintain a clean workspace and precise cuts, which are essential for seamless installations and repairs.
Looking ahead, the trend leans toward smart maintenance systems integrated with IoT devices. Imagine sensors that monitor moisture levels, air quality, or even detect shifts in your flooring or wall structures, alerting you before minor issues become major problems. Staying proactive is key—regularly scheduled inspections combined with the right tools can help you catch issues early.
So, what’s the best way to keep everything working smoothly? Start by implementing a routine check using a moisture meter before and after installation and investing in a versatile multi-tool kit that includes precision screwdrivers, putty knives, and sealant dispensers. This simple step ensures your work remains pristine, and potential problems are addressed promptly.
How do I maintain my flooring and showers over time
Consistent upkeep using quality products and proper tools not only prolongs the life of your installations but also keeps your home looking its best. Remember, the initial effort pays off in the long run, especially as trends move toward smarter, more sustainable home renovation solutions. To learn more about the latest in flooring and shower tech, check out this guide. Make it a habit to inspect, clean, and re-seal critical areas regularly—your home will thank you for it. For tailored advice or expert assistance, don’t hesitate to reach out today.
Throughout my home renovation journey, I’ve learned that the key to professional-looking baseboards and shower installations lies not just in the tools you use but in the mindset and subtle techniques that make all the difference. One of the biggest revelations was realizing that even small details, like properly scribing a baseboard or back-cutting miters, can transform a good project into a stunning finish. These insights have saved me countless headaches and rework, proving that patience and precision truly pay off. Embracing these lessons means you’re not just installing trim or tile—you’re creating a lasting impression of craftsmanship that elevates your entire space.
What No One Tells You About Perfecting Your Baseboard Fit
- The importance of wall scribing: Irregular walls are a DIYer’s nemesis, but mastering the art of scribing ensures your baseboards hug every contour smoothly. I struggled initially, but after practicing with flexible templates, I saw my gaps vanish.
- Back-cutting isn’t cheating—it’s smart: A tiny bevel on the backside of a miter joint can make all the difference. I used to think perfect angles were enough, but back-cutting gave me that seamless joint I always aimed for, especially on tricky corners.
- Consistent measurements are the secret sauce: Building a custom jig for repetitive cuts saved me from cumulative errors when replacing multiple baseboards. It’s a small effort that guarantees a uniform and professional appearance every time.
- Sealing vents and joints smartly: Applying paintable caulk after installation hides minor imperfections and prevents future gaps. It’s the finishing touch that transforms a rough cut into a polished look, a habit I now swear by.
- Wall irregularities demand patience: No wall is perfectly straight, but with a flexible scribing technique, I adapted my baseboard to every undulation, avoiding gaps and stubborn misfits. It’s a game of finesse that pays dividends in visual harmony.
Tools and Resources That Turn DIY Into Art
- High-quality miter saws: Investing in a reliable saw makes accurate cuts effortless. I use a model with a positive stop at 45° for perfect miters every time, which you can see in our detailed guide on upgrading your baseboards.
- Corner jig templates: Creating or purchasing a corner jig ensures consistent angles, especially for multiple corners—saving time and frustration. Trust me, once you see the difference it makes, you’ll wonder how you ever winged it without one.
- Painter’s tape and markers: These simple tools help mark precise cuts before sawing, preventing splintering and misalignments. It’s a small tip but a game-changer for clean, crisp joints.
- Scribing kits and flexible templates: For irregular walls, a quality scribing tool allows fitment without gaps. This soft skill elevates your DIY game and produces flawless results, as seen in expert tutorials on shower renovations.
- Caulking and sealing supplies: Finish your work with paintable caulk to hide tiny imperfections. It’s the final touch that makes your project look professionally done and adds durability.
Your Turn to Make the Leap
Remember, the journey to perfect baseboards and seamless showers isn’t about perfection out of the gate—it’s about learning, adapting, and refining your craft with each project. Starting with these insider tips and tools, you’re well on your way to creating stunning results that elevate your home’s look and feel. If you’re ready to explore further, check out our comprehensive baseboard upgrade ideas or learn more about luxury shower enhancements. Your skills are your greatest asset—so go ahead, turn your vision into reality, and enjoy every step of the process.
What’s been your biggest challenge with baseboards or shower installations? Share your experience below—I’d love to hear your story!