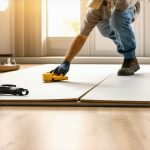
I remember the exact moment I realized my beautiful new baseboards had become a source of frustration rather than pride. After months of meticulous flooring installation, I noticed unsightly gaps between the baseboards and the wall — gaps that seemed to grow wider with each passing week. It was more than a visual annoyance; it was a constant reminder that something wasn’t quite right. That lightbulb moment led me down a rabbit hole of troubleshooting, and let me tell you, it wasn’t as simple as just adding more caulk.
As I dug deeper, I discovered that traditional sealing methods often fall short, especially with the ever-evolving designs and materials being used in 2026. Are you tired of battling with gaps that seem impossible to fix? Do you dread the idea of tearing out and redoing your baseboards every few years? Believe me, I’ve been there.
Today, I want to share how ditching the traditional caulk approach and applying innovative gasket-backings can be a game-changer. These fixes are practical, proven — and, best of all, durable. No more quick fixes that crack or peel after a season.
Why Baseboard Gaps Keep Coming Back — And What You Can Do About It
Many homeowners don’t realize that the root of persistent gaps often lies in material movement and the lack of proper backing support. With the advanced construction materials and wall shapes we’re seeing in 2026, traditional methods like caulk are becoming less effective. Instead, using gasket-backed techniques provides a flexible yet sturdy solution.
Early in my project, I made the mistake of assuming that filling gaps with just filler or caulk would fix the problem permanently. Spoiler alert: it doesn’t. According to recent industry insights, gaps can reappear or worsen if the foundational issues aren’t addressed with proper backing. For example, a study published by the Building Science Corporation notes that material expansion and contraction can cause cosmetic issues if not managed correctly.
If you’ve faced the disappointment of re-gapping your baseboards every year—trust me, you’re not alone. By exploring these gasket-back solutions, you’ll get closer to that seamless, professional look you’re after. Ready to learn how to finally keep those gaps in check? Let’s dive into some practical fixes that work in 2026 and beyond.
Assess Wall and Baseboard Movement
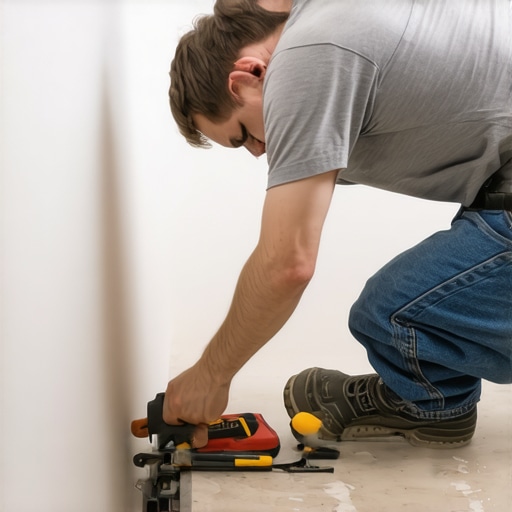
Start by examining your walls and baseboards for signs of movement or unevenness. Use a level or straightedge along the baseboard to identify shifts. During my last project, I noticed that slight wall warping caused gaps to worsen over time. Address this immediately by marking areas needing drywall adjustments before proceeding with gasket application.
Prepare Your Gasket Material
Select a flexible gasket backing material such as foam tape or rubber membrane, depending on wall type and baseboard material. For my installation, I used high-density foam tape because it compressed evenly and adhered well to both drywall and wood. Cut the gasket to match baseboard lengths, leaving a slight extra for overlapping joints.
Remove Old Caulk and Clean Surface
Carefully scrape away existing caulk or filler to ensure a clean surface. Use a utility knife to gently cut along the gap edges, then wipe with isopropyl alcohol to remove dust and grease. During my experience, neglecting cleaning caused the gasket to peel, leading to gaps reappearing within weeks.
Apply Gasket Backing to the Wall
Adhere the gasket strip directly behind the baseboard edge, pressing firmly to eliminate air pockets. Use a staple gun or adhesive if needed for extra hold. I once used double-sided tape for this step; however, I found that compression fitting and a quality adhesive provided a more durable seal against wall movement.
Ensure Proper Compression and Alignment
Once the gasket is in place, position the baseboard and press against the gasket to engage compression. Check alignment with a level, and make adjustments before securing. I learned that slightly over-compressing the gasket prevents gaps caused by minimal wall shifts over time.
Secure Baseboards Firmly
Attach the baseboard using nails or screws with enough force to compress the gasket further, sealing the gap. Use a nail gun or a drill with proper bits for efficiency. During my install, pre-drilling prevented cracking, especially on thicker MDF baseboards. Be cautious not to over-tighten, which could distort the gasket or baseboard.
Finish and Seal Edges
Apply paint or finish to match your décor, if desired. For extra sealing, you can add a thin bead of flexible caulk over the gasket to reinforce the seal and provide a seamless look. I experimented with a silicone sealant, which adhered well and accommodated slight movement, preventing future gaps.
By integrating gasket-backed techniques, you not only fix existing gaps but also create a flexible, durable barrier that adapts to wall and baseboard shifts, typical in 2026 construction materials. This approach drastically reduces the need for recurring repairs and keeps your interior look flawless over the years. For more insights, consider exploring our guide on baseboards makeover ideas.
 Many homeowners believe that achieving a flawless carpet, baseboard, flooring, or shower installation boils down to straightforward techniques. However, as an industry veteran, I can tell you that there are nuanced pitfalls and misconceptions that can sabotage even the most diligent DIY efforts. One prevalent myth is that using high-quality materials alone guarantees perfect results. While premium products are essential, mastering advanced installation nuances—such as precise subfloor preparation or correct expansion joint placement—is equally critical. For example, many mistakenly assume that shifting or buckling is solely due to material defects, but often it results from improper acclimation or neglecting moisture control.
Moreover, an oops factor lies in neglecting wall irregularities or wall material compatibility. Installing flooring or baseboards directly onto uneven surfaces without proper leveling or shimming can cause ongoing gaps or cracks, regardless of the craftsmanship. To prevent this, detailed inspection coupled with advanced techniques like laser leveling can make a significant difference.
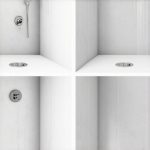
When it comes to showers, a common trap is over-relying on surface waterproofing methods without addressing underlying issues like subfloor rot or inadequate drainage slopes. The secret to a durable shower lies in integrating vapor barriers, proper slope calculations, and reliable drain seals—steps that often get overlooked in quick renovations. As highlighted by expert sources, neglecting these details can lead to long-term water damage, mold, and costly repairs.
Thinking about corner arrangements or complicated transitions? Advanced installers use precise scribing and custom-cut techniques that go beyond standard cuts. For instance, learning how to scribe baseboards to irregular walls or stone surfaces can elevate the final look and longevity of your projects. Curious how to refine these skills? Check out our guide on baseboard trends.
Now, here’s an advanced question for seasoned DIYers and pros alike: How does temperature and humidity fluctuation throughout a year impact the long-term stability of flooring installations, and what proactive measures can mitigate these effects? According to recent research by the Building Science Corporation, controlling indoor climate—especially humidity—is vital for managing wood and resilient flooring expansion and contraction. Incorporating proper acclimation, vapor barriers, and expansion gaps can prevent buckling and gaps down the line.
Don’t fall into the trap of thinking that the first installation is the last word. Continuous education and attention to detailed, often overlooked steps are what truly separate professional results from amateur setups. Want to master these nuances? Browse our collection of expert tips or reach out for professional guidance. Have you ever fallen into this trap? Let me know in the comments.
Keep It Running with the Right Tools
Achieving professional-quality results in flooring, baseboards, and showers isn’t just about skill—having the right tools is crucial for long-term durability. For flooring installation, I rely heavily on a high-grade pneumatic flooring nailer. It ensures consistent, flush-nail placement, reducing the risk of squeaks or loosening over time. For precise cuts and scribing, I prefer a quality laminate trimming saw, like the Kobalt Flex Using a specialist tool like a laser distance measurer, such as the Bosch GLM 50 C, allows me to quickly and accurately measure tricky spaces, saving time and minimizing errors that can cause gaps or uneven edges.
When it comes to showers, a reliable crack-opening tool, like a silicone joint scraper, helps in removing old caulk without damaging surfaces. A digital moisture meter is invaluable for checking moisture levels before installation, preventing long-term issues like mold or warping. Additionally, I recommend using a high-quality vinyl or cement-based adhesive compatible with your materials, ensuring strong bonding and movement absorption.
Long-term results depend heavily on routine maintenance. Regularly inspecting and tightening fasteners, cleaning filters, and checking for humidity-related issues can extend the life of your installations. For example, a well-maintained shower drain seal can prevent leaks and water damage, reducing costly repairs down the line. While some DIYers skip these checks, incorporating them into your maintenance routine makes a substantial difference.
Predicting where installation trends are headed in 2026, I believe tools with smart capabilities—like Bluetooth-enabled moisture sensors and app-controlled nailers—will become industry standard. They provide real-time feedback and help catch potential problems early, maintaining your home’s integrity.
So, if you’re serious about keeping your installations working flawlessly over the years, invest in these precision tools. They might seem like a bigger upfront cost, but they pay off in durability and peace of mind. Want to learn more about achieving perfect results? Visit our guide on durable flooring installation for expert tips.
How do I maintain my flooring and shower systems over time?
Implementing a routine inspection schedule, using appropriate cleaning products, and addressing minor issues promptly can prevent larger, costly problems. Regularly check for loose fixtures, sealant deterioration, or water infiltration, especially in shower areas. Upgrading to smart moisture monitors or digital fastener drivers ensures your installations remain tight and effective. Embracing these technologies and practices helps keep your home functional and appealing for years to come, making maintenance less of a chore and more of a safeguard against future repairs.

Lessons Only Experience Can Teach About Baseboard Gaps and Wall Movement
My biggest eye-opener was realizing that even the slightest wall irregularities could undo hours of perfect work, pushing me to develop an eye for unseen wall shifts.
Discovering the effectiveness of gasket-backed techniques over traditional caulking was a game-changer—I learned the hard way that flexibility is essential for durability.
The realization that material expansion, contraction, and wall support all play a role helped me avoid future gaps, transforming my approach from reactive to proactive.
Understanding the importance of proper surface prep—like cleaning and removing old caulk—prevented future failures and saved me from revisiting the same spots repeatedly.
Finally, I grasped that quality tools and proper compression techniques aren’t just for pros—they can turn a good project into a flawlessly finished one that lasts for years.