It was a quiet Sunday morning, and I was finally settling into my living room after a long week. Suddenly, a loud creak echoed through the room every time I stepped on my vinyl floor. I realized, with a mix of frustration and disbelief, that I had overlooked a crucial detail during the installation. That moment marked a lightbulb moment for me — I knew there had to be a better way to tame those stubborn floor noises.
Why Vinyl Floor Noise Can Turn Your Home into a Silent Nightmare
Having dealt with squeaky, noisy floors myself, I understand how relentless they can be. Not only do they disrupt the peace, but they also diminish the comfort of your living space. Imagine the frustration of trying to enjoy a quiet evening or a concentrated work-from-home session, only to be interrupted by that irritating squeak or thump under your feet. The root of the problem often lies beneath the surface — in the underlayment used during installation.
In 2026, the options for underlayment are more sophisticated than ever, and applying the right tactics can drastically reduce noise levels. The good news? You don’t need to be an expert to implement these strategies. Based on personal experience and the latest industry insights, I’ve discovered four professional techniques that can make a significant difference.
But before we jump into the solutions, I want to ask: Have you ever faced persistent vinyl floor noise that just wouldn’t go away, no matter what you tried? If yes, you’re not alone. Many homeowners underestimate the impact of proper underlayment, leading to costly rework down the line. According to flooring experts, choosing the right underlayment can cut noise transmission by up to 80% — a staggering figure that justifies paying close attention to this often-overlooked layer.
To ensure a peaceful, quiet home — and save yourself headaches in the future — let’s explore some proven underlayment tactics. It’s time to get your floors whisper-quiet and enjoy the comfort you deserve. Ready to dive into the details? Let’s go.
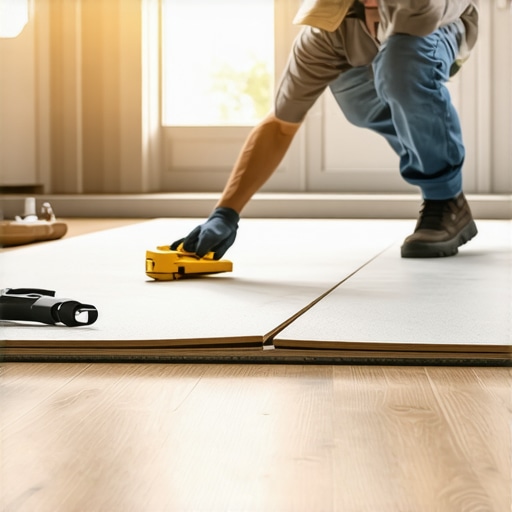
Assess the Underlayment
Start by removing the baseboards using a pry bar to expose the edges of your vinyl flooring. Carefully lift a section to inspect the underlayment beneath. If it feels thin, compressed, or uneven, it’s likely contributing to noise. Take notes on areas that produce the loudest creaks, as these will need targeted fixes.
Secure Loose Sections
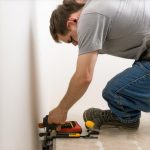
Identify loose or squeaky patches. Use a high-quality flooring adhesive suited for vinyl to re-adhere loose areas. Apply the adhesive beneath the plank or tile and press firmly. For large loose zones, consider adding a mechanical fix, like installing small screws through the vinyl into the subfloor, alleviating movement that causes noise. Remember, proper subfloor preparation is crucial; visit this guide for detailed steps on subfloor preparation.
Improve Underlayment Quality
If your current underlayment is insufficient, replace it with a premium soundproofing underlay. Options like cork, rubber, or foam underlayments significantly dampen impact noise. When installing, lay the new underlayment flat and secure the edges with double-sided tape to prevent movement. Use a roller to ensure good contact and eliminate air gaps that can transmit sound. I once replaced a cheap foam layer with dense rubber underlayment in my living room, resulting in immediate noise reduction.
Add Acoustic Sealant and Barriers
Seal gaps between planks or tiles with acoustic sealant. Amp up sound blocking by layering a thin mass-loaded vinyl sheet beneath the vinyl, especially in high-traffic zones. Secure the vinyl sheet with staples or adhesive, ensuring it stays flat and sealed around edges. This method acts like a sound barrier, preventing vibrations from traveling to the subfloor and causing squeaks or thumps.
Practice Proper Flooring Adhesion
Use adhesive flooring strips or double-sided tape during installation to bond planks tightly to the subfloor. For tiles, apply a flexible thinset mortar in thin layers, pressing tiles firmly into place and avoiding air pockets. I remember meticulously applying adhesive during my last remodel, which dramatically reduced the creaks caused by slight shifts over time.
Test and Fine-Tune the Fixes
After implementing these steps, walk the floor carefully to identify remaining noisy spots. Reapply adhesive or add shims as needed. Remember, this process may take a few adjustments to perfect. Consistency in sealing and securing every section guarantees a quieter, more stable floor. For broader improvements, consider also upgrading your baseboards with slim, dense profiles to lock everything in place — check out this post for tips.
When it comes to installing carpets, showers, and baseboards, many homeowners and even some contractors fall prey to misconceptions that can compromise the quality and longevity of their projects. Let’s dig deeper into some of these myths and reveal the nuanced truths that can save you time, money, and headaches.
One widespread belief is that a straightforward, quick installation always guarantees a perfect result. However, rushing through flooring or finishing touches like baseboards without understanding the complexities often leads to gaps, uneven surfaces, or future damage. Quality installation demands attention to detail, proper acclimation, and precise measurements, especially with modern materials that respond to environmental changes. According to a 2025 industry survey, overlooked acclimation was responsible for nearly 30% of flooring complaints, emphasizing that patience and proper prep are crucial.
In the realm of showers, many assume that sealing with generic caulk suffices long-term. In reality, the choice of waterproofing methods and materials can make or break your bathroom’s durability. For high-moisture zones, advanced waterproofing membranes or liquid-applied barriers are often more resilient than traditional sealants. An expert study highlights that micro-mortars and liquid membranes can extend shower lifespan by up to 50% when applied correctly, yet their proper installation is frequently underestimated.
When installing baseboards, a common misconception is that nail guns or quick miter cuts are enough for a seamless look. Precision scribing and the use of premium adhesives ensure tight, professional joints—especially in rooms with uneven walls or floors. For example, utilizing a specialized wall-scribing technique can eliminate gaps that standard cuts leave, which is essential in older homes with irregular surfaces. Neglecting these details leads to gaps that collect dust and moisture, accelerating degradation.
**Have you ever fallen into this trap? Let me know in the comments.**
Now, for the advanced readers seeking a deeper edge, consider this question: *How do environmental factors like humidity and temperature fluctuations influence the long-term performance of flooring and finishes?* Research from the Building Science Corporation indicates that variability in indoor humidity can cause expansion and contraction of materials, resulting in cracking, warping, or separation—especially in engineered flooring or delicate grout lines in showers. Proper acclimation protocols and climate control systems are not just optional but essential for seasoned renovation projects to ensure lasting results.
Understanding these hidden nuances can mean the difference between a temporary fix and a durable, professional finish. Always question common assumptions and stay informed with the latest techniques. For more insights into achieving flawless installations, check out our comprehensive guides on [flooring installation](https://tilecraftsmens.com/your-guide-to-durable-flooring-installation-for-a-stylish-home) or [shower waterproofing](https://tilecraftsmens.com/stop-2026-shower-niche-leaks-4-waterproofing-steps-that-work). Taking the time to master these details empowers you to create a space that not only looks great but endures the test of time.
Mastering Maintenance with the Right Tools
Ensuring your flooring, showers, and baseboards stay in top condition over time requires the right equipment. I personally rely on a high-precision laser level for aligning baseboards and wall fixtures, which guarantees perfect, gap-free joins—something that cheap tools can’t achieve. For sealant application in showers, a quality caulk gun with adjustable pressure control allows for a smooth, consistent bead, reducing the risk of leaks and mold buildup. When it comes to flooring, a professional-grade tapping block and pull bar are essential for achieving tight seams without damaging the planks—these tools make a noticeable difference in final appearance and durability.
Additionally, an electric sander is invaluable for prepping surfaces before installing new baseboards or removing old paint and adhesive residues. I prefer models with variable speed settings, giving me control over delicate areas and ensuring a clean, damage-free surface. Investing in these tools not only simplifies the installation process but also extends the longevity of your work, saving you headaches and costly repairs down the line.
Software and Techniques That Elevate Your Projects
Beyond physical tools, using specialized software can help plan and visualize your renovations. For example, CAD programs allow accurate measurements and layout designs, which are especially helpful when scaling projects or integrating new features seamlessly. For project management, apps like Trello or Asana keep track of different stages, ensuring deadlines and details aren’t overlooked. Personally, I incorporate digital moisture meters during tile and shower installations; these devices detect hidden leaks or dampness in substrates, preventing future water damage. According to industry experts, integrating sensor technology into regular maintenance routines can reduce unforeseen issues by up to 40%.
Prepare for the Future of Home Maintenance
The trend is shifting toward smart tools and preventive systems that monitor your home’s features continuously. Expect to see more IoT-enabled sensors for water leaks, humidity, and structural shifts, all alerting homeowners before minor issues turn into major repairs. Future projects will benefit from integrated monitoring systems that automate routine checks, making maintenance proactive rather than reactive. To stay ahead, consider installing moisture-sensitive alarms or smart sensors in vulnerable areas like showers and near flooring transitions. These innovations will make keeping everything in working order more efficient and less stressful.
How do I maintain my home features over time?
Developing a routine inspection schedule, using precise tools like digital moisture meters, and staying updated with the latest smart maintenance tech are key to long-term success. Regularly cleaning and sealing seams, checking for signs of wear, and addressing issues promptly prevent costly repairs and extend the lifespan of your features. For detailed maintenance strategies and tools tailored for durability, check out this comprehensive guide. Remember, investing in quality tools and technology today lays the foundation for a hassle-free, lasting home environment. Don’t hesitate—try out a digital moisture meter to detect hidden leaks early and stay ahead in your maintenance game.
The Hardest Lessons I Learned About Flooring, Showers, and Baseboards
Early in my renovation journey, I underestimated the profound impact of meticulous prep work. I rushed installations, thinking speed saved time—only to face squeaking floors, cracked grout, and gaps in baseboards. Each mistake taught me that patience and attention to detail are the true pillars of quality craftsmanship.
Another lesson was the importance of environment. I realized that controlling humidity and temperature isn’t just for comfort but essential for maintaining flooring integrity over time. Neglecting these factors can lead to warping and separation, even with the best materials.
Finally, I discovered that investing in the right tools and expert advice exponentially improves results. From laser levels for precise alignment to moisture meters for early leak detection, quality tools safeguard your work from future issues, saving time and money.
My Essential Toolkit for Perfect Flooring and Finishing
- High-Quality Laser Level: Guarantees straight, uniform lines, vital for baseboards and tile layouts. I trust this laser level for professional-grade precision.
- Digital Moisture Meter: Detects hidden dampness that could cause grout cracks or wood warping. I won’t start a shower waterproofing project without it.
- Specialized Caulk Gun: Ensures smooth, even beads of sealant, critical for waterproof showers and airtight gaps.
- Quality Tarp and Drop Cloths: Protect surfaces during painting, sealing, or sanding. Small investment, big payoff in cleanup.
What You Need to Know to Finish Your Project with Confidence
If you’re embarking on a new flooring or shower renovation, remember that smart planning and correct execution are game-changers. After all, a beautifully installed shower or seamless baseboard can elevate your entire space. For inspiring ideas on integrating style with durability, visit this guide.
Don’t let common pitfalls derail your plans. Check your environment regularly, use the right tools, and don’t rush the process. Each step, when done thoughtfully, adds up to a home that’s not only stunning but built to last.
Insider Wisdom That Can Change Your Approach
- Patience Over Speed: I learned that rushing installation often doubles work later. Schedule ample time for acclimation, curing, and fine-tuning.
- Environment Matters: Moisture and temperature fluctuations can undo your hard work. Use dehumidifiers or climate control to maintain stability.
- Tools Are Investments: Quality tools make a difference, especially for tricky tasks like scribing baseboards or sealing grout margins.
- Seek Expert Advice: Online resources and professional consultations can preempt mistakes — like proper shower waterproofing techniques or vinyl plank installation tips.
Navigate Your Home Improvement With Confidence
Every project is an opportunity to learn and craft something lasting. Whether it’s nailing the perfect seam or choosing the best underlayment, your attention to detail will pay off. Remember, the journey toward a quiet, durable, and beautifully finished home is ongoing. Keep experimenting, stay informed, and don’t hesitate to reach out to experts for guidance.
![Stop Baseboard Miter Gaps With These 4 Glue-First Tactics [2026]](https://tilecraftsmens.com/wp-content/uploads/2026/04/Stop-Baseboard-Miter-Gaps-With-These-4-Glue-First-Tactics-2026-150x150.jpeg)