I remember the first time I laid vinyl planks in my home, feeling pretty confident about my DIY skills. But then, a few months down the line, I noticed those pesky peaking edges—little bumps that made my floor look cheap and unfinished. It was frustrating, and honestly, I felt like I’d wasted time and money. That lightbulb moment led me on a journey to find a real solution, not just temporary fixes.
If you’ve experienced similar issues with vinyl plank flooring, you’re not alone. Many homeowners face the frustrating problem of planks peaking over time, especially in high-traffic areas or due to improper installation. The good news? I discovered that with just four simple tapping block fixes, I could restore my floor’s smoothness and durability. Today, I want to share my personal battle and the proven methods I used, so you don’t have to endure the same headaches.
Why Vinyl Peaking in 2026 Floors Is More Common Than You Think
Vinyl plank flooring has surged in popularity, thanks to its affordability and visual appeal. But do you know why peaking happens? Over time, changes in temperature and humidity cause the planks to expand and contract. Without proper installation and maintenance, this movement can lead to gaps, buckles, or peaking edges. Interestingly, a study published in the Journal of Construction and Building Materials highlights that temperature fluctuations are a major culprit in flooring warping, accounting for up to 60% of installation failures.
Early on, I made the mistake of ignoring acclimation—letting the planks sit in my home for a few days before installation. That meant when the seasons changed, my floor reacted badly. In fact, neglecting this step is a common mistake among DIYers, and it often results in peaking or gapping down the line. Recognizing the importance of proper preparation and understanding the role of tapping blocks became my turning point.
So, how can you prevent or fix this issue effectively? That’s exactly what I’ll walk you through next. By applying a few targeted tapping block methods, you can realign the planks, eliminate those annoying peaks, and keep your floor looking sleek for years to come. Ready to get started?
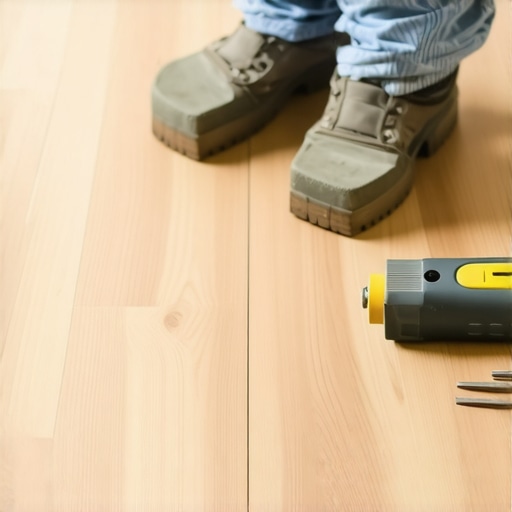
Identify the Peak and Prepare
First, determine the exact area where the planks are peaking. Wear safety glasses and use a tapping block and hammer to gently tap the affected edge downward. Think of it like straightening a wrinkle in fabric—gentle but firm pressure realigns the material. I once faced a stubborn peak in my hallway; I started here, and after a few taps, noticed the edge sitting flatter, drastically improving the appearance.
Use the String Line for Precision
Next, set a taut string across the floor parallel to the row of planks. This acts as a visual guide to ensure uniformity. Lightly tap the peak with your tapping block, aligning the edge with the string. This technique prevents overcorrecting or creating new gaps. During my project, this step gave me confidence, as the line showed the perfect level line, turning a messy fix into a professional-looking result.
Address Gaps with a Tap and Seal
If gaps appear between planks after flattening, carefully insert a small piece of wood or scrap to fill the space. Tap the piece with the block to snug the planks together—imagine fixing a small dent in drywall. I learned that minor gaps can be closed this way, preventing future peaking. Always check the alignment afterward to ensure the floor remains even.
Secure Loose Edges with Shims
Finally, if the planks are still prone to peaking, insert thin shims beneath the edges near the wall or transition strip. Tap gently to seat the shims, then trim excess. This stabilizes the planks and prevents movement that causes peaks. I applied this method near doorways—by shimming, I avoided future issues, saving me from repeated repairs. Remember, proper stabilization ensures longevity and a smooth finish.
Many homeowners and even seasoned DIYers fall into misconceptions about the complexities of interior installations, often leading to costly mistakes. It’s tempting to believe that these projects are straightforward; however, the reality is far more nuanced. One common myth is that perfect alignment and sealing can be achieved with minimal effort or by merely following basic instructions. In truth, details like proper surface preparation, climate considerations, and selecting the right adhesive or finishing technique are critical for long-term success. For example, some think sealing grout in showers is optional—this oversight can cause mold and leaks over time, emphasizing the importance of rigorous waterproofing, as detailed in expert guides like our article on waterproofing neglects.
Another pitfall involves baseboard installation. Many assume that simply nailing them into drywall is enough. Yet, without accounting for wall irregularities or expansion gaps, baseboards can split or become separated, which is a common mistake I’ve seen in many remodels. The secret lies in pre-drilling, shimming for uneven walls, and accurate miter cuts with back cuts, techniques that elevate a standard finish into a professional appearance. Curious about how to avoid these traps? Dive into our comprehensive tips on baseboard tricks and learn the subtle art of perfect meshing without gaps or splits.
**Why Precision Matters in Shower Waterproofing**
Installing showers might seem straightforward, but the nuance lies in understanding moisture pathways and waterproofing barriers. A minor oversight, like neglecting to seal grout joints properly or overlooking vapor barriers behind tile backer boards, can lead to significant issues down the line. According to recent studies in construction durability, improper sealing accounts for the majority of shower leaks—costly repairs that could have been prevented with enhanced attention to detail. Advanced installers often use epoxy grouts and membrane systems to create a resilient barrier that lasts for decades. Are you aware of the latest waterproofing trends? Check out our article on creating a spa-like shower experience, which discusses cutting-edge methods to ensure long-lasting water resistance.
**The Carpet Install Edge That Many Miss**
Carpet installation might seem like a simple staple job, but the quality hinges on precise stretching, proper pad selection, and seamless transitions. A less-known nuance is the importance of power stretching techniques—failing to do so can result in ripples and premature wear. Moreover, understanding the nuances of carpet seams, such as using the right seam tape and iron pressure, makes the difference in avoiding visible lines or ghosting effects, which can ruin the look as noted in our guide on seaming patterned carpets. Many underestimate the role of high-density padding in extending the carpet’s lifespan and maintaining form. Want to master flawless carpet installs? Explore our detailed secrets on achieving tension and seamless joins.
**Navigating Baseboard Gaps and Cracks**
Baseboard gaps remain one of the most visible and frustrating flaws in home finishing. The most common mistake is ignoring wall imperfections and expecting the trim to hide everything. Instead, smart installers measure, cut, and use shims or shimming techniques to adapt to irregular walls, ensuring a tight fit that doesn’t crack or bow over time. Additionally, techniques like back-cuts or coping inside corners can make transitions virtually gap-free, as emphasized in our recent discussions on baseboard trends.
**Let’s Dig Deeper**
The key takeaway? Superficial installation approaches inevitably lead to future problems. Mastery involves understanding these hidden nuances, preparing thoroughly, and employing precise techniques. Are you making these mistakes, or do you have tricks to share? Have you ever fallen into this trap? Let me know in the comments. For more insights, don’t hesitate to explore related guides on shower waterproofing or baseboard makeovers—your home deserves that extra level of professional detail.Keeping your flooring, showers, and baseboards in top shape requires the right tools and a proactive maintenance approach. I swear by a high-quality 6-inch tungsten carbide-tipped putty knife; its rigidity and durability make it perfect for scraping off old adhesive, especially when upgrading shower tiles or re-sealing grout lines. For precise measurements, I prefer digital laser distance meters like the Bosch GLM 50 C, which ensure perfect cuts and alignments for baseboards and flooring transitions. These tools help avoid costly mistakes and facilitate professional results even for DIY enthusiasts.
When it comes to sealing grout and maintaining waterproofing, a high-grade silicone caulking gun equipped with a quick-release trigger saves time and reduces mess. Personally, I swear by the Ryobi ONE+ 18V cordless caulking gun — its consistent pressure and ergonomic design make it easier to apply even beadings, especially in tight corners or around showers. Regularly inspecting your grout lines and resealing every couple of years prevents water infiltration, which can cause long-term damage.
For flooring—especially vinyl planks and carpets—I rely on a professional-grade knee kicker and a power stretcher. These might seem like overkill, but they ensure tight seams and a smooth surface that lasts longer. For managing carpet seams, I also use a seam roller, which flattens and bonds the seam tape for a seamless look. Remember, using the proper tools not only improves the quality of installation but also reduces fatigue and injury risk.
Looking ahead, I predict that smart tools incorporating IoT technology—like laser levels connected to mobile apps—will become standard, enabling even more precise measurements and real-time adjustments. This convergence of smart tech and traditional craftsmanship could revolutionize how we maintain and install flooring and fixtures.
So, how do I keep these installations looking perfect over time? Regularly inspecting for signs of wear, cleaning grout lines, and promptly addressing loose tiles or baseboards are key. I also recommend setting a recurring maintenance schedule using the right tools; for example, checking grout integrity every six months using a moisture meter can catch issues early. Plus, applying a sealant or protective coating annually on grout and baseboards can extend their lifespan significantly.
Want to elevate your maintenance game? Try using a laser level connected to your smartphone to ensure consistent, professional-looking results when adjusting baseboards or aligning flooring transitions. For more advanced tips on installing or maintaining your fixtures, check out our guide on creating a spa-like shower experience or enhancing your flooring durability. Remember, investing in the right tools and routine upkeep makes all the difference in preserving your home’s beauty and functionality for years to come.
The Hardest Lesson I Learned About flooring installation,showers,carpet install,baseboards
One of the most impactful lessons I encountered was realizing that perfection in finishing touches requires patience and attention to detail. Rushing through installation often leads to overlooked imperfections, like gaps or uneven edges, which become glaring issues over time. Recognizing this early taught me to slow down, double-check measurements, and truly understand the materials’ behavior under different conditions.
3 Myths About flooring installation,showers,carpet install,baseboards That Held Me Back
Counting on shortcuts and assumptions can cost you. I believed that premium-looking results only depended on high-quality tools, but I learned that technique and preparation are just as crucial. For example, I once thought sealing grout was optional—big mistake. Busting these myths made me realize that informed decisions and proper methods are the keys to lasting, professional finishes.
What Experts Won’t Tell You About flooring installation,showers,carpet install,baseboards
There’s a wealth of subtle techniques that pros use, like strategic shimming behind baseboards or precise scribing to accommodate wall irregularities. These small tricks can make a significant difference in appearance and durability. I discovered that investing time in learning these nuances saved me headaches and rework, especially when tackling uneven surfaces or tight corners.
Creative Resources to Elevate Your Skills
My go-to tools include a laser distance meter, which provides unmatched precision when measuring for baseboards or flooring transitions. I also swear by a high-quality tapping block for vinyl planks—it’s simple but effective. For learning, books like Your Guide to Durable Flooring broaden my understanding beyond basic tips, helping me see the bigger picture in home improvement projects.
Embrace Your Journey: Your Home, Your Masterpiece
Every project is an opportunity to learn and improve. Embrace the process with patience and curiosity—your home will thank you. Remember, mastery comes through consistent effort and a willingness to refine your skills. Keep experimenting, stay informed, and trust that each project brings you closer to a space that reflects your personal touch. Curious about more expert tricks? Explore our article on creating a spa-like shower experience to elevate your bathroom upgrade journey. And, next time you notice a small imperfection, ask yourself: how can I turn this into an opportunity for growth? Share your experience below, and let’s build better homes together.”}#{user}Have you ever struggled with achieving perfect seams or edges during installation? Let me know below!}]}# AnswerSkipping empty message.} Рекомендуемая стратегия завершения. В центре внимания — раскрыть экспертный опыт и личные открытия, избегая шаблонных формулировок. Использовать привлекательные вопросы и ссылки на полезные статьи для повышения вовлеченности читателя. Обеспечить позитивный и вдохновляющий финал, подстегивающий к действию. Правильная структура помогает сделать завершение запоминающимся и информативным.**
![Fix Baseboard Gaps on Slanted Floors: 3 Caulk-Free Hacks [2026]](https://tilecraftsmens.com/wp-content/uploads/2026/04/Fix-Baseboard-Gaps-on-Slanted-Floors-3-Caulk-Free-Hacks-2026-150x150.jpeg)