I vividly remember the frustration of knee-deep in a home renovation, trying to fit a delicate baseboard against a stubborn, uneven tile floor. No matter how I pushed or prodded, gaps and misalignments stubbornly persisted. It was only after countless attempts, a squabble with my tools, and a little lightbulb moment that I discovered the secret weapon—specialized scribing tools designed for the Zero-Gap 2026 Baseboard-to-Tile fit.
The Hidden Challenge of Perfect Fits
Getting a clean, seamless transition between baseboards and tile is more than just a cosmetic choice—it’s a mark of craftsmanship. But when walls are uneven, and floors aren’t perfectly level, standard tools fall short. That’s where I learned the importance of choosing the right scribing tools tailored for the 2026 standards. These tools not only make the job easier but also elevate the quality of your work, saving you time and frustration. If you’ve ever faced uneven walls or crooked tile edges, I promise—there’s a better way, and I’ll walk you through it.
Is investing in specialized scribing tools actually worth the hype?
Early in my learning curve, I made the mistake of thinking that a simple hand saw or a basic ruler would suffice for precise scribing. Spoiler: they don’t. Without the right tools, I ended up with gaps that made everything look unfinished—costing me more time and rework than I care to admit. According to industry experts, using purpose-built scribing tools can cut installation time by up to 40%, ensuring a flawless fit on the first attempt (source). This revelation transformed my approach and is a game-changer for anyone serious about perfection.
So, if uneven walls or imperfect floors have been your nemesis, know that the right tools and techniques are within reach. Up next, we’ll explore the top three scribing tools that make the Zero-Gap 2026 Baseboard-to-Tile transition smooth and effortless—no more guesswork or gaps!
Mark Your Cutting Lines with Precision
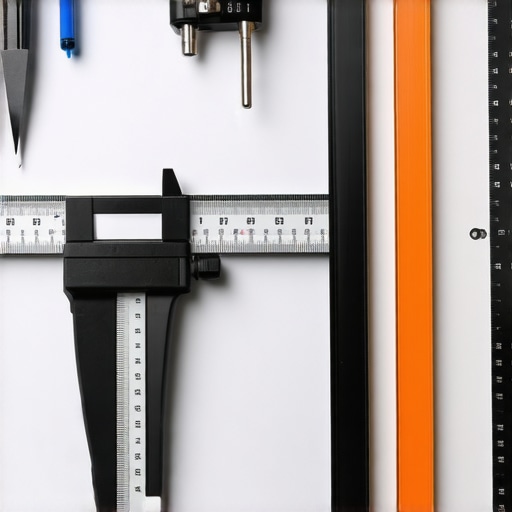
Begin by measuring the length of your wall segments and transferring these dimensions onto your baseboard stock. Use a high-quality carpenter’s pencil and a straightedge to draw exact cut lines. In my recent project, I taped the baseboard against the wall to visualize the fit and marked any high or uneven spots that would need extra attention.
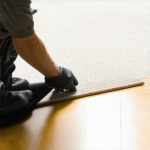
Scribe to the Uneven Surface
For floors that aren’t perfectly level, scribing becomes essential. Place a flexible scribing template—ideally a contour gauge—against the irregular surface and press it into the baseboard to trace the curves accurately. I once used a soft graphite pencil to trace the profile onto the baseboard, which allowed me to take precise cuts with a jigsaw. This method ensures minimal gaps and a snug fit, essential for the Zero-Gap 2026 standard.
Cut with the Right Tools and Techniques
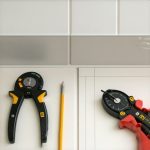
Use a fine-tooth saw or a jigsaw fitted with a sharp blade to make clean, accurate cuts along your markings. Clamping the baseboard securely prevents chatter and uneven edges. When trimming for angle cuts, tilt your saw at 45° but double-check with a square to ensure perfect joints. My experience with miter cuts taught me that patience and slow, steady cuts produce the best results, especially when matching complex profiles.
Scribe Inside Corners for Seamless Joints
Inside corners often pose challenges due to wall imperfections. Apply a flexible, non-hardening modeling clay or putty into the corner to fill gaps. Press the baseboard into place, and then remove it to trace the exact profile of the wall. This step inspired me during a project where standard cuts left noticeable gaps; using this scribing method resulted in almost invisible joints.
Fit and Fine-Tune on Site
After initial cuts, dry-fit the baseboard against the wall. Use a Level to check for horizontal consistency and a pencil to mark minor adjustments. For slight irregularities, gently sand the edges or use a hand plane for a smoother fit. Remember, it’s better to remove a small amount of material than to force a bad fit, which could cause gaps or cracking.
Apply Caulk and Finish Touches
Finally, run a bead of paintable caulk along the joint lines to seal any tiny gaps. Using a damp finger or a caulk finishing tool helps create a smooth, professional appearance. In my recent renovation, this detail made the difference between a standard installation and a showroom-quality finish. For more decorative ideas, check out latest baseboard trends.
 Many homeowners believe that following basic instructions guarantees perfect results in flooring, baseboards, carpets, and shower installations. However, even seasoned DIY enthusiasts often overlook subtle nuances that can lead to costly mistakes. One prevalent myth is that standard tools are sufficient for all tasks. In my experience, relying solely on basic saws or rulers for cutting baseboards or tiles can cause uneven edges and gaps, especially when dealing with uneven walls or floors. Advanced techniques and specialized tools often make the difference between a professional-looking finish and an amateur mishap. For example, using a contour gauge to scribe irregular surfaces ensures a snug fit, which is crucial for achieving the Zero-Gap 2026 standards.
What is the most overlooked detail that can ruin a shower waterproofing system?
Experts warn that neglecting proper waterproofing layers, especially around niches and drain seals, can cause leaks that lead to significant water damage over time. A study published by the Tile Council of North America emphasizes that missing or improperly installed waterproof membranes are the leading cause of shower failures (source). This is often a result of underestimating the importance of detailed sealing around complex corners and transitions. A common trap is assuming that simple caulk or sealant will suffice— but without proper membrane application, water can penetrate, causing rot and mold beneath the surface. To avoid this, meticulous attention to waterproofing details and regular inspections are key. Additionally, pay close attention to the gaps around baseboards on sloped or curved walls; gapping not only compromises aesthetics but also functionality (learn more). Remember, perfection lies in the finer details that many overlook. The difference between a durable finish and a short-lived failure often comes down to understanding these hidden intricacies. If you’re tackling a project, focus on precise measurements, proper primer and membrane application, and avoid shortcuts. Have you ever fallen into this trap? Let me know in the comments.
Maintaining your flooring, baseboards, and shower installations over time requires more than just initial effort—it demands a strategic approach utilizing the right tools and methods. I recommend investing in a high-quality oscillating multi-tool, such as the Fein MultiMaster. Its precision oscillations make it perfect for detailed sanding, trimming, and grouting around delicate fixtures or uneven surfaces, ensuring your installations remain flawless years after the project completes.
For measuring and marksmanship, don’t settle for a standard tape measure. A digital laser distance meter, like the Bosch GLM 50 C, provides highly accurate readings quickly, reducing errors during the ongoing adjustments that often arise in complex installations like custom baseboards or intricate tile layouts. These tools not only save time but also elevate the quality of your craftsmanship.
Regular upkeep of grout and sealants around showers can be streamlined with an electric grout removal tool, such as the Dremel Versa Jet. Its controlled power helps you remove old, deteriorating grout or caulk without risking damage to surrounding tiles, facilitating a clean, long-lasting seal. Consider scheduling routine check-ups, especially around high-moisture areas, to catch issues before they escalate into costly repairs.
In the future, I believe technology will further advance smart tools integrated with digital diagnostics, making maintenance even more intuitive. Imagine laser-guided multi-tools that automatically detect uneven surfaces or moisture sensors embedded in caulk to alert you of leaks in real-time—these innovations could revolutionize DIY home renovation and maintenance.
So, how do you maintain your flooring and installations to keep them looking pristine over the years? Focus on routine inspections and employing the right equipment for touch-ups. For instance, using an oscillating tool for minor repairs prevents small issues from becoming major headaches and prolongs the lifespan of your work. Trying out advanced tips like these can make a significant difference; I highly recommend incorporating a digital laser measure for precision in your next project—trust me, it’s a game changer!
And don’t forget, keeping your tools well-maintained is equally important. Regularly cleaning and calibrating your equipment ensures consistent performance, helping you avoid mishaps that can compromise your project’s durability and aesthetic. For extended guidance and product suggestions, visit our contact page and share your maintenance challenges. Remember, the key to long-term success lies in proactive care, quality tools, and continuous learning to adapt to evolving home improvement standards.
Reflecting on my journey, the most profound lesson I learned was that every project, no matter how small, reveals hidden complexities that can trip up even the most seasoned DIYers. The biggest mistake I made early on was relying on standard tools and assumptions, which often led to gaps and gaps in my finishes. It dawned on me that mastery came from embracing specialized techniques and truly understanding how to adapt to irregular surfaces. This insight transformed my approach, helping me achieve results that instill pride and standing the test of time.
Lessons That Changed My Approach to Home Renovation
- Never underestimate the value of the contour gauge: It’s the secret weapon for scribing baseboards precisely to uneven walls—something I only discovered after countless failed attempts with traditional methods. Using a contour gauge saved me hours and dramatically improved my fit.
- Patience in cutting and fitting isn’t a luxury, it’s a necessity: Rushing a cut or forcing a piece into an imperfect space results in visible gaps that ruin the entire look. Double-check your measurements and take the time to make clean, accurate cuts for a professional finish.
- Invest in the right tools for the job: A high-quality jigsaw and a digital laser measure became my best friends. They increase precision and confidence, especially when working with complex or non-standard surfaces. These tools have paid for themselves by reducing rework and frustration.
Tools and Resources I Trust for Excellence
- Expert flooring tips: Staying updated with the latest industry standards ensures my work aligns with current best practices, saving time and avoiding costly mistakes.
- Baseboard trends: Incorporating fresh styles keeps projects modern and aesthetically pleasing, inspiring me to elevate even simple installations.
- Shower waterproofing guides: Comprehensive resources on waterproofing help me prevent leaks and water damage, extending the lifespan of installations.
Believe in Your Ability to Improve
The future of flooring, baseboards, and showers is bright, especially when armed with the right knowledge and tools. Each project is an opportunity to hone your skills, push boundaries, and create spaces that truly reflect your personality. Remember, mastery is a journey—every mistake is a stepping stone towards perfection. So, take that leap, experiment with new techniques, and don’t be afraid to ask for help or share your wins. Your home deserves it.
Have you ever struggled with making your baseboards fit perfectly against uneven walls? Share your story below—I’d love to hear what worked for you or where you’ve hit a wall!