I remember the moment vividly. I had just finished installing a new hardwood floor in my living room, feeling pretty proud of my craftsmanship. But as I stepped onto it, I felt that unsettling bounce—a kind of springiness that shouldn’t be there. It was frustrating because I’d followed all the guidelines, or so I thought. Turns out, hidden joist issues were the culprit behind that odd sensation. If you’ve ever experienced a similar problem—floors that feel less solid than they should—you know how discouraging it can be. That lightbulb moment made me realize how crucial proper joist fixing is for a home that lasts.
Why Bouncy Floors Can Make You Question Your Home’s Strength
A bouncy or spongy floor isn’t just a minor annoyance; it can be an indicator of underlying structural problems. When joists aren’t properly secured or are deficient, it leads to uneven weight distribution, which diminishes the stability of your entire flooring system. Not only does this compromise safety, but it also affects soundproofing and can accelerate wear and tear. Early on, I learned that ignoring these issues could mean more costly repairs down the line—and no one wants surprise expenses after investing in a home upgrade.
For instance, inadequate joist support can cause squeaks, creaking sounds, or even bounce underfoot, which diminishes comfort and can reduce your home’s value. Repairing a bouncy floor by addressing joist issues might seem daunting, but with the right fixes, you can restore solid footing and peace of mind.
If you’re tackling a renovation or new installation, ensuring your joists are solid is essential. I discovered this early in my projects when misjudging joist placement led to uneven flooring. To avoid repeating my mistake, it’s vital to understand the most effective fixes tailored to 2026 standards. This article will guide you through three proven joist fixes that guarantee a sturdy, bounce-free floor—so stay tuned.
Is Fixing Your Bouncy Floor Worth the Hassle? Here’s My Take.
Early in my DIY journey, I assumed minor squeaks and bounce were normal—part of the charm of an older house, perhaps. But I learned the hard way that ignoring joist issues compromises safety and durability. A common mistake I made was relying on quick fixes, like inadequate shimming, without addressing the root problem. According to industry experts, neglecting joist integrity can lead to significant structural failure over time. For reliable, long-term results, it’s best to approach fixes with a strategic plan.
So, if you’ve faced similar issues or just want your next renovation to stand the test of time, understanding these key fixes will make all the difference. Ready to fortify your floors? Let’s dive into how to do it right with proven, professional techniques.
Reinforce Your Joists Correctly
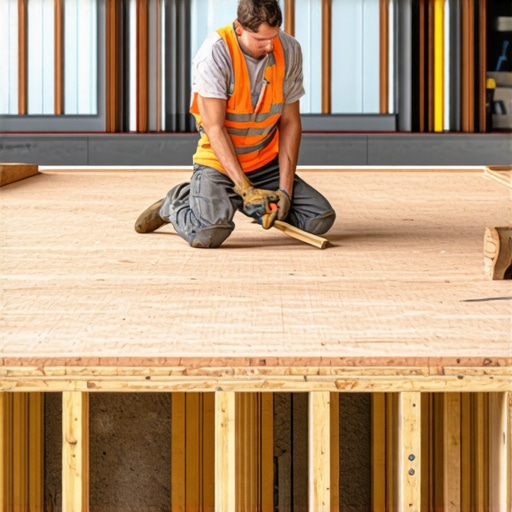
Begin by locating every joist in your affected area. Use a stud finder or measure spacing based on your previous installation. Mark these spots clearly. Remove any existing subflooring carefully to expose the joists underneath. When I did this in my living room, I discovered some joists had shifted, leading to the bounce. To fix this, I screwed new framing to the compromised joists, ensuring they were aligned properly. For detailed tips on durable flooring installation, check out this guide about lasting results.

Install Support Beams and Blocks
Adding support beams or bridging blocks between joists distributes weight more evenly. Cut pressure-treated lumber or solid wood blocks to fit snugly between joists, then nail or screw them firmly into place. During my project, I used a level to ensure all beams were perfectly horizontal, which eliminated the bounce. This technique mirrors installing baseboards with precise cuts so they sit flush—see tips for flawless finishing. The key is tight, secure fitting for maximum stability.
Replace or Repair Damaged Joists
If any joists are rotten, cracked, or severely warped, replacing them is essential. Use a reciprocating saw to cut out the damaged parts, then fit new joists of matching size and grade. Secure them with appropriate nails or screws, and ensure they are level with the existing structure. I had to remove a rotted joist, which temporarily created a gap; filling this with a new piece stabilized the entire floor. Think of this like fixing uneven baseboards—precision matters. For comprehensive instructions, consider consulting expert flooring tips for consistent results.Many homeowners assume that installing baseboards, flooring, showers, or carpets is straightforward, but key nuances often escape casual DIYers. **Contrary to popular belief, the smallest overlooked detail can compromise your entire project.** For example, a common myth is that simply matching the color with existing decor suffices for a seamless look. In reality, understanding the material’s expansion and contraction properties ensures longevity, especially for flooring or shower tiles. Ignoring these factors can lead to cracks or buckling over time.
A mistake I often see is neglecting proper expansion gaps in flooring installations. While many think a tight fit is ideal, this can cause warping as materials expand with temperature changes. Professionals recommend leaving a gap of about 1/4 inch, which should be concealed by baseboards to maintain aesthetics. If you’re interested in elevating your interior details, check this guide on baseboard upgrades.
**The ‘Oops’ Factor:** Many underestimate the importance of moisture barriers under flooring and behind shower tiles. Skipping this step might save time initially but can cause mold, rot, or water damage in the long run. A crucial but often overlooked aspect is proper sealing of shower edges—tiny gaps can turn into water leaks. Experts like those at TileCraftsMen emphasize meticulous waterproofing to prevent costly repairs later. Read more about avoiding these pitfalls in our shower waterproofing tips.
### How Can Advanced Techniques Prevent Home Renovation Failures?
Many experienced installers utilize scribing techniques for irregular walls to achieve a flawless seam that looks professional. This method involves cutting baseboards or tiles to match uneven surfaces precisely, avoiding gaps or misalignments. For flooring, using a moisture meter before installation can prevent selecting materials unsuitable for your environment, reducing future repairs. According to industry research, employing these nuanced strategies significantly increases the durability and aesthetic appeal of home upgrades.
Have you ever fallen into this trap? Let me know in the comments. Embracing these subtle yet vital details makes the difference between a project that lasts and one that requires early rework. For comprehensive advice tailored to your home’s needs, consider reaching out through our consultation page.Maintaining your home’s flooring, baseboards, showers, and carpets requires more than just installation expertise; it demands the right tools and ongoing upkeep to ensure longevity and consistent performance. In my experience, investing in high-quality equipment and adopting structured maintenance routines have significantly extended the lifespan of my renovations, saving time and money over the years.
One of my most valued tools is a professional-grade moisture meter. This device allows me to monitor the moisture content in wood and concrete, which is crucial when installing new flooring or sealing shower enclosures. According to industry standards, like those outlined in the 2026 waterproofing guidelines, controlling moisture levels prevents mold growth and surface warping, ensuring that your investment remains durable.
For carpentry and baseboard updates, a precision scribing tool is indispensable. It helps me achieve perfect cuts, especially when dealing with uneven walls or floors. The importance of accurate fitting cannot be overstated, as gaps and misalignments can lead to increased wear or water ingress over time. Visit our article on simple baseboard updates to see how the right tools make all the difference.
When it comes to showers, maintaining waterproof integrity is vital. I rely on a specialized silicone sealant and a high-quality grout renewer to prevent leaks and staining. Regularly inspecting grout lines and applying new sealant can prevent water damage. Industry expert recommendations suggest performing these checks biannually, especially after heavy use or seasonal changes.
For carpets, a powerful extractor vacuum and seam roller are essential. I use these to maintain the appearance and structural integrity of my carpet installations. A clean, well-maintained carpet not only looks better but also helps in prolonging its life, especially in high-traffic areas.
Looking ahead, the trend in maintenance tools points towards smart monitoring devices integrated with home automation systems. These gadgets can alert homeowners to issues like rising humidity or water leaks before they become serious problems, aligning with the future of proactive home care.
**How do I keep my home features performing over time?** Regular inspections, timely repairs, and using the appropriate tools are your best strategies. For example, incorporating a moisture meter into your routine can help identify potential issues early, avoiding costly repairs. If you’re ready to elevate your maintenance game, try using a high-precision scribing tool for your baseboards or flooring edges—accuracy now saves headaches later. Get started today, and ensure your renovation lasts for years to come.
What I Wish I Knew Before Starting My Home Projects
- Overconfidence in quick fixes can cost you dearly—taking the time to understand the root causes of issues ensures long-term success rather than temporary relief.
- A small detail, like leaving proper expansion gaps or properly sealing grout, can make or break the durability of your renovation, saving you time and money down the line.
- Investing in the right tools, such as a high-quality moisture meter or a precise scribing instrument, dramatically improves the accuracy and longevity of your work.
- Collaborating with professionals or referencing expert guides (like our recommended resources) can reveal pitfalls you didn’t anticipate and elevate your results beyond expectations.
Tools and Resources That Transformed My Approach to Home Upgrades
- Durable Flooring Installation Guides: This comprehensive resource has been my go-to for mastering modern, lasting techniques, ensuring my floors stay beautiful for years.
- Baseboard Makeover Tips: A simple read that upgraded my finishing skills and helped me achieve seamless, professional-looking edges around the room.
- Moisture Meters: Trusted by pros, these devices prevent moisture-related issues—crucial for flooring and shower waterproofing.
- Connecting with experts provides personalized advice that can save you from costly mistakes and give your project that extra polish.
Your Turn to Elevate Your Home
Embarking on or refining your home improvement journey can be both rewarding and challenging. Remember, the key lies in attention to detail and a willingness to learn from each project—practice will make your finishes more refined, and your results will stand the test of time. Don’t hesitate to experiment and invest in quality tools and expert advice; your future self will thank you.
Have you ever struggled with a specific step, like scribing baseboards or sealing shower tiles? Share your experiences below—let’s learn and grow together in making our homes truly durable and beautiful!

2 thoughts on “Bouncy Floors? 3 Joist Fixes for Solid 2026 Installs”
Johnathan Green
February 14, 2026 at 10:20 pmReading this post really resonated with me because I’ve gone through similar issues with bouncy floors in my own home. One thing I found particularly helpful was the emphasis on support beams and correct joist reinforcement. When I had a slight wobble, I initially assumed it was just an uneven subfloor, but digging deeper, I realized that loose or damaged joists were the main issue. I ended up installing bridging blocks and support beams, which made a noticeable difference in stability. It’s interesting how these subtle fixes can make such a big impact in the long run. Has anyone else tried reinforcement methods like installing support beams? I’d love to hear about different techniques that worked for others, especially those that are effective under current standards like 2026.
Emily Carter
February 20, 2026 at 1:14 amI really appreciate this detailed breakdown of fixing bouncy floors. I recently encountered a similar issue in my basement after finishing it as a family room, and I learned that sometimes even small shifts in joist alignment can cause big problems. What struck me was the importance of verifying the actual condition of the joists before deciding on a fix. Using a moisture meter, as mentioned in this article, is a game-changer—especially because moisture issues often hide behind the scenes, like mold or rot that we don’t immediately notice. I’ve also found that double-checking the level and employing proper support techniques, such as sistering joists or adding bridging, make a tremendous difference. For those tackling similar challenges, do you recommend any specific tools or brands for quick joist assessment? I’d love to hear from others who have effectively used these methods to strengthen their floors under 2026 standards.