Ever had that sinking feeling when your freshly laid flooring starts looking less than perfect just days after the project wraps up? I remember my first attempt at installing new hardwood in my living room. I was eager to get it done quickly, thinking speed was the best way to beat the weekend traffic and get back to normal life. But instead, I ended up with gaps, uneven planks, and a headache that haunted me for weeks. That moment was a real lightbulb—speed without precision isn’t just frustrating, it’s costly in repairs and re-dos. Over time, I learned that achieving a perfect flooring result fast isn’t about rushing but about knowing the right techniques and avoidable pitfalls. Today, I want to share these tried-and-true tips, so you don’t have to suffer the same setbacks. We’re going to cut through the noise and get your flooring project done right, quickly. Whether you’re tiling, installing carpets, or laying down hardwood, these insights will help you save time and avoid common mistakes. Have you ever finished a flooring job only to find it needs redoing a few months later? If yes, keep reading—I might just have the solution you need.
Why Rushing Usually Backfires in Flooring Projects
Many homeowners, myself included early on, believe that speed is the secret to a smooth, successful installation. But the truth is, rushing often leads to sloppy joints, uneven surfaces, and even damage that takes more time and resources to fix. The key isn’t just working fast; it’s working smart. Proper preparation, using the right tools, and understanding fundamental techniques can dramatically cut down your project time without sacrificing quality. For example, laying out your materials carefully beforehand and checking for levelness throughout the process prevents rework down the line. Not to mention, following expert advice—like opting for quality underlayments or adhesive—makes a visible difference in how quickly and effectively a floor settles into perfection. I once skipped a step and thought I could save time, only to spend double fixing my mistakes. Learning from that, I now prioritize method and patience. Remember, reliable sources such as expert flooring tips reinforce that proper technique is the foundation of efficiency. In the next sections, I’ll walk you through actionable steps to get flawless results faster, saving you both time and money. Ready to transform your space with confidence? Let’s dive into what really works.
Prepare Your Materials and Space
Before you start laying down flooring, organize all your materials in one accessible area. Double-check measurements, cuts, and materials to avoid delays mid-project. I once grabbed the wrong size of tiles mid-way, causing unnecessary delays; now, I lay out my supplies, including spacers, adhesives, and tools, to ensure smooth workflow.
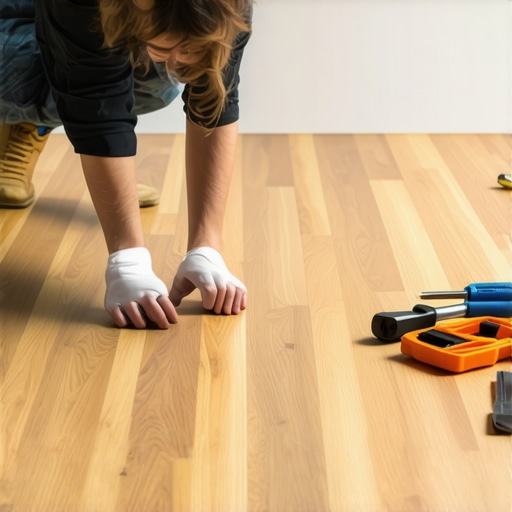
Ensure a Level and Clean Surface
The foundation matters. Use a leveling tool to check for uneven spots and sand down high points. Scrape off old adhesive or debris that can cause unevenness or squeaks later. Think of it as preparing a canvas—without a smooth background, your masterpiece will suffer. I learned this the hard way when uneven subflooring led to cracked grout, costing me extra time and money. For more tips on creating a perfect base, visit this guide.
Plan Your Layout Strategically
Lay out the planks or tiles before adhesive application. Use spacers to maintain uniform gaps, which simplifies grouting or finishing later. This planning step prevents awkward cuts and ensures a balanced look. I once started installing without planning, which resulted in awkward cut-offs at the doorway. By mapping out the layout in advance, I saved hours of rework. Visualize your design and double-check measurements—like sketching a blueprint before building.
Use the Right Tools and Techniques
Invest in quality tools—like snap cutters, trowels, and spacers—and learn their proper use. For example, applying uniform pressure with a notched trowel helps ensure consistent adhesive coverage. When I learned to use a rubber mallet gently to tap tiles into place, I achieved a smoother, more even surface. Think of it as playing piano—delicate adjustments yield harmony. For specific tips on steps like applying adhesive or setting tiles, see expert advice here.
Handle Edges and Corners with Care
Edges often require special attention—use corner guides or trim to ensure neat, straight lines. Don’t rush through these details; precision here pays off in aesthetics and ease of finishing. I once hurried through a corner, leading to a crooked edge that took hours to rectify. Proper pre-cut corner blocks or transition strips simplify this process. Think of it as the frame around a painting—crucial for the overall presentation.
Let Materials Set and Cure Properly
Patience is essential. Allow adhesives or grouts to cure fully before walking on or applying finishings. Rushing this process risks damaging your work. I recall impatiently walking on a newly laid hardwood floor after only a few hours, causing visible indentations. Always follow manufacturer instructions, and plan your project timeline accordingly. This step ensures durability and a flawless appearance down the line.
Inspect and Finalize the Project
Once the flooring is installed and cured, examine the entire surface for loose or uneven sections. Make necessary adjustments or reattach loose planks immediately. Finish with baseboards or skirting, which hide gaps and give a polished look. For styling ideas that elevate your space, check out these trendy updates. A meticulous finish prevents future issues and maintains aesthetics for years to come.
 When it comes to home upgrades like showers, carpets, and flooring, many DIY enthusiasts believe that following basic tutorials guarantees success. However, even seasoned homeowners often get caught up in misconceptions that can compromise the final result. Let’s explore some of these pitfalls and uncover the nuanced details that can elevate your installation from average to exceptional.
One prevalent myth is that choosing cheaper materials solely saves money and time. In reality, low-cost options often require more maintenance or reinvestment later. For example, cutting corners with subpar grout or adhesive might seem like a win initially but can lead to cracking, mold, or detachment within a few years. Experts emphasize that investing in quality materials—like durable adhesives or premium underlayments—not only ensures longevity but also streamlines the installation process, reducing the need for repairs later. For insights on selecting the right products, visit this guide.
A common trap in shower remodeling is underestimating the importance of proper slope and waterproofing. Many believe that merely sealing joints suffices; however, neglecting accurate slope ensures water drains correctly and doesn’t pool, which can lead to leaks and structural damage. Waterproofing membranes are often misunderstood as optional, but they form the crucial barrier that prevents water ingress—especially in complex shower niches or curved surfaces. Skipping these steps is a short-term saving that can cost thousands down the line. For an in-depth look at effective shower waterproofing, check out this article.
Carpet installation might seem straightforward, but many get tripped up by inadequate surface preparation. Overlooking the importance of a perfectly clean, level subfloor can cause wrinkles, bubbles, or uneven wear. Specifically, moisture can be an insidious enemy, so ignoring vapor barriers or failing to inspect for existing leaks leads to mold and premature carpet failure. A hidden nuance is understanding the significance of the tack strip placement; misaligned strips not only disrupt aesthetics but also weaken the hold, leading to a loose fit over time. For expert tips on achieving flawless results, visit this resource.
Flooring installation is often mistaken as just laying planks or tiles down, but mastering transitions and expansion gaps makes all the difference. Overlooking these details can result in cracked tiles or warped hardwood. Many assume that a tight fit is always better, but allowing appropriate expansion room accommodates seasonal changes, preserving the integrity of your floor. An often-missed nuance is understanding subfloor compatibility—using the wrong kind of underlayment or neglecting to level the surface can cause unevenness, squeaks, or buckling. To avoid these pitfalls, visit this comprehensive guide.
So, what are some advanced considerations that even experienced installers frequently overlook? For example, in shower surrounds or complex flooring layouts, proper sealing of seams and attention to vapor barriers prevent moisture infiltration—an unseen but deadly threat to your home’s structure. Additionally, understanding the significance of climate-specific materials can vastly improve durability; what works in humid environments might fail in dry regions. According to a recent study in the *Journal of Building Science*, climate-adapted material choices extend the lifespan of installations by up to 30%. Have you ever fallen into this trap? Let me know in the comments.
Maintaining your flooring, baseboards, and shower installations over time requires not just good initial work but also the right tools and regular care strategies. From precision tools to software that keeps your projects organized, investing in reliable equipment can significantly extend the lifespan of your renovations. Personally, I swear by using a high-quality oscillating multi-tool for detail work around edges and tricky corners. Its versatility allows me to sand, cut, and scrape without switching tools, saving hours and minimizing errors. For example, when adjusting baseboard fits or clearing grout lines in tiled showers, this tool provides impeccable control and clean results. To keep your work pristine, always opt for models with variable speed control—this feature helps you tailor your approach to different materials, preventing accidental damage. When it comes to maintaining hardwood or laminate floors, I recommend a microfiber mop combined with a pH-balanced cleaner. This gentle approach preserves finish integrity while effectively removing dust and grime. In the future, I predict smart home-integrated sensors might monitor moisture levels or suggest maintenance needs proactively, further reducing costly repairs.
How do I maintain my flooring and finishes over time?
Routine cleaning and periodic inspections are vital. For instance, checking for loose baseboards or signs of water damage early can prevent major issues. Using specialized tools, like a moisture meter—which I recommend highly—can help detect hidden water infiltration behind walls or under flooring before it becomes a structural problem. Expert advice from this guide emphasizes the importance of regular upkeep. Additionally, applying protective sealants annually can safeguard surfaces against stains and wear. I also suggest using quality edge sealants around shower surrounds, especially if you notice any cracks developing. Regular re-caulking of shower joints can avert leaks and mold buildup, prolonging your installation’s longevity. To stay ahead, make it a habit to schedule professional inspections every few years to catch subtle issues early.
For those embarking on scaling their renovation projects, investing in digital project management tools, like Trello or Houzz apps, helps keep track of maintenance schedules and future upgrades. These apps enable you to set reminders for re-caulking, resealing, or cleaning routines, making upkeep less daunting. Remember, consistent maintenance costs a fraction of what repairs would if issues go unnoticed. If you’re eager to adopt a proactive approach, try implementing a biannual inspection with a moisture meter and a re-sealing routine for your shower area—simple steps that pay off in long-term durability.
Finally, embracing these tools and habits positions you ahead of the curve, reducing the likelihood of unexpected repairs. Proper maintenance not only enhances the aesthetic appeal but also preserves your investment. Always refer back to expert insights like those found in this resource for advanced techniques and the latest recommendations. With the right approach, your home improvements will stand the test of time, making every dollar spent worthwhile. Ready to make maintenance a priority? Start with a detailed inspection using a moisture meter today — your future self will thank you!
The Toughest Lesson I Learned About Flooring Projects
Patience truly pays off. I once believed rushing through my hardwood installation would save time, but I ended up with uneven planks and gaps that took twice as long to fix. Now, I understand that fast isn’t always better; meticulous prep and steady progress are the real secrets. This lesson transformed my approach and can do the same for you. Remember, investing time in quality materials and proper techniques prevents costly re-dos down the line. Embracing this mindset has saved me countless headaches and improved my results immensely.
Tools and Tips I Swear By
Over the years, I’ve found that quality tools like a reliable snap cutter or a precise level make all the difference. I trust brands recommended in this comprehensive guide because they’ve helped me achieve professional-looking results with less effort. Using the right adhesives and tack strips, and knowing when to step back and inspect, are game-changers. These small but crucial adjustments elevate your flooring from average to extraordinary and save you time in the process.
Make Expert Advice Your Best Friend
Discovering the importance of proper subfloor prep and moisture barriers was an eye-opener. Experts in this resource emphasize that foundational work determines longevity. Skimping on this step is tempting but short-sighted. My personal tip is to always double-check levelness and moisture levels before installation. This proactive approach minimizes future issues like squeaks or buckling, keeping your home safe and beautiful for years.
Is Your Home Ready for a Flooring Makeover?
Before diving into your next project, consider not just the materials but also your process. A well-prepared space, a strategic layout, and patience during curing steps make all the difference. Remember, a flawless finish isn’t about rushing to the finish line but about respecting each phase of the process. When you do so, your home not only looks great but also stands the test of time.
Your Turn to Make It Perfect
Have you ever faced challenges during flooring installation that taught you valuable lessons? Or maybe you’ve found a pro tip that made your project smoother? Share your experiences below—your insights could help others avoid common pitfalls and achieve stunning results in their home upgrades.
مراحل الطلاء، بما يضمن نظافة واستدامة النتائج.


One thought on “Flooring Installation Tips: How to Achieve Perfect Results Fast”
Amanda Rogers
January 12, 2026 at 6:00 pmWow, I really appreciate how this post dives into both the technical and psychological aspects of flooring projects. I’ve had my fair share of setbacks, especially rushing through the prep work, only to regret the uneven surfaces and cracked grout later. The emphasis on proper surface leveling and patience during curing really resonated with me. One tip I’d add is to always double-check moisture levels, particularly when working with hardwood in humid climates—ignoring this can cause buckling down the line. I’m curious, what are some of the best tools or gadgets you’ve found helpful for ensuring a perfectly level subfloor before laying down new flooring? Also, since many DIYers might be on a budget, are there affordable brands or tools that still deliver professional results? Thanks for sharing these insights; they definitely make me feel more confident about tackling my next renovation project with a smarter approach.