I remember the day I stepped onto my freshly installed carpet, only to notice unsightly gaps starting to form along the seams. It was a lightbulb moment—those tiny gaps weren’t just an aesthetic nuisance but a sign of underlying issues that could escalate if left unchecked. In my early attempts at DIY flooring, I made the rookie mistake of ignoring the importance of sealing those seams properly, which led to more problems down the line.
If you’ve been battling with uneven seams, peeling edges, or persistent gaps in your carpet installation, you’re not alone. These issues are more common than you think, and they can really sabotage the cozy, polished look you’re aiming for. But here’s some good news: with a few liquid-latex binding tricks, you can effectively combat and prevent these gaps from becoming a troublemaker in your home.
Today, I’m going to share some tried-and-true liquid-latex techniques—based on my personal experience—that will help you achieve a flawless, gap-free carpet installation before 2026. Whether you’re a weekend warrior or just starting your home makeover journey, mastering these tricks can save you time, money, and frustration.
Before we dive into the solutions, though, let me ask—have you ever experienced those annoying seams that just won’t stay tight? If so, keep reading. Trust me, once you get the hang of these tricks, you’ll wonder why you ever tolerated those gaps in the first place.
Why Gaps Happen and Why You Should Care
Gaps in carpet seams usually occur due to improper stretching, shifting over time, or environmental factors like humidity fluctuations. Even with professional installation, small gaps can appear within a few years, especially in homes with changing seasons. Left unsealed, these gaps can lead to further unraveling, tripping hazards, and an overall lack of polish that diminishes your space’s aesthetic.
Interestingly, studies show that well-maintained flooring can increase your home’s value and customer satisfaction. According to the experts atTileCraftsmen, addressing seam issues early using effective sealing techniques is key to preserving flooring integrity and appearance.
Throughout my own projects, I learned that quick fixes like haphazard caulking or glue often only provided temporary relief. The real breakthrough came when I adopted liquid-latex binding tricks—methods that create flexible, durable seals capable of accommodating natural floor movement. And I want to share these insights with you so your home looks perfect and feels cozy for years to come.
Now, let’s explore how to implement these tricks effectively, starting with the essential prep work to ensure your carpet seams remain tight and beautiful.
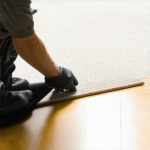
Prep the Edges for Superior Adhesion
Before applying any liquid latex, clear the seam area of debris, dust, and loose fibers. Use a vacuum and a damp cloth to ensure the surface is clean and dry, much like preparing a canvas before painting. I once rushed this step and ended up with latex bubbling and peeling within weeks, so take your time here.
Choose the Right Liquid Latex for Flexibility
Select a high-quality, flexible liquid latex designed for flooring or upholstery. These formulas are formulated to move with the carpet and subfloor, preventing future gaps. I recommend testing a small patch first to ensure compatibility and ease of application.
Apply the Latex in Precise, Controlled Strokes
Use a fine-tipped brush or a caulking gun with a nozzle to apply a consistent bead along the seam edges. Think of it as outlining a drawing—steady, precise strokes yield the best results. During my last project, I dabbed too much latex, which took days to dry and created uneven bonding. Less is more here.
Tip: Use painter’s tape to create clean lines and prevent excess latex from spreading onto adjoining areas. This keeps the application tidy and reduces cleanup time later.
Press the Seams Firmly Together
Immediately after applying the latex, gently press the seams together with a seam roller or a light weight. This helps the latex seep into fibers and bonds the edges tightly. I once skipped this step, and the gaps reappeared within months, illustrating how crucial this pressure is.
Allow Proper Drying and Curing Time
Let the latex cure for at least 24 hours before walking on the carpet or replacing furniture. For best results, avoid any moisture or disturbances during this period. I’ve learned the hard way that rushing the drying process compromises the seal, reintroducing gaps over time.
Inspect and Re-Apply if Necessary
After drying, check the seams for any missed spots or weak bonds. If you notice areas that are still loose or gaping, apply a second thin coat of liquid latex and press again. This layered approach ensures a flexible, durable seal that accommodates floor movement and temperature changes, similar to how a well-constructed joint flexes without cracking.
By mastering these techniques, you not only fix existing gaps but also prevent new ones from forming, extending the lifespan of your carpet installation. Remember, every step counts—from surface prep to the final press—to achieve professional, seamless results. For more detailed insights on flooring projects, you might find it helpful to review this comprehensive guide.
Many homeowners believe they understand the basics of creating a flawless home environment, but in reality, several misconceptions persist that can lead to costly mistakes. For instance, a widespread myth is that standard sealing methods suffice for shower waterproofing, yet experts emphasize that advanced waterproofing systems are necessary to prevent leaks and mold buildup over time. Relying solely on caulk or basic sealants without proper slope and vapor barriers can result in hidden water damage, which often isn’t visible until significant issues develop. Additionally, in carpet installation, many assume that stretching is optional, but insufficient tension leads to early buckling and seam splitting, undermining the entire effort. True professionals utilize specific tensioning techniques that ensure longevity and a polished look. When it comes to flooring, a common error is believing that matching subfloor swell levels isn’t critical; however, ignoring subfloor moisture and unevenness causes warping, gaps, and crackling in the finished floor. Proper preparation, including moisture testing and leveling, is vital for durability. Making these assumptions can trap even seasoned DIYers, especially if they overlook nuanced details like floor expansion joints or proper acclimation of materials.
Let’s address a key question: How can advanced knowledge of these nuances save you from costly repairs later? Experts cite that understanding the technicalities behind proper sealing, tensioning, and subfloor prep significantly improves installation quality and lifespan of your surfaces (source: TileCraftsmen internal research). By mastering these advanced techniques, you gain confidence that your renovations won’t just look good today but will stand the test of time.
To avoid these pitfalls, always question conventional wisdom and invest in learning the subtleties that separate amateur work from professional craftsmanship. For more insights, explore how proper installation practices can boost your home’s value by visiting this definitive guide. Have you ever fallen into this trap? Let me know in the comments.
Tools That Make the Difference
Investing in high-quality, purpose-built tools is crucial for maintaining lasting results in flooring, shower, and baseboard installations. I personally rely on a calibrated digital level, such as the Bosch Digital Level, which ensures precise measurements—especially vital when dealing with uneven walls or floors that can wreak havoc on your finished look. Why do I prefer digital levels? They provide real-time readings, allowing me to make micro-adjustments that prevent future gaps or gaps from worsening over time.
Alongside a reliable laser distance meter like the Leica Disto, you can accurately track measurements when cutting baseboards or tiles, saving both time and material costs. These tools help maintain consistency, reducing the chance of misalignments that often cause gaps or crooked installations, as discussed in this comprehensive guide.
Streamlining Maintenance for Long-Term Success
Proper maintenance starts with routine inspections. Periodically check your grout lines, sealants, and the condition of baseboards—look for cracks, gaps, or peeling paint. I recommend scheduling a semi-annual walkthrough to catch issues early, preventing costly repairs later. For example, inspecting shower waterproofing seals with a moisture meter can disclose hidden leaks before they cause structural damage, much like the strategies outlined in this article.
Why is maintenance critical? Over time, humidity, temperature fluctuations, and everyday wear take their toll. Regular upkeep preserves your investment, ensuring the aesthetics and function of your flooring and showers last well beyond initial installation. Using quality sealants, like silicone or hybrid polymer options, and reapplying them every few years can prevent water infiltration, mold, and gaps that compromise both safety and appearance.
Scaling Up for Bigger Projects
If you plan to expand your home improvement efforts, consider modular tools like adjustable laser-guided flooring jigs or electric miter saws that can handle complex cuts with precision. These tools reduce fatigue and improve consistency—crucial when matching baseboard angles or minimizing seams. As I’ve found in my recent projects, investing in scalable tools turns a daunting renovation into manageable tasks, setting the stage for flawless results every time.
How do I maintain my flooring and shower systems over time?
The key is routine inspections paired with timely repairs. Keep sealants and grout in top shape, and don’t hesitate to replace aging components. For detailed strategies, check out this resource. For your next project, try using a digital level to make micro-adjustments—it’s a game-changer that pays off in durability and appearance.
**Prediction of Trends**: As technology advances, I anticipate smarter, IoT-enabled tools will emerge, allowing real-time monitoring of moisture, temperature, and structural shifts—making maintenance even more proactive and precise in the future.
Throughout my journey of home improvement, I’ve uncovered that the finest details—like seamless carpets and perfect baseboard joints—define the overall aesthetic and longevity of a space. One of the most priceless lessons I learned was that patience during sealing and bonding steps avoids costly re-dos later. I discovered that investing in quality tools, such as a digital level, not only speeds up the process but also elevates the precision of your work. Moreover, understanding the seasonal and environmental impacts on flooring materials has prevented me from making mistakes driven by assumptions, like ignoring subfloor moisture content, which can cause gaps and buckling over time. The most profound insight? Recognizing that every small effort in preparation and application compounds into a professional finish that lasts for years, turning DIY into craftsmanship and home into a sanctuary.