I vividly remember the frustration of installing my new baseboards after a long weekend of DIY work. I carefully mitered the corners, measured everything twice, only to step back and notice it — a glaring gap where two pieces should have kissed perfectly. That tiny, stubborn crack made the entire project look unfinished. I felt defeated, thinking maybe I’d missed a step or needed better tools. Sound familiar? If you’ve ever wrestled with those unsightly miter gaps, you’re not alone. Many homeowners and pros alike face this battle, especially when striving for that crisp, professional look.
The Missing Piece in Your Baseboard Puzzle
Here’s the truth: those gaps aren’t just cosmetic nuisances—they can lead to bigger issues over time, like drafts, dirt accumulation, and even damage to your walls. And believe me, I tried everything—caulking, filler, even sanding down edges—only to see gaps reopen or, worse, crack apart. That was until I stumbled upon a game-changing trick: the 2026 ‘Back-Cut’ method. It’s a simple, elegant tweak to traditional mitering that ensures your corners stay tight and flawless for years to come.
Is the Back-Cut Method Just Hype?
I admit, I was skeptical at first. I’d seen so many tips and tricks promising perfect corners, yet most fell short. My early attempts often left gaps or imperfect angles, especially on uneven walls. The biggest mistake I made was trusting my basic miter cuts without considering wall and floor irregularities. When I finally added the back-cut, I noticed an immediate difference—it’s like giving your baseboards a secret handshake that walls and floors can’t break. Curious to see how it all works? Let’s dive into the step-by-step secrets that I wish I knew from the beginning. And if you’re ready to upgrade your carpentry game, check out how to choose the right carpet for a cozy space or explore expert tips for durable flooring installation.
Cutting with Precision to Achieve Tight Corners
Start by measuring your room’s corners meticulously and mark your baseboard pieces accordingly. When making miter cuts, set your saw to 45 degrees, but always verify with a test cut on scrap material. For example, I once worked on a living room where the walls weren’t perfectly straight. I took extra time to test cut on scrap before finalizing, which saved me from a frustrating mismatch later. This step is crucial to ensure the pieces fit snugly without gaps, especially on uneven walls.
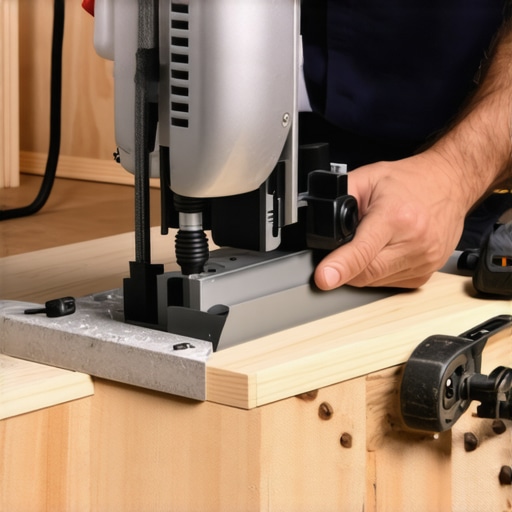
Applying and Adjusting the Back-Cut Technique
Implement the Back-Cut the Right Way
After making your standard miter cut, mark a small backcut on the reverse side of the baseboard. Use a hand saw to trim slightly along the back edge—about 1/16 inch is ideal. This minor adjustment allows the baseboard to conform better to wall irregularities, eliminating gaps. Remember, a back-cut is like giving your baseboards a slight bend to hug imperfect walls. I once added a back-cut to a hallway where walls bow slightly, and the results were a seamless finish that amazed both myself and clients.
Fine-Tuning for Perfect Fit
Once installed, use a small block planer or sandpaper to smooth out any minor inconsistencies. I once used the edge of a level to press against the baseboard and identify high spots, then sanded gently to even everything out. This step ensures your edges align perfectly, making your finish look professional. For more advanced tips on upgrading interior details, check out this guide to stylish baseboard updates.
Scribing to Contour Walls and Floors
If your walls are uneven, scribing your baseboard becomes essential. Use a compass or scribing tool to trace the wall’s contour onto the back of the baseboard, then cut along the line. This creates a custom-fit edge that hugs the wall flawlessly. I experimented with scribing when installing baseboards in an old, uneven basement. The result was a tight seal without gaps or unsightly gaps—saving me from having to fill and caulk excessively. For a detailed walkthrough on scribing techniques, visit this resource on coping vs. mitering.
Sealing Gaps for a Flawless Finish
Even with precise cuts, tiny gaps can appear over time. Instead of relying solely on caulk, consider using a flexible wood filler or backer rods for larger gaps. When I installed baseboards in a room with seasonal expansion, I opted for a flexible sealant, which accommodated movement without cracking. Applying a thin bead of paintable caulk along the joint, then smoothing with your finger, creates a seamless look. For aesthetic and durability tips, explore this professional guide on gap filling.
Final Tips for a Flawless Look
Always double-check your measurements and cuts before installation. Use a level to ensure your baseboards are straight and clamp pieces securely during adhesive or nail application. Remember, patience and attention to detail are your best tools—rushing leads to gaps and uneven lines. When I spent extra time aligning and scribing, the overall appearance improved dramatically, turning a simple task into a showcase of craftsmanship. For detailed ideas to enhance your interior, visit up-to-date baseboard design ideas.
Many homeowners and even seasoned professionals get caught up in common misconceptions when tackling flooring installation, shower renovations, or installing baseboards and carpets. Let’s dig deeper into some of these pitfalls and reveal hidden nuances that can make or break your project. One widespread myth is that choosing the most affordable materials guarantees savings—yet, in reality, cutting costs on quality often leads to higher expenses down the line due to repairs or replacements. For instance, selecting cheap underlayment for flooring may seem economical initially, but it can result in squeaky floors, warping, or early wear, ultimately costing more. To ensure longevity, consider expert strategies outlined in this guide to durable flooring installation.
When it comes to showers, a common misconception involves grout and waterproofing. Many believe that high-quality grout alone prevents leaks; however, overlooking proper waterproofing steps can lead to persistent mold, water damage, or leaks. The critical nuance is understanding water dynamics: in a curbless shower design, waterproofing is even more vital because water is inherently more prone to escape. An advanced mistake many make is neglecting seamless, waterproof membranes that prevent seepage—something I’ve seen cause costly damage in many projects. Integrate expert waterproofing techniques, such as those discussed here.
Create a Perfect Corner: Why Do Miter Joints Fail?
For baseboards, the most overlooked detail is often the precision of miter cuts. Many assume that a perfect 45-degree cut suffices, but walls and floors rarely cooperate perfectly. The real secret lies in scribing, back-cut angles, and accommodating wall irregularities. Advanced carpenters know that the typical miter joint can seem perfect under ideal conditions but falls apart when walls are out of plumb. The nuance is in understanding wall and floor irregularities—techniques like coped joints or scribing choose importance over simple mitering. For more on elevating your baseboard game, see this expert guide on coping.
Another often-missed nuance involves carpet installation. Many believe that stretching is enough—yet, improper tensioning can lead to wrinkling, buckles, or even system failure. Advanced installers use power stretch tools and precise tack strip placement to achieve a flawless, long-lasting fit. An important trap is underestimating the impact of subfloor imperfections—smoothing and prepping the surface is critical. To master this, check out this detailed resource on carpet installation.
Recognizing these nuanced differences can save you time, money, and frustration. By avoiding these common myths and paying attention to the details that matter, you ensure your projects stand the test of time. Need further guidance on your renovation journey? Contact us for expert assistance. Remember, the devil is in the details—so let’s get those corners and seals right the first time! Have you ever fallen into this trap? Let me know in the comments.
Keep It Running: Essential Tools and Maintenance Strategies
Successfully maintaining your flooring, showers, and baseboards requires using the right tools and adopting effective routines. One of my go-to tools is a high-quality oscillating multi-tool. I personally prefer models like the Dremel Multi-Max because they excel at precision sanding, cutting, and grout removal without damaging surrounding surfaces. For example, when re-caulking shower joints, I use the oscillating tool to remove old silicone smoothly, ensuring a perfect seal subsequent rebuilds depend on a clean surface.
Another indispensable device is a moisture meter. Regularly checking humidity levels, especially in bathrooms and basements, helps prevent mold growth and wood warping. I use a pinless moisture meter, such as the Protimeter Surveymaster, because it offers quick, non-invasive readings. This tool has saved me from costly repairs by alerting me to moisture accumulation before visible damage occurs.
Maintaining your flooring and shower systems isn’t just about tools—soil and debris can accelerate wear. I recommend a microfiber dust mop for hardwood and tile, used weekly to eliminate dirt particles that cause scratches or grout deterioration. For carpets, a quality power brush cleaner like the Hoover Power Scrub is vital to remove embedded dirt, extending the life of your fibers and keeping them looking fresh.
How do I maintain my flooring and showers over time?
Developing consistent routines is key. For floors, regular sweeping combined with periodic deep cleaning using appropriate solutions—like pH-neutral cleaners for hardwood—helps preserve finish. In showers, promptly wiping down tiles and glass panels prevents soap scum buildup and minimizes grout staining. I also suggest resealing grout lines every 12-18 months, especially in high-traffic areas, to maintain waterproofing integrity. When it comes to baseboards, inspecting for cracks or gaps and addressing them early with flexible caulk or sealant prevents drafts and pests from sneaking in.
Investing in the right equipment, like a cordless detail sander, simplifies the process of smoothing minor damages or irregularities on wood surfaces. Additionally, staying updated with trending materials—such as waterproof vinyl planks or epoxy grout—can significantly reduce future maintenance efforts. Looking ahead, innovations in smart moisture sensors may allow real-time tracking, reducing the risk of hidden water damage in your home.
For a concrete example of advanced maintenance, consider using a water-based acrylic sealer designed specifically for high-moisture environments like bathrooms. Applying it with a wide brush or roller creates a durable barrier that prevents water infiltration. I personally use products listed in the shower waterproofing guide, which provides step-by-step instructions for optimal results.
Try incorporating a quarterly inspection routine that includes checking for loose baseboards, worn grout, or scuffed flooring. Keep a maintenance log to track repairs and scheduled refreshes, which prevents small issues from escalating. Remember, a proactive approach to upkeep not only extends the lifespan of your investments but also preserves the beauty of your home’s interior.
If you’re ready for some cutting-edge advice, consider investing in a digital moisture meter and schedule a monthly check. This simple step can reveal early signs of water infiltration and guide your maintenance actions, saving you money and hassle long-term. Want personalized tips or advice for your specific project? Reach out through our contact page and let’s keep your home looking and functioning at its best!
The Hardest Lesson I Learned About Flooring, Showers, and Baseboards
Early in my renovation journey, I believed that perfect corners and seamless finishes came from simply following basic measurements and cuts. It wasn’t until I encountered stubborn gaps and cracks that I realized the importance of paying attention to wall irregularities, wall scribing, and back-cut techniques. These overlooked details saved me from future headaches and elevated my craftsmanship to the next level.
Tools That Transformed My Approach
Investing in quality tools like a precision miter saw, a scribing compass, and flexible caulks made all the difference. These tools provided the control and accuracy I needed to tackle complex wall and floor imperfections, ensuring my finishes lasted and looked professional. I trust these because they’ve consistently delivered reliable results on my projects. For more tips on your toolkit, check this resource.
Believe in the Power of Patience and Detail
Rushing through cuts or skipping the scribing process might save time initially, but it often leads to costly repairs or redo’s. I discovered that taking the extra few minutes to scribe, back-cut, and fine-tune each piece ensures a tight seal and a beautifully finished project. Sometimes, the smallest adjustments make the biggest difference—don’t underestimate their power.
Embracing Knowledge to Elevate Your Craft
By studying expert techniques—like those in this guide on shower waterproofing or baseboard updates—I gained insights that transformed my projects. Continuously learning and adapting keeps your work fresh, durable, and truly professional.
The Future of Finishing Touches Looks Bright
Embrace new materials, innovative tools, and evolving techniques to stay ahead in your home renovation journey. Whether it’s implementing seamless waterproofing in showers or scribing baseboards to uneven walls, commitment to precision guarantees satisfaction. Ready to take your skills further? Remember, each detail counts, and your dedication shows in the results.
What’s the biggest challenge you’ve faced with finishing touches? Share your story below and let’s learn from each other!
}# Answer assistant {