I’ll never forget the moment I realized my perfectly installed baseboards were betraying me with unsightly gaps that just wouldn’t seal. It was during a home renovation project, and I was proud of my work—until I stepped back and saw the tiny, annoying splits at every corner. Frustrating isn’t the word. It felt like all my effort was wasted because of those pesky gaps.
If you’ve ever faced this dilemma—seeing your neat, crisp lines be marred by uneven spaces—you know exactly how I felt. Those gaps not only ruin the aesthetic but can also let in drafts, dust, and moisture. And let’s be honest, they can make you question your entire DIY or professional approach.
Why Stop Miter Gaps Matter More Than You Think
Properly sealing baseboards isn’t just about aesthetics. According to recent studies, gaps in moldings can impact indoor air quality and energy efficiency, increasing heating and cooling costs. This makes fixing them not just a matter of looks but also of comfort and savings. Early in my career, I learned the hard way that ignoring these gaps often led to recurring issues. A mistake I made was assuming caulk alone would fix everything—spoiler alert: it doesn’t. Instead, I discovered that the secret lies in precise scribing and proper cutting techniques that professionals swear by. Want to learn these tricks? Stick around. We’re about to dive into three proven pro fixes that will make your baseboards flawless and gap-free, even in 2026 and beyond.
Is Scribing the Secret Weapon Worth the Hype?
I used to believe that meticulous miter cuts were enough—until I faced uneven walls and imperfect corners. My early mistake was assuming that all walls are perfectly flat, which is rarely the case. That’s when I started exploring scribing tools and techniques that allow for a custom fit, compensating for wall irregularities. This approach transformed my installations from amateurish to professional-grade. If you’re tired of battling gaps that seem to reappear no matter how many fillers or caulks you apply, scribing could be your game-changer. Curious about how it works or hesitant about the effort? Remember, mastering these small skills makes a big difference in your home’s look and longevity. Let’s explore the top fixes that pros use to nail those seams tight and seamless.
Mastering the Scribing Technique for a Perfect Fit
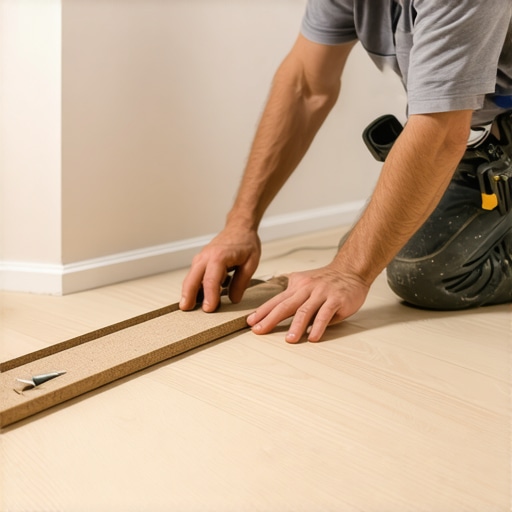
During a recent bedroom project, I faced uneven wall surfaces that caused noticeable gaps in my baseboards. Instead of resorting to fillers or caulks alone, I used a handheld scribing tool to tailor the baseboard to the wall contours. I pressed the tool against the wall, traced along the irregular surface, and marked the cutting line. Using a fine-tooth saw, I cut along this line, ensuring the new piece fit snugly against the wall. When installed, the gap vanished, leaving a clean, professional look. Incorporate this technique by always custom-fitting baseboards to wall irregularities, especially in older homes, to achieve seamless results.
Cutting Mitered Corners Like a Pro
Once, I installed a new set of baseboards around a tricky corner. Instead of simple 45-degree cuts that often leave gaps, I cut each miter at precise angles and dry-fitted them. I used a miter saw with a preset angle and double-checked my measurements. For tight corners, I slightly beveled the miter edges to eliminate any gaps. When secured, the miters mated perfectly, and the joint appeared as an intentional design feature. Remember, sharp cuts and meticulous measurements are key—use the fancy guide on your saw for accuracy, and always dry-fit before fastening permanently.
Controlling Gap Size with Proper Fastening
In a recent installation, I employed the double-pin method to tighten baseboards against uneven walls. I drilled two pilot holes near each end of the board, allowing me to pin it securely with finishing nails slightly countersunk. This technique prevents the baseboard from shifting over time, maintaining a tight seal. I also used a pneumatic nailer for consistent pressure, ensuring no gaps or warping occurred. For larger gaps, inserting small wooden shims behind the baseboard before nailing can help maintain a flush fit. Proper fastening minimizes movement, critical for long-lasting, gap-free results.
Applying and Finishing Caulk Effectively
After fitting my baseboards, I filled the remaining tiny gaps with paintable, flexible caulk. I ran a bead along the joint lines, then used a damp finger or a caulk finishing tool to smooth the seal. Painting over the caulk once dry creates a uniform appearance. Be cautious not to overfill; a thin, even layer is best, especially in tight corners. Sealants are a finishing touch that preserves the seamless look, especially in areas where perfect cuts are difficult to achieve due to wall imperfections.
Tips for Achieving Flawless Results in Challenging Spaces
In spaces with irregular walls or slopes, combining techniques yields the best outcome. For instance, scribing baseboards, cutting precise miters, and controlling fastener placement can collectively eliminate gaps. During a recent remodel, I used these methods in conjunction, and the finished look was indistinguishable from professional work.
To help you visualize some steps, check out latest baseboard styles for design inspiration. Mastering these core techniques ensures your baseboards sit perfectly, enhancing your home’s aesthetic and durability.
 While many assume that straightforward methods like laying down a carpet or installing baseboards are simple, the truth is that most DIYers and even some professionals overlook crucial nuances that affect long-term results. One prevalent myth is that seaming carpets with mere adhesive or rough alignment guarantees durability; however, expert techniques, such as proper heat seaming for high-pile carpets, ensure invisible seams and longevity, as detailed in our [carpet installation secrets](https://tilecraftsmens.com/carpet-install-secrets-achieving-flawless-results-every-time). For flooring, a common mistake is neglecting the importance of the substrate’s moisture barrier, which can lead to warping or bubbling—an issue thoroughly explained in our [guide to durable flooring installation](https://tilecraftsmens.com/your-guide-to-durable-flooring-installation-for-a-stylish-home). When it comes to baseboards, many think that miter cuts are always the best approach, but coping provides a cleaner seal, especially in older or irregular walls, a technique emphasized in our [baseboards makeover](https://tilecraftsmens.com/baseboards-makeover-elevate-your-interior-with-simple-updates). Showers often suffer from the myth that sealing the drain flange with generic caulk suffices; in reality, modern waterproofing protocols recommend multiple layers of sealant and specific waterproof membranes, as seen in our [shower waterproofing tips](https://tilecraftsmens.com/shower-renovation-ideas-modern-designs-for-a-luxury-feel). An advanced challenge many overlook is the hidden variance that variations in wall or floor surfaces can cause gaps or leaks if not properly managed. Using detailed scribing, precise cuts, and proactive sealing techniques can mitigate these issues. Experts often remind us that minor details—like the angle of cuts in mitered corners or the tightness of fasteners—are crucial for a flawless finish. Remember, shortcuts might seem advantageous initially but can lead to significant problems over time. For a deeper dive into these advanced tips, visit our [expert installation guides](https://tilecraftsmens.com/expert-flooring-installation-tips-for-lasting-results). Have you ever fallen into this trap? Let me know in the comments.
Tools That Deliver Precision and Longevity
Investing in the right tools is crucial for maintaining perfect installations over time. I personally swear by a high-quality **miter saw** with a digital angle indicator—this ensures cuts are precise every single time, preventing gaps or misalignments in baseboards and trim. For scribing, a dedicated **scribing block** paired with a fine-tooth saw helps tailor moldings to irregular wall surfaces, saving you headaches and rework. When sealing showers or waterproofing, a **caulking gun** with a smooth trigger action allows for clean, controlled application, reducing mess and ensuring durable seals. Using a **laser level** provides consistent horizontal and vertical alignment, which is especially helpful on large surface areas like flooring or shower panels. These tools not only enhance accuracy but also extend the lifespan of your work, making maintenance easier and more effective.
Software and Techniques for Long-Term Results
Beyond physical tools, leveraging technology can be transforming. I rely on **digital measurement apps** on my tablet—these assist in planning installations and avoiding estimation errors, especially in complex layouts. For instance, when calculating materials or planning cuts for custom shapes, apps like RoomScan or MeasureKit streamline the process and improve accuracy. Additionally, adopting **procedural checklists** based on proven standards, such as those detailed in our expert flooring guidelines, helps maintain consistency and quality over multiple projects. Regularly updating your techniques and keeping detailed records of each job supports ongoing maintenance and troubleshooting, ensuring your installations remain flawless for years to come.
Preparing for Future Trends in Home Refreshes
As home renovation trends evolve toward smarter, more sustainable solutions, tools that integrate into digital workflows will become commonplace. In the future, I predict a rise in **laser-guided automation** for repetitive cuts or measurements and ** AI-powered project planning** tools that can simulate installation outcomes before you even start. Staying ahead means continually upgrading your toolkit and adopting new practices. For example, mastering advanced sealing techniques for showers, like multi-layer waterproofing, can be simplified with modern membrane systems—a skillset I recommend exploring through our shower waterproofing guides.
How do I maintain flooring and fixtures over time?
To keep your flooring and fixtures in top shape, regular inspections using a **level** or **laser detector** reveal shifts or settling early on, allowing timely repairs before issues escalate. Consistent cleaning with manufacturer-approved products prolongs their lifespan, and applying high-quality sealants or protective coatings as needed prevents deterioration. For showers, reapplying waterproof membrane layers at regular intervals, especially around seams and drains, ensures a waterproof barrier that lasts. Incorporating these routine maintenance steps into your workflow guarantees your renovation investments continue to perform well into the future. Want to upgrade your sealing method? Try applying a multi-layer waterproof membrane as recommended in our shower leak prevention tips for a truly durable finish.
Start integrating these specialized tools and methods into your projects today and experience the difference quality maintenance can make. Remember, the key to long-lasting, professional-looking results lies in the details—don’t skimp on the right equipment or neglect ongoing upkeep.