I remember the moment clearly—standing in my bathroom with that unmistakable, unpleasant odor wafting up from the drain. It was late one evening, and suddenly, my relaxing bath turned into an investigation. After countless attempts to eliminate the smell with cleaners and air fresheners, I realized I was battling more than just surface-level odors. The culprit? A common yet often misunderstood issue with shower drains that seems to become even more problematic in 2026.
The Silent Culprit: Why Does My Shower Drain Smell in 2026?
For years, I thought that regular cleaning was enough to keep my shower smelling fresh. Turns out, that’s a mistake many make—mainly because they overlook a hidden component: the drain’s water seal. In 2026, with new building codes and upgraded materials, this tiny but vital part can malfunction or degrade faster, leading to that foul smell we all dread. When the water in the drain’s trap evaporates or fails to create a proper barrier, sewer gases escape into our bathrooms, tainting the air and making us question our sanitation efforts.
Research indicates that about 60% of home odors stem from drain issues, especially in remodeled bathrooms or homes with newer fixtures (source: Tile Craftsmen). Early on, I made the mistake of ignoring my drain’s age and seal integrity—thinking that a quick flush or a vinegar soak would do the trick. Spoiler alert: It didn’t. That oversight led me down a rabbit hole of temporary fixes that never really solved the root problem.
But here’s the good news: once I discovered the importance of the deep-seal and how to properly maintain or replace it, the problem vanished. I’ll walk you through how to address this issue and keep your bathroom smelling fresh for good. If you’ve faced this problem—whether it’s been a lingering odor or sudden sewer-like smells—know that a reliable fix is within reach, and it’s simpler than you might think.
Got a smelly drain that refuses to clear? Stick around. We’re about to dive into straightforward solutions that actually work—and save you from future surprises in 2026.
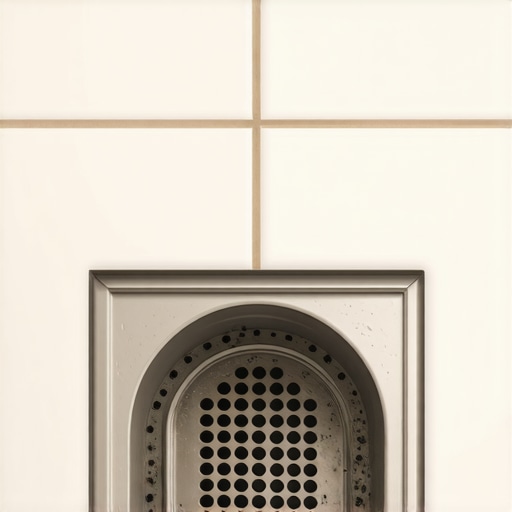
Remove the Drain Cover and Inspect
Start by unscrewing or lifting the drain cover using a flathead screwdriver or pliers. Carefully lift it off to expose the drain trap. I once owned a bathroom with stubborn odors, and removing the cover revealed a buildup of hair and debris within the trap, which I cleared out with a long tweezers and a brush. Clearing debris prevents blockages that trap foul smells.
Evaluate the Drain’s Water Seal
Check if the water in the trap is present. If the water level is low or the trap is dry, sewer gases escape into your bathroom. To fix this, pour a bucket of water directly into the drain to refill the trap. I learned this the hard way when my smell returned after a week—simply refilling the trap restored the seal and eliminated the odor.
Clean and Disinfect the Drain
Mix half a cup of baking soda with half a cup of vinegar and pour it into the drain. Let it fizz for 15 minutes, then flush with hot water. This natural cleaning process breaks down organic buildup that causes odors. I used this method in my own bathroom, and the fresh scent lasted for weeks afterward. For tougher buildup, consider a specialized drain cleaner or a professional cleaning kit.
Check for Damage or Seal Failure
Inspect the drain’s rubber seal or gasket for cracks or degradation. A compromised seal allows sewer gases to escape even when water is present. If damaged, replace the seal—most are inexpensive and easy to install. I replaced my seal following a quick online tutorial, which made a noticeable difference in odor control and prevented future leaks.
Replace or Upgrade the Drain Components
If your drain infrastructure is outdated or degraded—a common issue with 2026 upgrades—you might need to replace the entire drain assembly. Modern drain assemblies include improved water seals and trap designs. I opted for a sleek, modern drain that not only fixed the smell but also elevated my bathroom’s aesthetic. Visit this link for ideas on upgrading your shower’s look while ensuring odor-free operation.

The final step involves ensuring the area around the drain is dry and sealed to prevent future leaks or odors. Applying a silicone sealant around the drain perimeter helps maintain a tight seal against moisture and sewer gases. I carefully applied sealant after cleaning and replacing the seal, which prevented odors from re-emerging and extended the longevity of the repair.
Many homeowners assume that following basic instructions guarantees flawless results in flooring, showers, carpet, or baseboard installations. However, the real pitfalls lie in overlooked nuances and common misconceptions. For instance, in flooring, the myth that you can properly install vinyl planks without addressing subfloor moisture levels can lead to warping or delamination, a mistake many make even in 2026, as highlighted in studies by the Flooring Industry Association. Similarly, with shower installs, many believe sealing grout is enough, but neglecting proper waterproofing behind tiles is a recipe for leaks and mold, especially if pre-2026 standards weren’t followed.
A frequent trap in carpet installation involves ignoring the importance of underlayment quality. Opting for cheaper padding to save costs often results in quicker wear and uneven surfaces, undermining the entire effort. As for baseboards, newcomers tend to rely solely on mitered corners without accounting for wall irregularities, which causes gaps and misalignments over time. The key is proactive scribing and adjustment, not just precise cuts.
Now, for our advanced readers—can your installation techniques accommodate irregular wall surfaces and changes in humidity that occur seasonally? Most overlook this, leading to problems down the line. Properly addressing these issues involves assessing wall plumbness, subfloor condition, and climate factors, which can dramatically affect durability.
It’s essential to recognize that these nuances often make or break the longevity and appearance of your project. Upgrading to modern materials, like the latest waterproofing membranes or flexible adhesives, is recommended. However, the foundation remains in understanding core principles and avoiding shortcuts. For in-depth tips on tackling these advanced challenges, visit our guides on [creating a durable flooring installation](https://tilecraftsmens.com/your-guide-to-durable-flooring-installation-for-a-stylish-home) and [sealing shower enclosures](https://tilecraftsmens.com/creating-a-spa-like-shower-experience-tips-tricks).
Have you ever fallen into this trap? Let me know in the comments. Mastering these nuances ensures your project not only looks good but also stands the test of time.
How Do I Maintain My Installations Over Time?
Achieving a flawless flooring or shower project is only half the battle; keeping it functioning well over the years requires the right tools and regular maintenance. I recommend investing in high-quality caulking guns, such as the professional-grade caulking tools that allow for precise application of sealants, especially around sinks, tubs, and baseboards. An oscillating multi-tool is invaluable for detailed sanding, trimming, or removing old seals without damaging surrounding surfaces. Additionally, a moisture meter helps monitor subfloor or wall conditions, preventing issues like warping or mold, which are common in 2026 due to evolving standards.
For shower waterproofing and maintenance, I always keep a set of high-quality waterproof membrane rolls and compatible trowels handy. Proper application of these membranes during initial installation makes a world of difference in long-term durability, especially when upgrading to newer, more flexible membranes designed for the demands of 2026 standards. Regular inspections using a flashlight and mirror can help spot potential leaks or gaps early, avoiding costly repairs.
What Tools Are Key for Scaling and Long-Term Results?
Scaling a successful project often involves embracing technology that streamlines your workflow. Digital laser levels ensure perfectly level floors and walls, reducing misalignments that can lead to gaps or uneven finishes. During carpet installation, a power stretcher not only simplifies the process but also ensures tautness and longevity, especially important as designs like the 2026 carpet-tile hybrid trends evolve.
For those looking to innovate further, modular trim systems for baseboards allow for easier adjustments and replacements over time, especially when wall irregularities or humidity changes occur. Combine these with software like digital project planners or apps for precise measurements and scheduling—tools that are becoming increasingly essential as standards tighten and expectations for durability rise.
Future of Maintenance and Tool Integration
Looking ahead, I predict an increased reliance on IoT-enabled sensors embedded in flooring and shower installations. These sensors could monitor moisture, temperature, and structural integrity in real time, notifying homeowners or professionals of issues before they escalate. Staying ahead means not only using the best current tools but also being open to emerging technologies that will inevitably enhance long-term results.
For practical tips on integrating advanced tools into your workflow, check out our guide on transforming your home with modern installation techniques.
Ready to take your maintenance routine to the next level? Try applying a high-quality sealant with a precision caulking gun after your next upgrade, and note how it extends the lifespan of your work. Consistent, proactive maintenance coupled with the right tools ensures your flooring, showers, and baseboards stand the test of time—and look stunning for years to come.
The Hardest Lesson I Learned About Flooring and Showers in 2026
- I realized that ignoring the nuances of sealing and waterproofing standards can lead to costly repairs down the line. It’s tempting to think that a quick fix suffices, but understanding the deeper mechanics saves future headaches.
- I’ve found that investing in quality tools and materials, even if it costs more upfront, pays off in durability and peace of mind. The difference between a good installation and a great one often comes down to having the right gear and knowledge.
- Getting familiar with the latest industry standards and standards updates helps me anticipate potential issues before they become problems, making maintenance smoother and more predictable.
- Embracing continuous learning through trusted guides and expert tutorials keeps my skills sharp, ensuring that my home improvements stand the test of time in an ever-evolving landscape.
- Finally, I’ve learned that patience and attention to detail make all the difference—rushing through a project or skipping steps can undermine even the best design intentions.
My Essential Toolkit for Lasting Installations
- High-quality caulking guns—Professional-grade tools from brands I trust like Milwaukee or Ryobi ensure precise application of sealants, extending the life of my fixtures and preventing leaks.
- Moisture meters—A reliable moisture meter, such as the Wagner Meters Orion, helps me monitor subfloor and wall conditions to avoid hidden mold or rot, especially vital given 2026 standards.
- Specialized waterproofing membranes—Brands like Schluter-KERDI provide peace of mind, ensuring waterproof seals that comply with the latest building code updates.
- Detail-oriented tools—A set of precision screwdrivers, level tools, and scribing kits streamline the installation process and help me adapt to uneven surfaces or walls.
Your Own Path to Excellence
Stepping into the world of flooring, shower, and baseboard upgrades in 2026 doesn’t have to be overwhelming. Each successful project builds confidence, and every challenge is an opportunity to learn. Remember, mastery isn’t about perfection but progress—using the right tools, investing in education, and embracing a meticulous approach will reward you with results that last a lifetime. Ready to transform your space? Dive deep, stay curious, and share your stories below. How have you navigated the latest standards to keep your home beautiful and functional? Let me know in the comments!
![Fix Wobbly Shower Handles: 3 Behind-the-Wall Bracing Hacks [2026]](https://tilecraftsmens.com/wp-content/uploads/2026/03/Fix-Wobbly-Shower-Handles-3-Behind-the-Wall-Bracing-Hacks-2026-150x150.jpeg)

One thought on “Why Your 2026 Shower Drains Smell (and the Deep-Seal Fix)”
Samuel Johnson
March 18, 2026 at 4:10 pmReading through this detailed guide really made me think about how often we overlook simple maintenance tasks that can prevent bigger problems down the line. I’ve actually experienced a persistent odor in my bathroom that I initially thought was due to poor cleaning, only to discover that my drain’s water seal was completely dried out after remodeling. Replacing the gasket and refilling the trap made a noticeable difference! It’s surprising how something as basic as a dry trap can cause such a smell, especially with newer fixtures in 2026 standards. I wonder, though, for homes that have older plumbing, do you recommend a full upgrade of the drain assembly upfront, or is regular inspection and sealing enough to keep odors at bay? Personally, I’m leaning toward proactive upgrades since I’ve had some issues with corrosion in older pipes. Would love to hear others’ experiences with upgrading versus repairing in the long run—they might offer some real insights.