I remember staring at a freshly installed baseboard, only to notice a jagged gap where it didn’t quite meet the wall—a problem that kept nagging at me every time I walked into the room. It was a lightbulb moment: no matter how precise my cuts or careful my nailing, those pesky gaps on curved 2026 walls seemed unavoidable. Frustration grew, and I wondered if there was a way to make these imperfections disappear without redoing the entire job.
Why Fixing Gaps on Curved Walls Matters More Than You Think
Gapping in baseboards isn’t just about aesthetics—it’s a sign that the real work of creating a seamless, professional finish is incomplete. These gaps can trap dust and dirt, especially in homes with pets or allergy sufferers, and can even lead to damage over time if moisture sneaks in. But here’s the thing: many DIYers and even seasoned pros overlook the subtleties involved in curved wall installations, leading to gaps that mar the overall look.
Curved walls, especially the 2026 models that are becoming more popular, present unique challenges. Unlike straight walls, curved surfaces demand a different approach—more patience, better tools, and a keen eye for detail. Early in my own projects, I made the costly mistake of applying standard miter cuts without considering the wall’s curvature, resulting in gaps and uneven surfaces. That was a hard lesson, but it’s one that’s thanks to my mistakes I can now share some effective solutions.
Every home improvement project has its pitfalls. Gaps on curved walls often seem like an insurmountable obstacle—unless you know the right tricks. This post will walk you through four proven fixes, based on real experience, that will help you achieve a clean, gap-free finish.
Did you know that improperly scribing or cutting baseboards can lead to visible gaps even on slight curves? According to industry experts, mastering the art of wall scribing can make a significant difference. To learn more about seamless baseboard installations, check out [this comprehensive guide](https://tilecraftsmens.com/baseboard-trends-in-2025-fresh-styles-for-every-room).
So if you’ve faced those frustrating gaps on your curved walls and want solutions that work, stick with me. We’re about to dive into four fixes that will elevate your finishing game and leave your walls looking professional—and flawless.
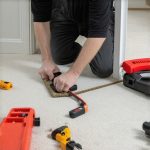
Scribing Baseboards for Curved Walls
Start by carefully measuring the wall’s curve with a flexible contour gauge, pressing it against the wall to capture its shape. Mark the scribe lines directly onto the back of your baseboard. When cutting, use a fine-toothed saw and cut along the marked line. I once attempted to freehand cut, resulting in a jagged edge; then I realized the importance of precision tools paired with accurate measurement for a perfect fit.
Using a Smoothing Plane and Caulk Effectively
After fitting your baseboard, gently bevel the edge using a sanding block or smoothing plane. This softens abrupt angles, allowing the baseboard to gently hug the wall’s curvature. Apply a high-quality flexible caulk along the joint, then smooth it with a caulk finishing tool to create an almost invisible transition. I found that caulking alone isn’t enough—sanding the edge first makes the caulk adheres better and looks cleaner.
Applying Flexible Fillers for Minor Imperfections
For small gaps or uneven spots, flexible fillers or wood putty can adapt to slight irregularities. Press the filler into the gap with your finger or a putty knife, then smooth it out. Once dried, sand it lightly before painting or staining. I discovered that using traditional spackle was less effective than a flexible filler, especially on curved surfaces, because it cracks and shrinks over time.
Adapting Baseboards with a Tuck Technique
If the gap is stubborn, try the tuck method: slightly flex the end of the baseboard and slide it into the corner or against the wall, securing it with finishing nails. For larger gaps, cut a thin wedge from extra baseboard material, insert it into the gap, and glue it in place before nailing. This approach requires patience but results in a snug fit that minimizes gaps.
Sealing and Finishing
Finally, seal all joints with paintable flexible sealant, covering the caulk and filling small imperfections. After drying, sand lightly to ensure a flush surface, then paint or stain to match your decor. Remember, proper sealing prevents moisture intrusion, which can cause gaps to widen over time.
When it comes to home renovations like installing carpets, baseboards, or showers, many people operate under assumptions that can compromise quality and durability. Let’s dig deeper to uncover some frequently overlooked nuances that even seasoned DIYers might miss, ensuring your projects stand the test of time.
**What Most People Get Wrong About Carpet Installations**
A prevalent myth is that stretching your carpet sufficiently guarantees a flawless finish. In reality, over-tensioning can lead to uneven wear and premature tearing. Proper installation involves not only adequate stretching but also meticulous tacking to prevent future ripples or wrinkles. According to flooring experts, using heavy-duty power stretchers combined with precise tack strip placement results in a smoother surface that lasts longer. Falling into the trap of rushing this step can cause expensive rework down the line.
**The Hidden Trap of Baseboard Scribing**
Many assume that simply cutting baseboards mitered at 45 degrees on corners suffices. However, if your walls are uneven or concave/convex, these corners will develop gaps or misalignments. A common mistake is neglecting wall scribing — the process of tracing the wall’s exact profile onto the baseboard before cutting. This nuance ensures tight fits and seamless appearances, especially on irregular surfaces. For advanced projects, mastering wall scribing—via tools like contour gauges—can dramatically improve results. Did you know that copying the wall’s profile rather than relying solely on miter cuts can prevent gaps and reduce the need for caulking? Check out this detailed guide on [baseboard trends in 2025](https://tilecraftsmens.com/baseboard-trends-in-2025-fresh-styles-for-every-room).
**Flooring Installation: The Complexity Beneath Your Feet**
A common misconception is that leveling the subfloor is unnecessary if it looks flat. In fact, even subtle unevenness can cause problems like squeaking, gaps, or buckling later on. The secret lies in thorough subfloor prep — using self-leveling underlayment or shims where needed, and double-checking flatness with a long straightedge. This attention to nuance prevents costly repairs down the road. Also, proper acclimation of materials before installation helps avoid expansion or contraction issues that lead to gaps or buckles.
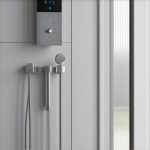
**Showers and Waterproofing: The Fine Print**
Many assume that applying sealant is sufficient to waterproof showers. However, waterproofing is a layered process; it involves proper membrane application, sealing all penetrations, and ensuring slope for drainage. Overlooking details like vapor barriers or improper slope can cause leaks or mold growth. For a professional-grade shower, detailed waterproofing—like using epoxy grout and proper curb sealing—is critical. You can explore comprehensive waterproofing strategies in [creating a spa-like shower](https://tilecraftsmens.com/creating-a-spa-like-shower-experience-tips-tricks) and ensure your project withstands moisture.
**How Do You Avoid These Hidden Mistakes?**
The key to mastery lies in understanding and executing the subtleties—whether it’s wall profiling, substrate prep, or layering waterproofing. Skipping these nuances might seem minor initially but can result in significant setbacks. Think of these details as the finishing touches that distinguish a good job from a pro-level result.
Have you ever fallen into this trap? Let me know in the comments. Remember, investing time in mastering these subtle points elevates your home projects from amateur to expert level. For more tips on professional finishes, explore our [contact us](https://tilecraftsmens.com/contact-us) page or dive into advanced flooring techniques with [flooring installation tips for 2025](https://tilecraftsmens.com/transform-your-home-expert-flooring-installation-tips-for-2025). Your home deserves nothing less than perfection.Maintaining your home improvements like flooring, baseboards, or showers is crucial to preserving their appearance and functionality over time. Having the right tools and adopting effective maintenance routines can significantly extend the lifespan of your installations. One essential tool I personally rely on is a high-quality multi-tool with various attachments. Its versatility allows me to perform detailed sanding, caulking, and minor repairs without switching devices, making routine upkeep more efficient. For example, using a flexible sanding attachment on grout lines or baseboard edges helps keep everything looking sharp and well-finished. Additionally, a digital moisture meter is invaluable for detecting hidden moisture issues in areas like showers or beneath floors before they become serious problems. Regular inspections with this device can reveal leaks or high humidity levels early, allowing for prompt action. Moving forward, trends indicate an increasing shift toward smart home maintenance systems. Integrating IoT-enabled sensors that monitor humidity levels, temperature, and moisture can automate alerts, guiding homeowners to address issues before damage occurs. This proactive approach is transforming the traditional maintenance mindset, making home care more preventative than reactive.
How do I maintain my flooring and fixtures over time?
Establishing a routine cleaning schedule using pH-neutral cleaners prevents buildup that could degrade surfaces. For flooring, avoiding harsh chemicals and excessive water preserves seals and finishes, especially on wood and luxury vinyl. Applying a fresh coat of sealant or protective finish every few years on grout, baseboards, or shower seals also prolongs durability. Remember, addressing minor issues promptly—like small cracks or loose tiles—prevents costly repairs later. For technical guidance, consider exploring detailed maintenance strategies by industry experts. Don’t hesitate to experiment with a flexible filler or a squeeze of high-quality silicone caulk during your routine checks; even small updates can make a big difference in the longevity of your spaces. To ensure your maintenance habits are comprehensive, visit our article on [your guide to durable flooring installation](https://tilecraftsmens.com/your-guide-to-durable-flooring-installation-for-a-stylish-home). Keep these tools in mind and develop a habit of scheduled inspections—your home will thank you for it!
Lessons the Walls Never Taught Me
One of the most profound lessons I learned was that no matter how careful I tried to be, my first attempts at installing baseboards on curved walls often resulted in gaps that seemed impossible to fix without starting over. It taught me to embrace the importance of precision wall profiling and detailed measurement. Additionally, I realized that relying solely on caulking isn’t enough; subtle sanding and flexible fillers make a significant difference. My biggest aha moment was discovering the tuck technique and wall scribing—it transformed my approach from guesswork to craftsmanship.
Another insight was that upgrading my tools, like contour gauges and fine-toothed saws, made the entire process smoother and more accurate. The effort I put into understanding wall curvature and surface irregularities directly impacted the quality of my finish. These lessons highlighted that the devil is truly in the details, and investing in the proper skills and tools pays off with professional-looking results that stand the test of time.
My Go-To Arsenal for Perfect Finishes
If you’re serious about achieving flawless results in your home projects, certain tools and resources are invaluable. First, a high-quality contour gauge is essential for capturing wall profiles accurately—I’ve trusted mine for years, and it never lets me down. A fine-toothed saw or a multi-tool with a precision cutting attachment helps make clean cuts along scribed lines, saving time and frustration. For finishing, I rely on a flexible, paintable sealant and a small sanding block to smooth out transitions seamlessly.
Books such as “The Complete Guide to Baseboard and Molding Installation” have deepened my understanding of professional techniques and nuance. Watching tutorials from seasoned pros on platforms like YouTube has also boosted my confidence. Lastly, don’t underestimate the value of a good moisture meter when working in bathrooms or kitchens—preventing future issues makes your work worthwhile. These tools and resources empower you to tackle even the most challenging surfaces with confidence and precision.
Stitching the Future with Action and Care
Every home improvement journey is a chance to grow, and mastering the art of finishing on curved or irregular surfaces is no exception. Don’t shy away from experimenting with wall scribing, beveling edges, or subtle fillers—these small steps accumulate into big differences. Remember, patience and attention to detail are your best allies. By applying what you’ve learned and honing your skills, you’ll turn imperfect spaces into showcasing points of your home’s character.
Take action today: start your next project with a mindset of precision and care, and enjoy the pride of a job well done. Your walls, floors, and fixtures will thank you for the effort, and your home will reflect your commitment to quality craftsmanship. Ready to see the difference a little extra effort makes? Share your experiences or ask for advice below—let’s build better homes together!