I’ll never forget the moment I stepped into my newly renovated shower, only to see a tiny puddle forming at the base. It was a small leak, barely noticeable at first, but enough to set off alarm bells. That slip-up—thinking a quick seal would suffice—turned into a months-long headache involving mold, costly water bills, and sleepless nights. Sound familiar? You’re not alone. These sneaky leaks can hide behind walls and under floors, making you feel like you’re fighting a losing battle with your own bathroom.
Why Tackling the 5 Leak Points on Your Digital Shower Matters Now
Let’s face it: modern bathrooms are smarter, sleeker, and more complex than ever. Digital valves promise convenience and efficiency, but they also introduce new vulnerabilities. If neglected, minor imperfections at these critical points can escalate into major water disasters, damaging your home’s structure and your peace of mind. According to the
official plumbing guidelines, even a tiny leak can cause subfloor rot and mold growth within weeks.
Early on, I made the mistake of overlooking these crucial leak points—thinking I could just seal a few spots and call it a day. That misstep cost me time, money, and a lot of frustration. Learning from my experience, I realized that understanding and sealing these specific points is essential for peace of mind. Today, I want to help you avoid the same pitfalls and show you how to seal your 2026 digital valves quickly and effectively, so you can enjoy your sleek new shower without worry.
Is Your Shower Leak-Prevention Strategy Actually Working?
If you’ve ever rushed through a DIY fix or assumed that a quick application of sealant was enough, you’re probably familiar with the disappointment that follows. Trust me, a rookie mistake early on was ignoring the importance of waterproofing beneath the tiles around the valves. Not addressing these hidden weak spots led to leaks that eventually became costly repairs. Recognizing this common mistake has inspired me to share proven strategies, guiding you to protect your investment and keep water where it belongs—inside your pipes, not in your walls.
Now, let’s dive into the specific leak points you need to seal fast—before a minor drip turns into a major catastrophe. Ready to safeguard your bathroom and save money? Keep reading.
**
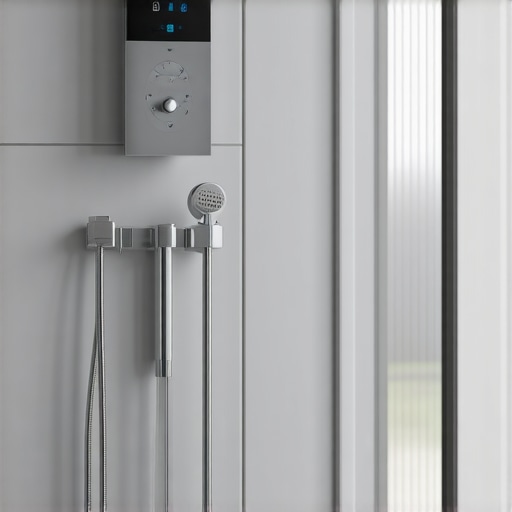
Identify the Critical Leak Points First
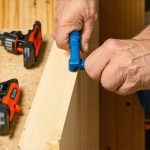
Start by inspecting your shower for visible cracks around the digital valves, base, and seals. Use a flashlight to look behind panels and under the tray. Remember, leaks often originate from small gaps or deteriorated seals. A year ago, I noticed a tiny puddle near my digital controls. Upon closer inspection, I realized the silicone sealant had shrunk, creating a pathway for water. Replacing this seal was straightforward and stopped the leak entirely.
Remove Old Sealant Carefully
Use a utility knife or a silicone remover tool to gently strip away the old silicone or waterproofing membrane without scratching the porcelain or tile surfaces. Precise removal prevents traps for moisture. I used a plastic scraper to avoid damaging my tiles, which kept the surface smooth for new sealing.
Apply High-Quality Waterproof Sealant
Select an epoxy or silicone-based waterproof sealant rated for bathrooms. Apply evenly around the valve stems, base edges, and any joints, ensuring no gaps remain. Think of this process as applying a raincoat; coverage and adhesion are key. To ensure even application, I used a caulking gun with a steady hand, which eliminated any uneven spots that could later cause leaks.
Seal Hidden and Hard-to-Reach Areas
Use a flexible waterproof membrane in less accessible spots like behind the control panel or beneath the tray. Employ a silicone tube with a precision nozzle to reach tight corners. For my own shower, I applied a waterproof tape over the membrane to reinforce the seal, preventing water from seeping into the subfloor.
Test Before Closing Up
Once sealed, turn on your shower and observe for drips or moisture. Use a dry cloth to check seals after several minutes. A trick I learned is to fill the shower with water to the level of the seals and watch for any slow leaks over 15 minutes. This step helps catch issues before finalizing the repair.
Maintain Regular Inspection Schedule
Every few months, review your seals and replace any deteriorated silicone. Keep the area clean and dry to prolong the integrity of your waterproofing. Last year, proactive inspection saved me from a costly floor replacement. Remember, maintenance is your best defense against leaks becoming disasters.
By following these concrete steps, you ensure your digital shower remains leak-free, saving you money and stress. Every sealant application and inspection can make a significant difference—think of them as the gatekeepers keeping water where it belongs.
When it comes to home renovations like flooring, showers, and baseboards, many homeowners and even some pros fall prey to misconceptions that can compromise durability and aesthetics. A prevalent myth is that choosing cheaper materials or rushing the installation process saves money; in reality, this often leads to costly repairs down the line. For example, neglecting proper moisture barriers during shower installation is a silent mistake that causes mold and structural damage, even if the visible work looks immaculate. Advanced installers pay close attention to substrate preparation and waterproofing techniques—details that can make or break longevity. One common trap is relying solely on the adhesive or sealant to prevent movement or leaks, but experts emphasize that proper surface flatness, tensioning, and sealing in stages are essential for flawless results. Have you ever fallen into this trap? Let me know in the comments. An often-overlooked nuance is the proper transition between different flooring types, such as tile to hardwood or carpet to tile—mismatched heights can create tripping hazards and stress the materials over time. For instance, using a scribing technique for uneven walls or floors ensures a seamless fit, greatly enhancing both appearance and performance. Additionally, misconceptions about baseboard installation often lead homeowners to skip wall prep or ignore expansion gaps, which results in crooked or cracking molding over time. In fact, a simple pre-cut and shimming process can dramatically improve wall-to-baseboard alignment—something that most amateurs overlook. For a deeper dive into durable and professional flooring techniques, check out our comprehensive guide on durable flooring installation. Similarly, understanding advanced waterproofing methods, like installing a waterproof membrane behind shower niches or curb seals, prevents leaks that can ruin subfloors and promote mold growth. Rushing these steps, thinking a quick silicone bead will suffice, is a common mistake. Experts recommend combining multiple waterproof layers and performing thorough pressure tests before finishing. Incorporating these nuanced practices can transform a good-looking renovation into a long-lasting investment. In conclusion, the secret to success lies in paying attention to the details most overlook—sound substrate preparation, precise transitions, and multi-layer waterproofing—and resisting the temptation to cut corners. By mastering these hidden nuances, you can avoid the typical pitfalls and ensure your home stays beautiful and functional for years to come.
Invest in Precision Tools for Durable Results
One of my top recommendations is upgrading your measuring and layout tools. A high-quality laser level, such as the Bosch GLL3-330C, ensures perfectly aligned tiles and baseboards, reducing rework and uneven seams. I personally rely on this model because its accuracy and ease of use save me hours during large projects, and it minimizes costly mistakes. Pair this with a quality digital caliper to measure tight tolerances—precision here prevents issues like tile telegraphing or grout line gaps. Durable flooring installation hinges on such meticulous measurement practices, especially when working with materials that have minimal margin for error.
Master the Waterproofing Continuity
Maintaining the integrity of your waterproofing system over time is critical, especially in showers or wet areas. A tool I always keep handy is a moisture meter like the Flir MR77, designed for professionals to detect behind walls without invasive drilling. This device confirms that membrane layers are intact and that there are no hidden penetrations or punctures that could develop into leaks. Regularly testing with a moisture meter allows you to catch issues early and perform targeted repairs. Remember, as outlined in expert waterproofing strategies, multiple layers and thorough pressure testing—such as applying a dry, pressurized air test—are the gold standard for long-term leak prevention.
The Hidden Pitfalls I Fell For During My First Shower Seal
One of the most valuable lessons I learned is that a quick fix can often lead to long-term headaches. I once applied sealant without thoroughly inspecting the underlying surfaces, thinking that surface-level sealing would suffice. Months later, I faced leaks that took me ages to diagnose and fix, proving that attention to detail upfront saves time and money in the end.
Why Relying on Surface Repairs Can Be a Trap
I’ve discovered that minor cracks or gaps beneath the surface often serve as the real culprits for leaks. Overlooking these hidden issues is a rookie mistake. Now, I always invest in comprehensive inspection and multi-layer waterproofing strategies, which I detailed in our guide on waterproofing repairs, to ensure durability.
How a Simple Checklist Transformed My Approach
Creating a detailed checklist—including inspecting valve seals, base edges, and behind panels—revolutionized my sealing process. It helped me catch small issues before they became costly leaks. I encourage every homeowner to adopt a systematic approach, as shared in our comprehensive installation guide, for better results.
Investing in Quality Tools Made a Difference
High-quality silicone applicators, moisture meters, and pressure testers are game-changers. They enable precise application and early leak detection. Personally, I rely on tools like the moisture meter to ensure my waterproofing is intact and lasting. Proper tools save stress and prevent future repairs.
Enjoy Peace of Mind With Ongoing Maintenance
The hardest-earned wisdom is that sealing isn’t a one-time task. Regular inspections, proactive cleanup, and timely resealing are essential for lasting peace of mind. In my experience, setting a quarterly reminder to check seals prevented potential disasters, as explained in our maintenance tips on maintenance routines. Embrace a mindset of vigilance, and your shower will serve you well for years to come.