I remember the first time I installed vinyl planks in my living room, excited to finally achieve that sleek, modern look. But within months, I noticed gaps forming, uneven surfaces, and the whole floor feeling less sturdy than I imagined. Turns out, a few simple mistakes with my underlayment setup had set the stage for disaster. That lightbulb moment made me realize just how critical proper underlayment preparation is for a flawless vinyl plank installation.
Why Skipping Details Can Cost You Big in 2026
Proper underlayment isn’t just a minor step; it’s the foundation of your entire flooring project. If you get this wrong, you’re risking everything from uneven floors to costly repairs down the line. And with the advancements in vinyl flooring technology, the stakes are higher—mistakes made today could compromise your warranty or the durability of your floor in just a few years. According to flooring expert sources, poor underlayment preparation can lead to issues like squeaks, bubbles, and even premature aging of your flooring. So, why does this happen, and what are the pitfalls to avoid?
Is Underlayment Less Important Than It Seems?
Initially, I thought underlayment was just a cushioning layer—something nice to have, not a need-to-have. But I learned the hard way that overlooking this step or rushing through it can be disastrous. I once skipped checking the subfloor level, assuming it was fine. Big mistake. The uneven surface caused my vinyl planks to buckle and pop up in certain areas. If you’re unsure about your current setup or nervous about making costly errors, you’re not alone. Many DIYers and even professionals have faced these frustrations.
Have you ever installed flooring and faced unexpected problems that just wouldn’t go away? You’re certainly not the only one. Understanding the common mistakes and how to avoid them can save you time, money, and a lot of headaches. In the following sections, I’ll guide you through the most frequent underlayment pitfalls and how to sidestep them, so your 2026 vinyl plank project turns out just as beautiful and durable as you envision. Ready to dive in?
Secure the Subfloor with Precision
Start by removing any debris, dirt, or old adhesive from the subfloor using a vacuum and a damp cloth. Ensure the surface is completely dry before proceeding. Use a level to identify any dips or high spots; these imperfections can cause uneven vinyl planks and should be addressed immediately. For minor dips, a concrete patch or leveling compound will do; for high spots, rent a sander or a grinder. I once skipped this step and ended up with a wavy floor that had to be reinstalled — a mistake I won’t repeat. Ensuring a flat and clean surface provides a solid foundation, preventing future buckling or gaps.
Lay a Vapor Barrier for Moisture Control
Next, roll out a high-quality vapor barrier compatible with vinyl flooring. Overlap seams by at least 8 inches and seal them with manufacturer’s recommended tape. This layer prevents moisture from seeping through and reacting with the adhesive or planks, which can cause warping or mold in the future. When I installed my own flooring, I used a polyethylene sheet and taped every seam — a small extra step that protected my investment and extended the lifespan of my floor significantly. Proper vapor barriers are your first line of defense, especially in basements or ground-level rooms.
Choose the Right Underlayment Material
Select an underlayment suitable for your specific vinyl plank type and room conditions. Options include foam, cork, or rubber underlayments, each offering different benefits like sound absorption or extra cushioning. For a living room renovation, I opted for a dense foam pad, which offered both comfort and stability. Remember that thinner isn’t always better — thicker underlayments can hide subfloor imperfections but might raise your floor height more than desired. Consider your door clearances and transition thresholds to avoid unexpected gaps later on.
Ensure Proper Seam Alignment and Smoothing
Unroll the underlayment across the entire prepared area, carefully aligning edges to prevent overlaps or gaps. Use a straightedge or ruler to keep the underlayment straight, matching the direction of the vinyl planks for ease of installation. Secure loose edges with tape to prevent shifting. When I laid out my underlayment for the family room, I spent extra time smoothing out wrinkles and ensuring a tight fit — this small diligence paid off with a smooth, professional-looking finish. Taking your time here ensures your vinyl planks will sit evenly and comfortably, reducing noise and preventing movement.
Seal and Protect Before Flooring Goes Down
Finally, inspect the underlayment for any exposed seams or tears. Seal or tape these areas thoroughly to prevent moisture infiltration or shifting during installation. Be cautious around doorways and corners, where gaps are most likely. For added protection, especially in humid areas like bathrooms, consider a moisture-resistant underlayment designed specifically for such environments. I had a mishap where I didn’t seal a seam properly, resulting in a slight ripple in the floor — a mistake I fixed quickly with extra tape. Proper sealing ensures your underlayment remains effective over the years, maintaining a level, durable surface for your vinyl planks.
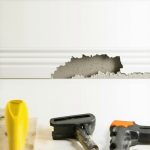
Even seasoned DIY enthusiasts often overlook the subtle nuances that distinguish a professional finish from an amateurish job. While most recognize the basics—like measuring twice or choosing quality materials—the real expertise lies in understanding advanced details and common pitfalls. For example, many believe that installing new baseboards is simply about mitering corners perfectly; however, without considering wall imperfections or slight unevenness, gaps will appear over time. A pro knows to scribe and customize cuts to match wall irregularities, ensuring seamless transitions and a polished look. Additionally, a widespread myth is that thicker grout lines in showers equate to better sealing, but in reality, excess grout can trap moisture, leading to mold and degradation. Proper waterproofing and precise installation prevent these issues. When it comes to flooring, especially with complex patterns or multi-layered setups, paying attention to subfloor stability and expansion gaps is critical—neglecting these can cause buckling or cracks later, a mistake I’ve seen cost homeowners thousands. Certified experts also avoid shortcuts like insufficient moisture barriers or rushing adhesive cures, which compromise durability. Flooring and carpet installation share common pitfalls, such as failing to acclimate materials or ignoring room humidity levels, which may lead to gaps, buckles, or frayed edges after a few months. The key is to understand the underlying science—how temperature fluctuations, humidity, and material properties interact—and adjust accordingly. Advanced installers even use scribing tools for baseboards to adapt to uneven walls, ensuring a flawless finish. Navigating these nuances enhances not only the aesthetics but also the lifespan of your upgrades. Have you ever fallen into this trap? Let me know in the comments. For more tips on elevating your home projects, check out the latest trends on baseboard styles or expert tips for durable flooring installation. Properly addressing these hidden details makes all the difference in achieving a professional result that lasts.Maintaining your home upgrades requires more than just initial effort; it demands the right tools and a strategic approach. Over the years, I’ve found that using specialized equipment can greatly extend the life of your baseboards, showers, flooring, and carpets. For instance, a **cosmetic scribing tool** helps adapt moldings to uneven walls, ensuring a seamless finish. I personally rely on a multi-function oscillating tool equipped with a carbide blade for trimming baseboards to fit irregular surfaces, which is faster and more precise than traditional saws.
Investing in a **high-quality moisture meter** allows me to monitor humidity levels, preventing issues like warping or mold, especially in bathrooms and basements. I reference the reputable **Wagner Meters** models, which offer accurate readings essential for deciding when conditions are ideal for sealing or installing sensitive materials.
For maintaining showers and preventing leaks, I recommend a **digital slope level**. This device helps ensure proper drainage slopes during installation, reducing puddles and water damage over time. I’ve found that even slight adjustments using this level can save extensive repairs later—something discussed in detail at this resource.
Tools should be complemented with efficient software solutions. I use **project management apps** like Trello or Asana to keep track of maintenance schedules and upcoming upgrades. Setting reminders for routine checks—like inspecting grout lines or sealing baseboards—helps avoid neglect that leads to bigger issues.
Looking ahead, the trend is moving toward **smart home integration**. Imagine moisture sensors linked with your smart system, alerting you to slow leaks before they cause damage. This proactive approach not only preserves your investments but also enhances home safety.
How do I maintain my installations over time? Regular inspection is key. For flooring, I typically revisit the subfloor and underlayment every couple of years using a **sturdy pry bar** to check for signs of movement or deterioration. For carpets, weekly vacuuming combined with professional steam cleaning prolongs their lifespan. Shower seals benefit from bi-annual resealing with high-quality silicone to prevent water infiltration.
One advanced technique I highly recommend: during baseboard installation, employ a **pro scribing tool** to adapt moldings precisely to wall imperfections. This small investment in tools can dramatically improve the aesthetic and durability of your finishes, saving time and money in the long run. Curious to see how this works? Check out this guide for detailed steps.
By combining the right equipment with a scheduled maintenance routine, you can enjoy the benefits of your home improvements for years to come. Don’t wait for problems to arise—embrace these tools and techniques today to keep everything functioning smoothly. Remember, the key to enduring results lies in proactive care and continuous learning.
Three Lessons I Wish I Could Tell My Past Self About Baseboards and Floors
One of the toughest lessons I learned was the importance of patience when scribing baseboards to uneven walls; trying to rush this simple step only led to gaps and a lackluster finish. Secondly, I underestimated how crucial proper acclimation of vinyl planks before installation is—skipping this caused buckling in future temperature swings. Lastly, I discovered that investing in quality tools like a pro scribing tool or a moisture meter can drastically reduce errors and rework, saving both time and money in the long run.
Tools That Elevated My Home Renovation Routine
For achieving professional results, I rely on a few key resources. The latest baseboard styles guide inspired me to choose trendy, durable designs. My go-to tool is the multi-function scribing tool—it ensures a perfect fit even on irregular walls. A reliable moisture meter helps me monitor humidity, preventing future issues like warping or mold. Combining these with detailed tutorials from trusted sources has made all the difference in my projects.
Keep Moving Forward While Embracing Home Transformation
The journey of home improvement is deeply rewarding when approached with patience, proper planning, and the right tools. Don’t hesitate to experiment, make mistakes, and seek out expert advice—each project is a stepping stone toward creating a space you love. Remember, addressing subtle details like sealing underlayment seams or scribing baseboards might seem minor but are the secret ingredients in a long-lasting, beautiful finish. Take that first step today, and your future self will thank you for the home’s transformation you initiated. What’s the next home project you’re excited to tackle? Share your plans below and let’s inspire each other to make dream spaces a reality.