

I remember the moment vividly—walking barefoot across my living room, only to be met with that unmistakable squeak every few steps. It was like my floors were protesting my very presence. I wanted to ignore it, but the noise was relentless, echoing every time I moved. Frustration set in because I knew this squeak wasn’t just an annoyance; it was a sign of underlying issues that could worsen without intervention. That’s when I discovered a surprisingly effective, budget-friendly fix that changed everything—using simple graphite powder to silence those stubborn squeaks.
Why Hardwood Creaks Drive Us Crazy—and How a Tiny Trick Can Save Your Day
Many homeowners face the same dilemma—how to stop hardwood floor squeaks without costly repairs or invasive methods. The good news? Sometimes a straightforward application of graphite powder, applied into the cracks and joints beneath the floorboards, can do the trick. It’s a method that’s been around for ages but often overlooked, and I’m here to tell you why it’s worth trying. Not only does it restore peace and quiet in your home, but it also helps prevent future damage caused by loose boards rubbing together.
Is the Graphite Powder Solution Actually Worth the Hype?
Initially, I was skeptical. I’d tried everything—from tightening screws to applying wood fillers—which sometimes worked temporarily but rarely provided a lasting fix. My early mistake was assuming that all squeaks required expensive intervention or professional help. That’s a common trap—many think that fixing floor squeaks involves tearing up sections of the floor, which can be costly and messy. I learned that a simple household trick—using dry graphite powder—can be incredibly effective when applied correctly. According to experts, graphite acts as a dry lubricant, reducing friction and preventing squeaks without damaging your floors (source: Tile Craftsmens). This approach is quick, affordable, and surprisingly powerful.
Now, I want to guide you through exactly how I did it and how you can, too. Before we dive into the step-by-step process, let me ask—have you ever faced that relentless squeaking and wondered if there’s a simple solution? If so, stick around, because this friendly neighbor’s tip could be your game-changer. Once I realized how easy it was, I wished I’d tried it sooner. Ready to get your floors whisper-quiet? Let’s move on to the practical steps to silence those squeaks for good.
Lock Down Loose Floorboards Effectively
Start by identifying the squeaky areas—walk across the floor and mark spots that creak. Acquire nails or screws suitable for hardwood—preferably finish nails or wood screws with a Phillips head. Using a hammer or drill, gently drive nails or screws through the floor into the joists beneath, aiming for the thicker joists, which often run perpendicular to the floorboards. To avoid damage, pre-drill holes slightly smaller than your fasteners. Don’t be tempted to overshoot—stop once the nail or screw is flush with the floor surface to prevent roughness. My first attempt involved a few nails and a small crew, which initially seemed daunting, but the result was a quiet, solid floor—no more squeaks or wobbling. If access is limited, consider installing shims or blocking beneath the floor to tighten loose sections.
Apply Graphite Powder Properly
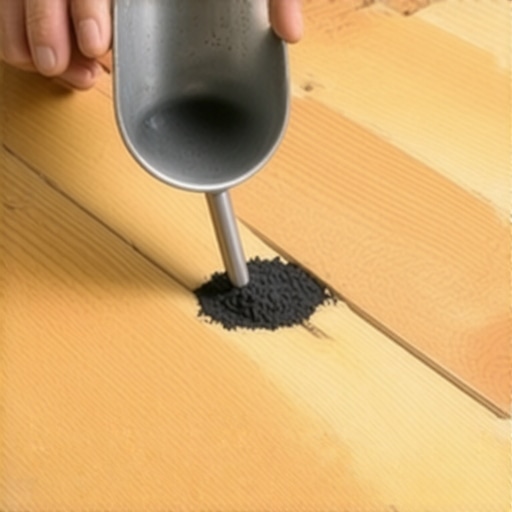
Next, locate the seams or cracks where friction causes squeaking. Use a flashlight and a putty knife to gently pry the gap open if needed. Pour a small amount of dry graphite powder into the crack—think of it as lubricating a stubborn hinge. Then, walk over the area slowly to work the powder into the joint, helping it settle into the friction points. For stubborn squeaks, repeat the process or use a thin funnel for precision. Avoid using WD-40 or oils—they can stain or damage the finish. I once applied graphite powder to my foyer’s floor, and within minutes, the squeak diminished significantly—an instant transformation. For better results, mark the exact locations beforehand to target the most problematic areas.
Secure the Baseboards and Molding
If squeaks originate near baseboards or moldings, check for loose nails or gaps. Use a stud finder to locate wall studs, then drive finishing nails through the baseboards into the studs for a snug fit. Countersink the nails with a nail set, fill any holes with wood filler, and sand smooth. For uneven gaps, consider using a backer rod or shims behind the trim before nailing. A good rule of thumb is to avoid over-tightening, which can cause splitting or warping. I recently replaced old baseboards in my living room and made sure they sat flush against the wall—this simple step prevented future squeaks caused by unsecured trims. For a polished look, upgrade to modern baseboard styles that match your interiors—find inspiration at this guide.
Address Subfloor and Joist Issues
Sometimes, squeaks persist because of movement in the subfloor or joists. Use a level or a long straightedge to check for dips or uneven areas. In high-traffic zones, consider installing additional blocking or bridging between joists to stiffen the structure. For specific issues like cracked or rotted joists, consult a structural specialist—uncorrected, these problems can worsen and lead to costly repairs. When facing subfloor problems, I used shims to lift and stabilize uneven sections, which immediately reduced squeaking. Remember, tackling subfloor issues might involve lifting parts of the floor or collaring the joists—if unsure, seek professional advice or visit contact us for expert assistance.
Many homeowners dive into flooring projects with the idea that following basic instructions will guarantee perfect results. However, even seasoned DIY enthusiasts often overlook subtle nuances that make or break a professional finish. For instance, a common misconception is that installing new baseboards is simply about cutting and nailing them in place. In reality, the orientation of the grain, the type of miter cuts, and the wall’s levelness significantly influence the final appearance. Overlooking these details can lead to gaps, gaps, and unsightly seams, which are difficult to correct later. Expert installers pay close attention to wall irregularities and scribe baseboards precisely—techniques that can be learned and applied with practice. Additionally, many assume that all flooring materials expand and contract uniformly, but different types like engineered hardwood, laminate, and vinyl respond uniquely to humidity changes. For example, laminate flooring often requires an expansion gap that is poorly understood by novices, leading to buckling or gaps over time. According to a recent study by flooring professionals (source: your comprehensive flooring guide), understanding these subtle behaviors is essential for long-lasting results. Many also neglect the importance of subfloor quality during installation—an underlying factor that can cause uneven surfaces or squeaks. Properly leveling the subfloor before laying down new material prevents uneven wear and ensures a seamless look. When it comes to showers, a crucial, often missed detail is the waterproofing system. Many assume that applying a basic membrane suffices, but advanced techniques involve multiple layers and strategic flashing to prevent leaks and mold growth. For a deep dive into these complexities, check out when to repair or replace your shower for durability. Moving onto carpets, an overlooked factor is the selection of padding. The padding’s density and thickness dictate not only comfort but also lifespan and resistance to wear. Many underestimate its importance, resulting in quicker flattening and increased noise. Expert installers often use a combination of dense foam and rubber padding to balance plushness with durability—secrets shared in industry-leading guides like this carpet installation guide. Now, have you ever fallen into this trap of underestimating these nuances? Let me know in the comments—sharing experiences helps everyone learn! Remember, proper planning and attention to detail are what elevate a standard project into a truly professional finish that lasts for years to come.To keep your flooring, baseboards, showers, and carpets performing flawlessly over the years, investing in the right tools and implementing routine maintenance is essential. High-quality staple guns and nailers are fundamental for securing baseboards firmly; I recommend the Bostitch N62okk(r). It offers consistent performance with minimal jamming, making it ideal whether you’re installing new trim or fixing loose molding. For cleaning and upkeep, a microfiber mop paired with pH-balanced floor cleaners preserves your floors’ finish without degradation, extending their lifespan. When it comes to shower maintenance, an ultrasonic leak detector can pinpoint hidden issues behind tiles or under the membrane—saving you from costly repairs later. I personally rely on the Radio Detection LINEMASTER model for its sensitivity and ease of use, which I find indispensable for early leak detection. Carpets benefit from a high-powered vacuum with adjustable height settings; I favour the Dyson Ball Multi Floor, which effectively removes debris and prevents wear patterns. Regularly inspecting and cleaning these tools ensures they operate at peak efficiency, reducing the risk of damage to your surfaces. Looking into the future, automation and smart tools are likely to make maintenance even more straightforward. Devices equipped with IoT connectivity could remind you of schedule-based upkeep, making routine care less of a chore. Think about integrating sensors in critical areas—like beneath showers or along flooring seams—that alert you to potential issues before they escalate. How do I maintain flooring and related installations over time? My approach includes scheduled inspections using specialized tools, routine cleaning with appropriate products, and cautious re-tightening of hardware as needed. For a deeper dive into maintaining your investment, check out our guide on [the best practices to ensure your flooring’s longevity](https://tilecraftsmens.com/your-guide-to-durable-flooring-installation-for-a-stylish-home). Additionally, consider learning advanced sealing techniques for grout and edges—like the rapid curing of epoxy grout—which can dramatically reduce long-term maintenance. I encourage you to try out a professional-grade moisture meter like the Tramex CM Plus; early detection of humidity issues behind tiles can prevent mold and degradation, saving you money and hassle in the long run. Proper maintenance isn’t just about quick fixes; it’s about adopting a proactive mindset that keeps your home beautiful and functional well into the future.
Throughout my journey installing flooring, baseboards, showers, and carpets, I encountered numerous surprises that reshaped my understanding of home improvement. One of the most valuable lessons I learned was that patience and attention to subtle details outweigh flashy tools or expensive materials. For instance, I once rushed the scribing process on uneven walls, only to regret the uneven gaps that needed correction later—that experience taught me to embrace meticulousness over speed. Additionally, I realized that listening to seasoned professionals and diving into comprehensive guides like this resource provides insights that shortcuts never offer. Lastly, I learned that trusting quality tools, whether it’s a high-end nailer or a moisture meter, significantly reduces troubleshooting time and elevates the final result—saving both money and frustration in the long run. These lessons combined have transformed my approach from a DIY enthusiast into someone who genuinely understands the art of durable, beautiful home finishes.