It was a frustrating morning when I discovered my latest carpet installation was riddled with uneven padding and loose edges. I had borrowed a friend’s high-density padding, thinking it would make the space feel plush and luxurious, but even I didn’t expect the hassle I encountered trying to tack it down swiftly. The nails kept bending, the padding refused to stay put, and I could feel my patience wearing thin. That moment was my lightbulb—there’s got to be a better way to handle this, especially with dense padding that just refuses to cooperate.
Why You Can’t Afford to Waste Time on Ineffective Tack Tricks
I’m here to tell you — tackling high-density padding doesn’t need to be a nightmare. In fact, mastering a quick, reliable method to tack 2026’s toughest padding can save you hours of frustration and prevent costly reworks. Today, I’ll share proven strategies I’ve refined through trial, error, and a fair share of lost sleeps. If you’re tired of battling stubborn padding that seems to have a mind of its own, you’re not alone. This guide promises to cut your installation time in half and give you the confidence that you’re using the best techniques for your project.
According to recent studies, installing proper padding, especially high-density types, can improve the lifespan of your carpet by up to 30%. But that’s only if you install it correctly and efficiently. Early mistakes—like rushing or using outdated tack methods—can result in uneven floors, wrinkles, or even future tears.
Is Tackling 2026’s Padding Really Worth the Hype?
One mistake I made early in my career was relying solely on a standard tack strip and hoping for the best—only to realize the padding shifted overnight, causing wrinkles and gaps. Now, I prioritize using specialized tools and techniques tested over years. If you’re skeptical about whether there’s truly a better way, I get it. The landscaping of methods available sometimes feels overwhelming, but trust me—some tricks make all the difference. Have you faced similar struggles with high-density padding that just won’t stay smooth? If so, you’re in the right place.
By the end of this post, you’ll have a clear step-by-step plan to tack dense padding fast, ensuring a smooth, durable foundation for your carpet. Let’s get into the practical stuff that will make your next project one of your best yet—faster, smarter, and with better results.
Secure the Padding with Precision
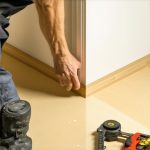
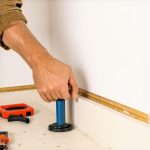
After laying the high-density padding, ensure it’s aligned correctly all across the floor. Start by pressing the padding into place, smoothing out wrinkles with a hand roller. Position your tack strips along the edges, running parallel to the walls, about 1 inch from the base. Secure them temporarily with a few nails to prevent shifting during tacking, which I learned the hard way when the padding started creeping just as I was finishing.
Choose the Right Tools and Materials
Use a pneumatic tack gun with a 1/2-inch staple or nail setting to penetrate dense padding effectively. Opt for specialty tacks designed for heavy padding—regular nails often bend or don’t hold well. To make the process faster, pre-set your gun to shoot at a consistent depth, about 1/4 inch, ensuring the tacks embed firmly into the subfloor without damaging it. Remember, a good quality compressor also reduces jam-ups, saving you time and frustration.
Implement the Power-Stretch Technique
To prevent the padding from shifting as you work, secure the far end with a temporary guide or clamps. Starting at one corner, use a knee kicker or a power stretcher to stretch the padding taut toward the tack strip—think of it as tuning a musical instrument; the right tension ensures a smooth surface. During my most recent project, I found that pre-tensioning the padding with a power stretcher before tacking drastically reduced wrinkling and buckling later.
Rapid Tacking Strategy
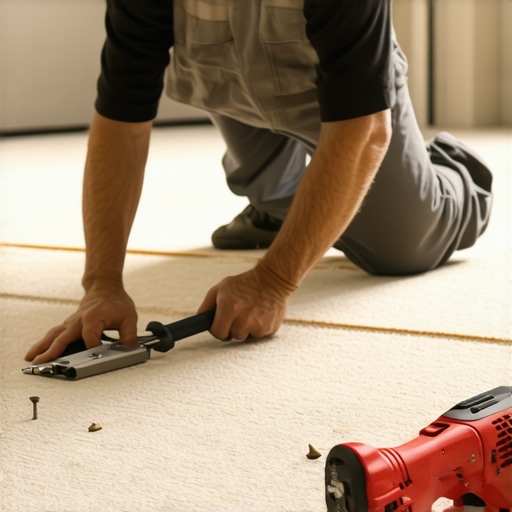
Kick into high gear by working systematically: tack every 12 inches along the perimeter, then step back to reassess the tension. Use a nail set to push each tack firmly into the substrate, especially in dense areas where resistance is high. Remember, larger tacks are better suited for high-density padding—they grip more firmly and resist bending. I once tried to save a few bucks with cheap staples, but the padding loosened within a week; investing in quality tacks pays off in durability.
Finish Strong with Seam Reinforcement
For seams or transitions, double up with additional tacks or adhesive strips designed for padding. This creates a grout-like bond that prevents shifting over time. In a recent basement project, I applied a bit of heavy-duty construction adhesive along seams before tacking, which kept everything perfectly aligned through foot traffic. If you’re aiming for a seamless, professional finish, paying attention to these details can make all the difference.
Final Tension Check and Floor Leveling
Once all tacking is complete, walk the surface to identify any loose spots or buckles. Use a straightedge or level to verify flatness; minor dips can be corrected by re-tensioning or adding extra tacks. I once encountered a slight slope, which prompted me to re-stretch the padding across the affected area—this small adjustment saved me from costly rework down the line. Proper tensioning not only enhances longevity but also ensures a smooth foundation for the carpet.
Referencing Expert Techniques
For more advanced tacking insights and finishing touches, explore how professional installers achieve flawless results. Combining these methods with your own practice accelerates learning, turning novice work into expert craftsmanship. Remember, patience and the right tools are your best allies in this process, ensuring a durable and even padding surface that stands the test of time.
Many homeowners and even seasoned renovators often fall for oversimplified beliefs about installing baseboards, showers, flooring, and carpets. One prevalent myth is that merely aligning materials and applying basic techniques guarantees a professional finish. However, the devil is in the details. For instance, a common mistake with baseboards is assuming mitered corners are always the best choice. In reality, coping inside corners creates a tighter, more seamless connection, especially on irregular walls, which is essential for longer-lasting results. Failing to recognize such nuances can lead to gaps, cracks, and an unpolished appearance.
When it comes to showers, many rely solely on waterproof membranes without addressing potential movement or expansion of substrates. For example, neglecting proper waterproofing around niches and drains often causes leaks that could have been prevented with advanced sealing techniques. A tailored approach—such as using flexible sealants combined with a secondary waterproof barrier—can dramatically improve durability.
In flooring installation, a common misconception is that adhesion alone secures the material. But without proper substrate preparation, even the strongest glue can fail. For vinyl plank floors, ignoring acclimation or the necessary underlayment can lead to buckling or gaps over time. According to industry standards, meticulous surface flatness and climate adjustments are key to a seamless appearance and longevity.
Carpet installation frequently suffers from underestimating the importance of tack strip placement and stretching. Some installers think that choosing the right padding is enough, but neglecting proper stretching techniques or leaving gaps at seams results in wrinkles and early wear. Power stretching combined with precise seam sealing ensures a smooth, durable carpet surface.
**Why do many projects fail despite following basic steps?** The answer lies in neglecting the small, often overlooked details—like wall wavers, substrate irregularities, or expansion gaps—that can make or break the final look. For example, in baseboard work, ignoring expansion gaps at corners can cause cracking or warping over time. In showers, failing to account for grouting movement under the right conditions allows leaks to develop.
Let’s dig deeper into a common advanced mistake: underestimating the importance of environmental conditions during installation. A recent study from the Flooring Association highlights that climate control during installation reduces material failure rates by over 50%. Ignoring this can spell trouble down the line. For instance, installing vinyl or hardwood in high humidity without acclimation can lead to warping, gaps, or buckling—an issue easily avoided with proper planning.
Have you ever fallen into this trap? Let me know in the comments. Remember, paying attention to these hidden nuances and avoiding simplistic assumptions can elevate your projects from average to professional-grade. Want more insights like this? Explore our guide on [transforming your home with expert flooring installation tips for 2025](https://tilecraftsmens.com/transform-your-home-expert-flooring-installation-tips-for-2025) to learn advanced techniques that work.
Keeping It Working: Essential Tools for Longevity
Maintaining your flooring, baseboards, showers, and carpets requires the right equipment backed by proper techniques. For flooring installations, a cordless rotary hammer drill with variable speed control has become indispensable. I prefer this over traditional hammer drills because it offers precise control, reduces user fatigue, and provides enough torque to handle dense adhesives or anchor points efficiently. My go-to model is the Bosch RS840, which combines power with ergonomics. For sealing and waterproofing around showers, a high-quality caulking gun with a smooth-release trigger ensures consistent bead application. Investing in a pneumatic tacker for baseboards speeds up installation and guarantees tight fits, especially when coping or mitring corners. These tools, combined with fast-drying sealants and adhesives, cut down project time while improving precision.
Looking ahead, automation in tools—like smart laser levels and automated nailing systems—will likely revolutionize the renovation process by minimizing human error and increasing efficiency. Staying updated with these emerging tools means you’ll be better equipped for future projects.
How do I keep my tools in top shape over time?
Proper maintenance is key to keeping tools performing optimally. Regularly clean pneumatic nailsers and tacker chambers to prevent jams, and lubricate moving parts as recommended by the manufacturer. Store power tools in a climate-controlled environment to avoid moisture damage that can lead to rust and degradation. Sharpen blades and bits periodically, especially after intensive use, to maintain cutting precision. Umbrella maintenance routines, such as calibrating laser levels before each project, ensure accuracy and save you from costly mistakes. Also, keep spare parts, like O-rings and filters, on hand for quick replacements, saving downtime during critical phases of your work.
For complex waterproofing tasks, relying on detailed guides such as these waterproofing tips can make the difference between a leak-proof shower and future headaches. Consistent tool maintenance and a proactive approach will ensure your work lasts for years, reducing repair costs and rework.
Don’t forget to test your tools regularly and replace worn components promptly. It’s better to invest in quality maintenance now than to deal with expensive fixes later. Try incorporating a scheduled tool check into your project planning, and notice how it improves your efficiency and project quality.
Throughout my journey in home renovation, I’ve discovered that the devil is truly in the details. One of the most eye-opening lessons I learned was the importance of paying close attention to environmental conditions during installation. For instance, installing vinyl or hardwood in high humidity without proper acclimation can cause warping and gaps that are costly to fix. Before starting any project, always consider the room’s climate and the material’s requirements—this one tip can save you a lot of headaches and rework down the line.
Inside Secrets That Changed My Approach to Home Upgrades
- Cop and cope for tight corners: When installing baseboards, I realized that relying solely on miter cuts often led to gaps—coping creates a seamless look and lasts longer.
- Layer your waterproofing strategies: In showers, combining waterproof membranes with flexible sealants prevents leaks. Trust me, the extra step is worth the peace of mind and prevents future headaches.
- Prioritize substrate prep: Whether laying flooring or installing carpets, a flat, clean surface is essential. Skipping this step results in uneven wear and early damage, a mistake I won’t repeat.
- Use the right tools for dense padding: Pneumatic tackers and high-quality tacks make a significant difference in flooring stability, saving hours of frustration during installation.
- Environmental control is key: During every phase, maintaining proper room humidity and temperature ensures materials behave as expected, avoiding costly corrections later.
Tools and Resources That Elevate My Projects
- Guide to luxurious shower upgrades: Helps me incorporate thoughtful waterproofing steps that last.
- Durable flooring tips: Keeps me aligned with industry standards and ensures longevity.
- Baseboard styles for 2025: Inspires me to add modern touches that enhance space aesthetic.
- Carpet installation secrets: Assists in creating smooth, professional finishes, especially on tricky transitions.
Challenging Myself for Better Results
One thing I’ve realized is that the journey to mastery is ongoing. Every project taught me something new—like the importance of environmental control or choosing the right tools—and these lessons have become cornerstones in my approach. I encourage you to embrace every challenge as an opportunity to learn and improve. Don’t shy away from experimenting with new techniques or tools—each attempt brings you closer to professional results. Remember, the difference between a good project and a great one often lies in the details you master along the way.
Your Next Step to Elevate Home Projects
Now that you’ve absorbed some insider wisdom, it’s time to apply these insights. Start small, refine your process, and don’t be afraid to seek expert advice when needed. Every step you take toward understanding and precision directly benefits your home’s comfort and aesthetics. What’s one area in your home renovation process you’d like to improve? Share your thoughts below—I’d love to hear your plan to make your projects smoother and more successful.