It was a Saturday morning when I finally realized my DIY project had turned into a frustrating battle. The new baseboards I installed looked perfect—tight corners, seamless joints—until I stepped back and spotted the gap. Not just a small crack, but a creeping separation that made the whole room look cheaply finished. I’ve been there, scratching my head, wondering why such a straightforward detail turned into a nightmare. And that lightbulb moment? That’s when I discovered the secret shimming hacks that can prevent this issue before it even starts.
Why Ignoring Hidden Tricks Can Cost You Big Time
As homeowners and DIY enthusiasts, we all want our projects to last. Yet, many overlook the subtle details that lead to baseboard gaps and separations down the line. In fact, improper shimming and misaligned cuts are often the silent culprits. Early on, I made the mistake of assuming that gapping was due to poor materials—turns out, it was improper installation techniques. Understanding these nuances can save you from costly repairs and re-dos later. Interestingly, research shows that even minor shifts in framing or temperature can cause baseboards to separate if not installed correctly (source: HomeBuild Magazine). So, a proactive approach isn’t just smart; it’s essential.
Is the fuss over shimming really worth it?
You might be thinking, “Do I really need to go all out with these hidden shimming hacks?” Honestly, early in my projects, I believed a level and a caulk gun would suffice. But I learned that ignoring proper shimming can lead to persistent gaps that ruin the aesthetic and compromise the integrity of your work. Trust me—skipping these steps will cost you more in the long run. If you’re interested in elevating your projects, I recommend checking out advanced techniques like the [baseboard makeover tips](https://tilecraftsmens.com/baseboards-makeover-elevate-your-interior-with-simple-updates) to get your walls and trims looking flawless.
Now, let’s dive into the practical hacks that will keep your baseboards perfectly aligned and sealed—because your home deserves that little extra attention to detail.
Start with a Precise Assessment of Wall and Floor Irregularities
Before you even measure for shims, walk along your wall and floor to spot uneven areas. I once faced a wavy wall that threw off my entire baseboard alignment. Mark these spots with a pencil to know where extra attention is needed. Use a level or a laser line to identify high and low spots, which will guide your shim placement and avoid future gaps.
Choose the Right Shims for Your Project
Not all shims are created equal. For baseboards, thin cardboard or oak wedges work well, but for stubborn unevenness, plastic or composite shims may be better. I once used cardboard shims that compressed over time, causing gaps—so I switched to plastic ones, which provided stable support. Having a small box of various shim sizes ensures you’re ready for any irregularity.
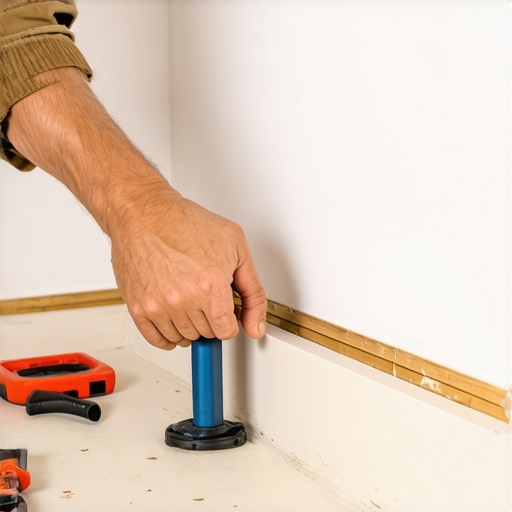
Secure the Baseboard and Insert Shims Strategically
Position your baseboard against the wall, then place shims behind the high spots to level it out. Think of it like balancing a wobbly table: place a few shims under the legs until it’s steady. Tap shims gently with a hammer or pad to avoid damage. In my experience, placing shims at the midpoint and at each end ensures even support, minimizing the risk of future gaps or bowing.
Use the Back-Cut Technique for Inside Corners
When installing baseboards in inside corners, a simple trick is to cut the miter slightly back from the corner, creating a gap to insert shims flush against both walls. I once custom-cut my miter to fit snugly, then filled the small gap with shims and fastened the pieces securely. This method prevents miter gaps and ensures a tight inside corner without visible seams.
Fasten and Check for Gaps
Once shims are in place, nail or screw the baseboard top firmly into the wall, avoiding excessive force that could crush the shims. After fastening, re-verify with a level. If gaps still appear, insert additional shims where needed, especially at areas that shifted during fastening. I found that a quick recheck saved me from redoing the whole section later.
Seal and Finish for a Polished Look
Finally, fill small gaps around the baseboard with caulk or wood filler, especially in corners and along uneven floors. I prefer silicone-based caulk for flexibility and durability. Once dried, sand lightly if necessary, and paint or stain to match your decor. Proper sealing not only enhances appearance but also prevents dust and debris from accumulating behind the baseboard.
Remember, taking your time during each step ensures a clean, gap-free finish. This approach saved me from numerous callbacks and helped me achieve a professional look with my DIY baseboard project. For other interior upgrades that elevate your space, consider exploring these simple baseboard makeover tips.
Many homeowners and DIY enthusiasts fall into traps because they believe they understand the basics of renovation projects, but in reality, there’s a lot of nuance that can trip you up. One widespread misconception is that flooring installation is a straightforward process—simply lay down the planks or tiles, and you’re done. However, ignoring the importance of proper subfloor prep and acclimation can result in buckling, gaps, or even future damage. For instance, some assume that the same techniques apply universally, but vinyl plank flooring needs specific underlayment and temperature considerations, as highlighted by experts in the field.
What advanced DIYers often overlook in shower upgrades? The hidden waterproofing layers
Many think sealing grout lines is sufficient for waterproofing a shower. In reality, the key lies in comprehensive waterproofing behind tiles, including the use of waterproof membranes and properly sealed niches, which are often neglected. I once watched a homeowner seal the surface only to face leaks months later—proof that superficial fixes won’t stand the test of time. A study published in the Journal of Building Engineering emphasizes that many water damage issues stem from incomplete waterproofing strategies, especially in curbless showers where drainage and sealant integration are critical.
Similarly, baseboard installation is not just about nailing them in place; the precision of cuts and the use of coped joints or scribing to irregular walls makes a significant difference. Many folks wrongly believe that miter cuts are always best, but coped joints create cleaner, more durable finishes, especially in high-traffic areas. This nuance helps prevent gaps and splitting over time, which can be costly to fix later.
When it comes to carpet installation, the common myth is that stretching alone guarantees a wrinkle-free surface. Yet, improper tack strip placement, wrong padding thickness, and inadequate seam sealing can cause buckling and separation. Advanced installers pay close attention to subfloor moisture levels, underlay quality, and seamless seams, all of which contribute to a professional, lasting finish. For detailed guidance, check out the comprehensive carpet installation secrets.
These nuances underline why trusting only the surface-level steps can jeopardize an entire project. The key takeaway is that paying attention to detailed preparation, material compatibility, and finishing techniques can be the difference between a professional-looking renovation and an ongoing headache. Have you ever fallen into this trap? Let me know in the comments.
Keep Your Projects in Top Shape with the Right Tools
Investing in specialized, high-quality tools can dramatically improve the longevity of your renovations. For flooring, I swear by a high-grade pneumatic stapler, which ensures consistent tension and reduces damage to planks, especially when working with engineered hardwood. When installing showers, a reliable digital moisture meter is invaluable; it helps monitor subfloor humidity levels, preventing future warping or mold growth, as highlighted by experts at Tilecraft. For baseboards, a fine-tooth coping saw allows for precise cuts that fit irregular walls perfectly, eliminating gaps and achieving a professional finish.
Regular Maintenance Preserves Your Investment
To keep your flooring looking pristine, sweep and vacuum regularly to prevent dirt buildup that can scratch surfaces. Applying a protective finish or sealant annually—especially on high-traffic areas—can safeguard against stains and wear. Showers demand routine sealant checks; resealing grout and inspecting waterproof membranes every year ensures leaks and water damage are prevented. Baseboards benefit from gentle cleaning with a damp cloth and occasional re-painting or staining to keep them looking fresh and prevent peeling or cracking over time.
Future Trends in DIY Home Upgrades
The future of home renovation tools leans toward smart technology. Digital laser levels, like the Bosch GLL 3-80, are becoming more affordable, providing precise highlighting of irregularities in real time, even on curved surfaces. Automated moisture sensors linked to home maintenance apps can proactively alert homeowners about potential issues before they escalate, as discussed in the latest industry reports. Embracing these innovations allows DIYers to maintain their projects more effectively and catch problems early.
How do I maintain my flooring and fixtures over time?
Establishing a routine inspection schedule is key. For floors, check for loose planks or tiles, and reapply sealant when signs of wear appear. For showers, clean grout and caulk regularly, and replace worn membranes before leaks develop. Baseboards should be inspected for cracks or gaps, and repainted or re-coped as needed. Using the right tools, like a quality level or moisture meter, makes this process smoother and more accurate. For detailed guidance, consider visiting this post on baseboard updates.
Remember, consistent maintenance coupled with the right tools extends the lifespan of your improvements. I personally incorporate a laser level and moisture meter into every project—it’s a game changer. In the future, expect even smarter home environments where sensors and automation help us stay ahead of repairs. Don’t hesitate to try out an advanced tool, like a digital moisture meter, to immediately enhance your maintenance routine and prevent costly issues down the line.
Looking back, my biggest lessons in home upgrades come from the moments I overlooked small details—those sneaky variables that make or break a project’s professionalism. One lightbulb moment was realizing that even the most meticulous cuts can fall apart if the support structure isn’t prepared. Incorporating the right shimming techniques, understanding wall irregularities, and choosing the tools that make a difference have transformed my DIY journey from frustrating to fulfilling. Trust me, these insights aren’t obvious at first glance but become invaluable once you’ve experienced the difference they make.
What the Pros Don’t Always Tell You About Installing Flawless Floors and Trim
- My biggest mistake was assuming that a level wall meant my baseboards would fit perfectly—until I learned that walls rarely are perfectly straight. Using a laser level or a chalk line really helps in pre-installation assessments, saving you from gaps later. Durability starts with proper prep.
- Skipping the step of thorough subfloor inspection led to buckling in my vinyl planks. Now, I always check humidity and flatness first, because moisture issues or uneven floors will cause problems down the line. A quality moisture meter isn’t expensive, and it’s a game changer. Proper subfloor prep avoids costly repairs.
- In my early installs, I relied too much on miter cuts when coping the inside corners. I found that coped joints yield a much cleaner look and last longer since they accommodate wall irregularities better. It’s a small step that makes a huge difference. Coping beats miter every time.
- Using cheap shims was my initial shortcut—until I realized they compressed or shifted over time, creating gaps and wobbling. Investing in plastic or composite shims of various sizes makes supported, lasting results. Having a toolkit with assorted shims ensures flexibility. Choose smart tools for flawless finishes.
Your Toolbox for Seamless Interior Upgrades
Beyond the basic hammer and saw, a few key tools elevate DIY work. A high-quality pneumatic stapler ensures tight, consistent fastening, especially for flooring. A digital moisture meter can prevent future water damage in showers and bathrooms. For baseboards, a fine-tooth coping saw allows for precise scribing to uneven walls. These tools have saved me hours of rework and truly paid off. When upgrading your home, remember that smart investments in tools lead to professional results and peace of mind.
Keep it Tight, Keep it Beautiful
Routine maintenance may seem mundane, but it’s essential for preserving your investments. Regularly inspecting and sealing grout and caulk in showers prevents leaks and mold. Clean and re-stain or repaint baseboards periodically—fresh paint can hide imperfections and refresh the space. For flooring, vacuuming and cautious cleaning keep materials looking new. Adopting simple maintenance routines now means fewer surprises later, and your home stays looking polished longer. Think of it as giving your upgrades a health check every season.
The Future Looks Bright and Smart
Emerging technology like digital laser levels and moisture sensors are making DIY projects more precise than ever. Smart home devices can alert you to rising humidity or structural shifts early, preventing costly repairs. Embracing these innovations helps maintain quality over the long haul and keeps your home in top shape. As I’ve discovered, blending traditional craftsmanship with modern tech yields the most rewarding results, turning home improvement from a chore into a hobby of mastery.
Insider Wisdom from My DIY Journey
- Lesson: Never underestimate the importance of wall assessment before flooring or trim installation. Small irregularities become big problems later.
- Tip: Always have a variety of shims and tools tailored for the project. The right support prevents gaps and crooked lines.
- Realization: Proper joint and corner treatments, like coping, can save you from unsightly gaps and structural issues over time.
- Tip: Routine inspections and timely sealing are your best defense against water damage, especially in showers and bathrooms. Prevention is cheaper than repair.
Tools That Transformed My Approach
- A quality laser level: Ensures perfect alignment in every project.
- A reliable moisture meter: Detects hidden issues before they cause damage.
- A fine-tooth coping saw: Creates cleaner, more durable joints for trim and baseboards.
- Assorted plastic and composite shims: Offer flexible, lasting support for uneven surfaces.
Your Next Step Toward Home Perfection
Achieving professional-quality results in flooring installation, shower upgrades, or baseboard finishing is within your reach. It requires attention to detail, the right tools, and a willingness to learn from each step. With each project, you gain confidence and a deeper understanding of your home’s inner workings. Don’t let small imperfections hold you back—embrace these lessons and tools to transform your space with pride. Have you ever struggled with a hidden flaw in your install? Share your experience below and let’s learn together!