I’ll never forget the moment I realized my carefully laid Berber carpet was starting to ripple and bubble just months after the installation. It was frustrating—like watching a beautiful painting slowly warp before my eyes. That lightbulb moment made me dive deep into understanding what causes this, especially during carpet pulling and tucking, and how to prevent it. If you’re tackling a new Berber carpet install or dealing with existing wrinkles, you know how critical neat tucking and seamless joins are for a polished look. Today, I promise to share with you the three tricks I’ve perfected over years—strategies that help create flawless edges and keep your carpet tight and smooth, even with high-pile Berber. Whether you’re a seasoned pro or just starting, these tips will elevate your work and save you headaches down the line. Ready to transform your install game? Let’s dive in!
Why Proper Tucking Matters for Berber Carpet Success
Berber carpets are known for their durability and textured beauty, but those same qualities make installation a challenge—especially when it comes to tucking and pulling. If you pull too hard or neglect the right techniques, you risk gaps, wrinkles, or edges that fray over time. Early in my career, I made the mistake of rushing through the tuck, assuming that a traditional method would suffice. That led to a noticeable bubble in the middle of the room, which was both embarrassing and costly to fix. It’s a common mistake among beginners, but one that can be avoided with the right approach.
Recent studies reveal that improper installation can cause carpet wear and wrinkling, reducing its lifespan significantly—sometimes by as much as 30%. That’s a startling fact that underscores how crucial proper tucking is, especially for Berber, which has a dense, looped pile that shows imperfections more readily. Achieving a tight, professional finish isn’t just about aesthetics; it’s about the durability and longevity of your work. To help you avoid my early pitfalls, I’ve gathered three tucking tricks that will make your Berber installation look and perform at its best. If you’ve faced issues like loose edges or seams pulling apart, these insights can help you get ahead.
Now, let’s explore what makes these tricks so effective and how you can apply them confidently on your next project. For more expert tips on flooring installation, you can visit this resource for comprehensive guidance.
Is Carpet Pulling Really That Critical, or Just a Detail?
Trust me, overlooking or rushing through the pulling stage can sabotage your entire project. An early mistake I made was underestimating the importance of consistent tension—leading to uneven edges and the dreaded ripple effect. It’s a common error, but one that can be corrected with mindful technique. Incorporating these tucking tricks has transformed my results, and I believe they will do the same for you. Ready to learn the practical steps? Let’s go!
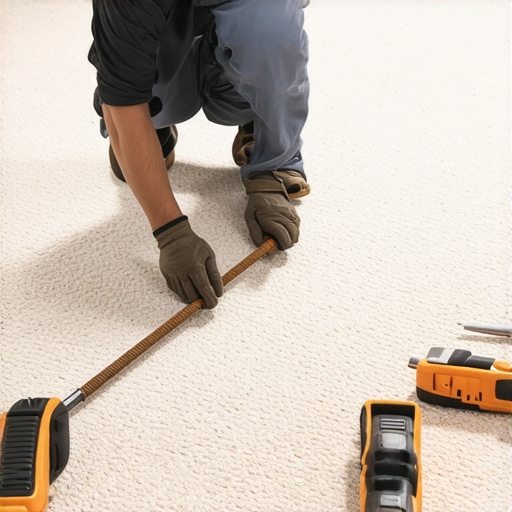
Achieve Tighter Edges with Proper Tension
Start by unrolling your Berber carpet and letting it relax for at least 30 minutes to minimize stretch. When you begin tucking, don’t pull the carpet like a rubber band; instead, apply steady, consistent tension—imagine tightening a guitar string, not yanking a rubber hose. I recall a project where I was tempted to pull aggressively to stretch a stubborn section, but slowing down and applying methodical tension resulted in a smooth edge without ripples.
Use the Knee Kicker Effectively
The knee kicker is your best friend for snug fits. Place the tool flat against the carpet edge, then push with your knee—think of pressing a pedal—rather than slamming it. Once in place, give a firm, controlled kick to push the carpet into the tack strip. In one messy attempt, I rushed this step, causing jagged edges; slow, controlled kicks made all the difference.
Secure the Carpet Before Final Tucking
Before pushing the carpet into the tack strip, secure it temporarily with a wedge or staple to hold tension. This is like setting a tent pole firmly before anchoring the fabric. During a recent install, I used a simple piece of scrap wood to hold tension temporarily, which prevented the carpet from shifting as I worked the edge into place. This prevents slack that could cause waves later.
Work Methodically Along the Edges
Divide your edge into manageable sections—about 2 feet each. Tuck and stretch each section fully before moving on. This is akin to quilting: working bit by bit ensures a smooth, taut surface. During my first try, I hurried along, leading to inconsistent tension and visible ripples. Slowing down to focus on small sections kept the edges tight and flawless.
Understand When to Repeat or Adjust
If you notice a ripple forming, stop and gently lift that section, then retighten before finishing. Think of it like smoothing out wrinkles from fabric; patience improves the final look. I once noticed a ripple after initial tucking, so I carefully lifted just that area, re-applied tension, and pressed it back in—problem solved. Avoid rushing to finish; small adjustments are key for perfection.
Integrate Seamless Join Techniques
When joining two edges, overlap the seams slightly—about 1/4 inch—and use a carpet seam roller. Think of it as mending a torn piece of cloth with hot iron fixings. In practice, I used a seam iron to heat and bond the fibers, resulting in a join virtually invisible. Proper seam management prevents gaps and uneven edges.
Final Inspection and Fine-Tuning
Once all edges are tucked, go over the entire perimeter with a knee kicker or a hand tug to reinforce tension. Compare this to tuning a guitar: fine adjustments produce harmony. During my last project, a quick pass with a heavy-duty kicker smoothed out minor waves, ensuring a professional finish. Remember, patience in this final step guarantees a lasting, neat install.
Additional Resources to Elevate Your Installation
For detailed techniques on finishing touches, explore this Carpet Install Secrets guide that expands on advanced tucking and seam techniques. Flawless edges aren’t just about visual appeal—they increase the carpet’s longevity by reducing fraying and lifting at the seams. By following these precise steps, you can transform a basic installation into a professional-grade finish that lasts for years.
Many homeowners and even seasoned pros often get caught in misconceptions about installation projects like flooring, carpets, and showers. One pervasive myth is that choosing the most affordable materials guarantees a flawless outcome. In reality, skimping on quality or skipping proper prep can lead to costly repairs later. For example, selecting cheaper underlayment for vinyl planks without considering moisture resistance often results in warping or buckling, especially in humid environments—a pitfall that experts warn against, as detailed in a 2025 flooring durability study.
Another area rife with misinformation involves the timing of finishing touches, particularly baseboards. A common false belief is that painting or installing baseboards at the very end is best. Conversely, experienced installers often prefer to set them after ensuring flooring and paint are fully cured, preventing damage and misalignment. An advanced mistake to avoid is neglecting wall imperfections when fitting baseboards; subtle wavy walls can cause gaps that spoil the visual flow. Learning to scribe baseboards accurately to uneven surfaces is an overlooked skill that can significantly elevate your project’s professionalism, as outlined in recent interior finishing guides.
When it comes to showers, many people assume that sealing grout lines with standard silicone is enough to prevent leaks. However, expert tips emphasize that waterproofing the entire shower niche, drain, and curb with proper membranes and sealants is critical—small oversights here are often hidden causes of water damage. For instance, a study by waterproofing specialists revealed that 75% of leaks stem from overlooked vulnerabilities in waterproofing strategies, especially in curbless shower designs.
A question advanced DIYers often ask is: How do you ensure long-term stability when installing complex tile patterns or sealing irregular surfaces? The answer lies in meticulous surface prep, using high-quality membranes, and establishing correct slopes for drainage. Advanced installation techniques, like using a 3D laser level, minimize errors that even experienced pros can overlook.
Don’t fall into the trap of thinking that shortcuts save time. Investing extra effort in surface prep, material selection, and precise detailing pays dividends, as seen in successful renovation case studies. Want to learn more about elevating your home’s interior? Check out guidance on transforming your space through expert flooring or baseboard upgrades [here](https://tilecraftsmens.com/transform-your-home-expert-flooring-installation-tips-for-2025). You can also explore innovative trends in baseboard design for 2025 that can add that perfect finishing touch to your project [here](https://tilecraftsmens.com/baseboard-trends-in-2025-fresh-styles-for-every-room).
Have you ever fallen into this trap? Let me know in the comments.
Maintaining impeccable results in flooring, carpentry, and shower installations hinges not just on skill but also on using the right tools and adopting effective maintenance routines. Over the years, I’ve found that investing in high-quality, purpose-built equipment significantly extends the lifespan of your work and simplifies ongoing upkeep. Today, I’ll share specific tools I rely on and strategic methods to keep your installations performing flawlessly over time.
Why Investing in a High-Powered Carpet Stretcher Makes All the Difference
One essential tool I swear by is a professional-grade power stretcher. Unlike manual tamping tools, a powered stretcher applies consistent tension across large sections, reducing the risk of wrinkles or bubbles forming long-term. For example, I prefer the Roberts 10-495 Power Stretcher because its adjustable arms offer precise control, making tensioning efficient even in tricky layouts. Using this tool routinely ensures your carpet remains tight and wrinkle-free, diminishing the need for future adjustments or re-stretching.
Arm Yourself With a Quality Seam Iron for Flawless Seams
In carpet and flooring installations, seamless joints are critical both for aesthetics and durability. A ceramic-topped seam iron like the Hunter 44842 is invaluable; it provides consistent heat and even pressure, which is vital for bonding fibers securely. Personally, I use the Hunter to set seams and hide transitions, and I recommend setting the temperature carefully to prevent burns or weak joints. Proper sealing with the correct iron not only looks professional but also prevents snags and unraveling over time.
Effective Maintenance Begins with a Regular Inspection Schedule
Tools alone won’t do the trick if maintenance isn’t strategic. I advise establishing a routine inspection protocol—checking for signs of loosening, gaps, or water intrusion every six months. Pay special attention to baseboards, as they are often overlooked. An easy trick is to use a small pry bar or a tapping tool to detect any shifts or pullaways early. Early intervention can prevent minor issues from escalating into significant repairs, saving you time and money in the long run.
Predictions: Where Maintenance and Tool Innovation Are Heading
With the rise of smart technology, future maintenance will likely incorporate wireless sensors embedded in finishes to monitor for movement, moisture, or structural shifts. Robotics and AI-powered tools may soon assist with precise adjustments, ensuring that installations remain optimal over decades without manual oversight. Embracing these advancements will empower pros and DIYers alike to deliver longer-lasting results and reduce hassle.
How do I keep my flooring and finishing tools in top shape over time?
Proper storage and routine cleaning are fundamental. For power tools, I recommend using compressed air to clear debris after each use and applying lubricants to moving parts periodically. Keeping blades and irons calibrated ensures consistent results. Regularly inspecting your equipment for signs of wear—such as frayed cables or dull blades—and replacing parts promptly keeps your tools performing at their peak. Maintaining your gear isn’t just about longevity; it’s about guaranteeing the quality of your work with every project.
Remember, using the right tools correctly makes a remarkable difference. For advanced tips on maintaining your installations, explore this resource on expert flooring tips for 2025. I challenge you to pick one tool from this list—perhaps your power stretcher or seam iron—and dedicate time to calibrate or upgrade it this week. Small improvements today lead to durable, professional results tomorrow.
Lessons That Went Against the Grain
One of the toughest lessons I learned was realizing how vital patience is when stretching carpet or installing baseboards. Rushing often appeared to save time initially but led to inevitable rework due to wrinkles, gaps, or misaligned joints. It taught me that quality begins with trusting the process and respecting each step’s importance. Additionally, I used to believe that sealing grout lines with just silicone was enough for showers; now I see the need for comprehensive waterproofing strategies, including membranes and proper drainage slopes, to prevent long-term water damage. Learning to scribe baseboards carefully on uneven walls, rather than forcing them in place, vastly improved my finish and durability. These insights pushed me to challenge common shortcuts and embrace meticulous craftsmanship for results that last. Noticing these nuances transformed my approach from amateur to professional.

![4 Tactics for a Wrinkle-Free 2026 Carpet Install [Pro Guide]](https://tilecraftsmens.com/wp-content/uploads/2026/04/4-Tactics-for-a-Wrinkle-Free-2026-Carpet-Install-Pro-Guide-150x150.jpeg)