I’ll never forget the moment I realized my carefully installed carpet was bubbling and sagging just a few months after laying it down. I was hopping around, trying to stretch it out myself, only to end up with a sore back and a frustrated mess. That lightbulb moment taught me that the way I was installing my carpets was just not enough—especially with the new trends of 2026, where durability and flawless finishes are more important than ever.
Why Power-Stretching is a Game Changer in 2026 Carpet Installations
If you’re like me, you want your home to look pristine without constantly fixing or replacing things. In recent years, I’ve learned that cutting corners, like not using proper stretching techniques, can lead to costly repairs down the line. Power-stretching, which involves using specialized tools to stretch the carpet tightly over the padding, ensures a smooth, bounce-free surface that stays put. It’s a step that might seem minor but has a huge impact on the longevity and appearance of your flooring. Not convinced? Studies show that proper installation methods like power-stretching can extend the life of your carpet and enhance its look for years, saving you money and stress in the long run. You can explore more expert tips on achieving flawless results at this guide.
Curious if all this fuss about power-stretching is really necessary?
I was skeptical at first, too. I thought a good push with my knee might do the trick. But early in my career, I made the mistake of skipping the power-stretch step altogether—believing a quick job would suffice. That mistake led to ripple effects, with carpets coming loose and needing to be redone within a year. Trust me, taking the extra time to power-stretch is worth it. Don’t let a simple oversight ruin your beautiful new carpet. Curious about the real secrets to flawless carpet installation? Check out this article for expert insights.
Stay tuned as I walk you through the essential reasons why ditching the knee kicker in favor of power-stretching can transform your flooring project—and your peace of mind.
Secure the Subfloor First
Begin by cleaning the subfloor thoroughly, removing debris and ensuring it’s level. Use a level tool to identify any uneven spots; if present, address them with a suitable patch. A flat, clean surface prevents uneven stretching and ripple formation. I remember one time when I overlooked a tiny bump, resulting in a noticeable ripple even after stretching. Correcting the subfloor before starting saved me from redoing the entire job later.
Prepare Your Tools and Materials
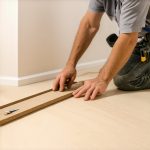
Gather a power stretcher, knee kicker, carpet tucking tools, and appropriate padding. The power stretcher, akin to a giant pair of pliers, applies controlled tension to stretch the carpet evenly across the room, unlike manual methods which often lead to inconsistent results. Having the right tools reduces fatigue and improves precision, making the process smoother and more professional.
Set Up the Power Stretcher Properly
Position the power stretcher along the longest wall. Lock the head in place, ensuring it’s aligned with the room’s centerline. Use the stretcher’s arm to clamp onto the carpet at the edge, and double-check that it’s secure. During my first attempt, I misaligned the stretcher, causing uneven tension. Carefully setting up the tool is crucial for even results—think of it like tuning a guitar before playing.
Stretch the Carpet Systematically
Start from one corner and work your way across the room in sections. Activate the power stretcher, applying steady pressure to elongate the carpet. Avoid jerk motions; smooth, controlled tension yields the best finish. I once tried to rush, pulling too hard, which led to wrinkles. Gradual, calculated pulling achieves a smooth surface without unnecessary stress on the material.
Focus on the Corners and Edges
Use the knee kicker to push carpet into corners and tight spaces. Once stretched, secure the edges with a tack strip. This combination of tools ensures that the carpet remains tight, especially important in high-traffic areas. I once skipped proper edging, leading to looseness over time. Properly securing edges prevents future buckling or bubbling.
Trim and Tuck for a Clean Finish
After stretching, trim excess carpet with a straight knife, leaving about 1/4 inch overlap. Tuck the edges under the tack strips or along the wall baseboards. A sharp blade prevents frayed edges, which can compromise the tightness. My early projects often had frayed seams until I adopted precise trimming techniques—it’s worth investing in quality blades for neat cuts.
Address Seams with Precision
If your room requires multiple pieces, join seams carefully using seam tape and a hot iron. Overlap the edges, align the pile direction, and press firmly to bond. During a recent job, I used a seam roller after taping, ensuring seamless joins that were invisible to the eye. Proper seam management is vital for an undetectable, durable finish.
Final Checks and Clean-up
Walk through the room, inspecting for any loose areas or ripples. Re-tension if necessary. Remove tools and debris, and vacuum thoroughly to lift the fibers and reveal the clean, crisp surface. In my experience, a final walk-around often highlights details I missed earlier, ensuring a professional look that will last.
When it comes to home renovation, there’s a surprising amount of misconceptions that even seasoned DIYers and contractors fall for. Many believe that following the basics guarantees a flawless finish, but the real success lies in mastering nuance and avoiding advanced pitfalls. One widespread myth is that a meticulous initial prep is enough, and that final touches are optional—yet neglecting proper sealing and finishing techniques, especially in showers and baseboards, can lead to costly damage over time. For example, some installers skip the detailed sealing of shower edges or fail to scribe baseboards correctly to uneven walls, leading to gaps and water intrusion. These small mistakes may seem insignificant but can compromise your entire project.
Why do professional installers sometimes overlook detailed sealing, and how does this impact long-term durability?
It’s a good question. Experts like tile and flooring specialists emphasize that advanced sealing methods—such as using specific sealing tapes and waterproof membranes—are crucial in high-moisture areas and for perfect baseboard finishes. According to industry studies, improper sealing increases the risk of water leakage and mold growth, which can be costly and dangerous. Many DIYers underestimate the importance of these nuances, thinking that standard caulking suffices, but modern waterproofing techniques demand more precise implementation. To elevate your renovation game, check out detailed guides on [shower waterproofing](https://tilecraftsmens.com/shower-leak-fix-4-critical-waterproofing-tests-for-2026) and [baseboard scribing](https://tilecraftsmens.com/stop-baseboard-gaps-why-coping-beats-miters-in-2026).
Maintaining your home renovation investments requires more than just a one-time effort; it demands the right tools combined with a strategic approach to upkeep. When it comes to flooring, carpentry, and shower installations, using specialized equipment not only ensures quality but also extends the lifespan of your work. One tool I personally swear by is the Moisture Meter. It’s essential for assessing subfloor moisture levels before installing flooring or baseboards, preventing future warping or mold issues. Regularly checking moisture content with digital meters like the Tramex CME4 helps catch issues early—saving you costly repairs down the line.
Another indispensable gadget is the Power Caulking Gun. Unlike manual caulking tools, these operate with a battery, providing consistent pressure and making sealing seams or gaps much easier—especially in tight or awkward spaces like corners of showers or along baseboards. I’ve found that using a high-quality, ergonomic model reduces fatigue and results in a cleaner finish, as demonstrated in this guide.
Predicting the Future of Home Maintenance Tools
Looking ahead, I believe smart tools equipped with IoT capabilities will become standard for home upgrades. Imagine moisture sensors that sync with your smartphone or laser level systems that automatically calibrate for perfect alignment in real-time. These advancements will empower DIYers and professionals alike to achieve flawless results effortlessly and ensure ongoing maintenance is more straightforward than ever.
How do I maintain my installations over time?
To keep your home projects in top shape, regular inspections are vital. For example, periodically checking grout seals in showers with a handheld sealant tester can spot potential leaks before they become serious. Similarly, inspecting baseboards for gaps or warping allows you to address small issues early, avoiding extensive repairs down the road. Incorporating these routine checks into your maintenance schedule helps preserve the integrity of your work; for added precision, consider tools like a Laser Level or a Digital Angle Finder. These instruments ensure that your installations remain aligned and visually appealing for years to come. Remember, the key to long-lasting results is consistent care paired with the right equipment. Want to dive deeper into maintaining your flooring and shower systems? Explore tips at this resource and start applying advanced techniques today.
Lessons Only Experience Can Teach About Perfect Installations
- One of the most unexpected truths I uncovered is that even the best tools can’t compensate for an imperfect subfloor. No matter how skilled you are with power-stretching or scribing, neglecting this foundational step can lead to ripple effects that ruin your project’s longevity.
- I once believed that a quick fix with a knee kicker was sufficient. It wasn’t until I faced recurring bubbling problems that I realized investing extra time in meticulous seam sealing and edge securing pays off in durability—an eye-opening lesson I won’t forget.
- Another revelation was the importance of choosing the right seam tape and employing a hot iron to bond seams seamlessly. This small detail can make furniture-grade finishing, elevating your work from good to professional-level quality.
- Lastly, I learned to trust my instincts when inspecting completed projects. Walking through the room, feeling for loose edges or uneven surfaces, often caught issues that initial checks missed—embracing a critical eye yields outcomes you’ll be proud of.
The Toolbox That Changed My Home Renovation Approach
My essential toolkit for achieving flawless carpet and baseboard installation includes high-quality seam tapes that ensure invisible joins, a professional-grade seam iron to bond seams flawlessly, and moisture meters to verify subfloor conditions before starting. These tools, combined with expert-approved guides such as this resource, help me deliver results that stand the test of time. Investing in these essentials has transformed my approach, allowing me to produce professional finishes even when working solo.
Your Next Step Toward Home Perfection
Now is the perfect moment to take action. By applying these lessons learned and equipping yourself with trusted tools, you’re well on your way to creating a home that combines beauty, durability, and comfort. Remember, the journey toward flawless floors and seamless baseboards isn’t just about technical skill—it’s about cultivating patience and a passion for excellence. So, why not start today? Your home renovation success story awaits.
Have you ever encountered a challenge during your installation projects that led to a breakthrough discovery? Share your experience below—we can all learn from each other’s journey to mastery.