

Have you ever found yourself cursing under your breath because the vinyl plank cut around the toilet doesn’t line up quite right? I’ve been there. One moment, everything seems smooth sailing—then I hit that awkward curve, and the frustration starts to build. It’s that dreaded feeling of all your effort going to waste because of a tiny miscalculation. Honestly, nothing kills the joy of a new flooring project faster than those pesky gaps and uneven cuts around your toilet base. But here’s a little secret I discovered after some trial and error: the Cardboard Template Trick for perfect cuts.
Why this trick might be the game-changer you need
When I first attempted to do my own vinyl plank flooring around the toilet, I underestimated how tricky those curves and tight spaces could be. Early on, I made the classic mistake of measuring with a tape measure and doing freehand cuts, which resulted in gaps and a less professional look. That’s when I realized that my mistake wasn’t the material or tools—it was my approach. I needed a simple, reliable method to replicate those complex shapes accurately. The cardboard template trick became my secret weapon. It’s inexpensive, easy to customize, and gives you that perfect fit without endless sanding or re-cuts.
Ever wrestled with imperfect cuts that ruin your entire install? Trust me, you’re not alone.
By using a piece of scrap cardboard shaped to match the toilet flange, you can trace precise cut lines directly onto your vinyl plank. This technique minimizes errors and saves you time—plus, it leaves you with a clean, professional finish. I’ve learned that even seasoned pros swear by this method, especially when working in tight spaces. And trust me, avoiding the common mistake of rushing your measurements is crucial. I once skipped this step early on and ended up with gaps that actually caused water to seep under the flooring—an expensive mistake I had to fix later. For more tips on seamless flooring installations, you can check out our step-by-step guide.
So today, I’m going to walk you through the real-world process of creating your perfect cardboard template, so you can cut your vinyl planks around the toilet flawlessly. Ready to say goodbye to those frustrating gaps and uneven edges? Let’s dive in, and by the end of this, you’ll be confidently tackling those tricky cuts with ease.
Create Your Customized Cardboard Template
Start by selecting a piece of scrap cardboard, ideally from a cereal box or shipping box, which is sturdy enough to hold shape but easy to cut. Place the cardboard on the floor next to your toilet flange, aligning it in a way that mimics the cut you need to make. Bend, fold, or shape the cardboard to match the contours of the flange and the wall; this step ensures your template will be a precise guide for your cut. Once satisfied, secure the shape with tape to prevent distortion during tracing. I once used an old cereal box to craft a template, which saved me hours of re-cutting and sanding. The sturdiness prevented accidental flexing, leading to cleaner cuts.
Trace Your Perfect Cut Line
Position your cardboard template on the vinyl plank, aligning it where you intend to make the cut. Use a pencil or a fine marker to trace along the outer edge of your template onto the plank, ensuring the line accurately reflects the shape of your flange and wall. Double-check alignment before tracing to avoid miscuts. I recommend doing a dry run without the saw on a scrap piece to confirm the pattern. For tight spaces, use a flexible ruler or a curved drawing tool if your flange has unusual angles. This step effectively minimizes guesswork, drastically reducing the chances of gaps or uneven edges.
Careful Cutting for a Flawless Fit
Set your saw or utility knife to the appropriate depth. For vinyl planks, a fine-tooth saw or a utility knife with a new blade works well. Carefully follow the traced line, applying steady pressure to maintain accuracy. Use a straightedge or a guide clamp if necessary for straight cuts; for curves, make multiple shallow passes rather than one deep cut to maintain control. When I cut around a stubborn flange, I held the plank firmly and made several light passes, which prevented cracking or jagged edges. Remember to wear safety glasses and work in a well-lit area to prevent slips, especially in tight corners.
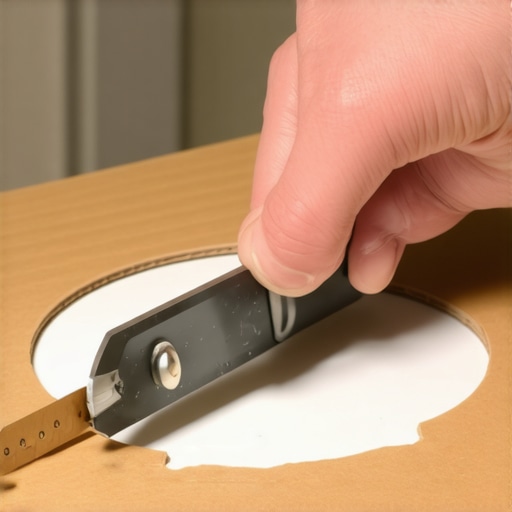
In some cases, the cut may need slight refinement. Use a sanding block or a fine file to smooth out rough edges, ensuring your plank will sit flush against the flange and wall. Test fit the piece frequently, trimming only as needed. This iterative process guarantees your vinyl plank will fit like a glove, avoiding gaps that can lead to water infiltration or lifting.
Final Fitting and Securing
Place the cut plank in position to verify fit. If needed, make minor adjustments with a utility knife or sandpaper. Once satisfied, proceed to install as per your flooring system’s instructions. I’ve often finished the installation with a light tap using a rubber mallet to seat the plank tightly into place, ensuring a seamless transition around the toilet.
Utilize this cardboard template method consistently for complex shapes and irregular edges, and you’ll achieve professional-looking results with minimal effort. For more detailed guidance on flooring installation techniques, check out our comprehensive guide to durable flooring.
When it comes to home renovations, many homeowners focus on the visible aspects—picking the right tile, choosing stylish baseboards, or laying down plush carpet. However, beneath the surface lies a web of nuances that, if overlooked, can lead to costly mistakes and frustrating surprises. Let’s dig deeper into some common misconceptions and advanced pitfalls that even seasoned DIY enthusiasts often miss.
One widespread myth is that standard measurements and tools suffice for complex areas like showers or uneven walls. In reality, relying solely on a tape measure or straightedge can result in subtle inaccuracies, especially in irregular spaces. For example, many believe that a slight misalignment in baseboard corners isn’t noticeable—until years later when gaps or cracks become evident. The smart homeowner knows that mastering scribing techniques or using custom templates, like the cardboard trick discussed earlier, prevents these issues upfront.
A frequent trap homeowners fall into involves neglecting the importance of proper subfloor preparation before flooring installation. Many assume that a subfloor’s surface is level enough, but even minor undulations can cause vinyl planks to separate, warp, or produce hollow sounds when walked upon. A study published in the *Journal of Construction Engineering* emphasizes that subfloor irregularities are a leading cause of flooring failure, highlighting the need for thorough subfloor leveling and moisture testing before laying down new surfaces.
For showers, a common mistake is neglecting the proper sealing and flashing around niches and drains. Some installers think that installing tiles and grout is sufficient, but water infiltration often occurs at poorly sealed joints, leading to mold and rot behind the walls. Expert tips recommend applying liquid membranes and using appropriate sealants to ensure longevity and prevent leaks—meaning that rushing through these crucial steps can lead to costly repairs later in the project.
Now, let’s explore an advanced question that many seasoned DIYers might ask: How can you effectively handle complex wall angles when installing baseboards without creating gaps or needing excessive filling?
The answer lies in precise scribing and the use of a flexible scribing tool, which allows you to match irregular wall contours accurately. This technique minimizes filler material and creates a seamless transition—saving time and enhancing aesthetic value. Implementing such nuanced strategies can elevate your craftsmanship from good to professional-grade, significantly improving your project’s durability and appearance.
In my experience, paying attention to these subtle details makes all the difference. Overlooking moisture barriers, improper sealing, or inaccurate measurements can compromise the entire project. To master these advanced techniques, I recommend exploring detailed guidance on [creating a spa-like shower experience](https://tilecraftsmens.com/creating-a-spa-like-shower-experience-tips-tricks) or staying updated with the latest [flooring installation trends](https://tilecraftsmens.com/transform-your-flooring-top-trends-in-installation-for-2025). After all, a flawless finish is often the result of diligent preparation and nuanced understanding.
Have you ever fallen into this trap? Let me know in the comments and share your experience with overlooked details in home renovation projects.
Keeping It Working: Essential Tools and Maintenance Strategies
Achieving professional results in home renovation isn’t just about the initial install; it’s about ensuring everything continues to function flawlessly over time. Having the right tools on hand and understanding maintenance routines can dramatically extend the lifespan of your flooring, baseboards, showers, and carpets. Today, I’ll share the tools I rely on daily and practical maintenance tips to help you keep your investments looking great and performing well for years to come.
Precision Tools for Longevity
One of my most valued tools is the cordless oscillating multitool. Its versatility in trimming vinyl around irregular shapes or tight corners saves hours of frustration. I trust the brand Dremel, primarily because of its durability and wide range of blades. Investing in a quality set means fewer replacements and more precise cuts, especially when creating templates or refining edges after installation.
Laser level is another game-changer. Unlike traditional bubble levels, a laser level provides a 360-degree horizontal and vertical plane, ensuring that baseboards, tiles, and flooring are perfectly aligned. This precision prevents early wear or aesthetic issues, especially in larger projects.
Essential Maintenance Routines
Long-term success hinges on proactive upkeep. For flooring, regular sweeping and using a manufacturer-recommended cleaner maintains appearance and prevents debris buildup that can compromise sealants or the finish. For carpets, periodic professional cleaning extends the fiber life and keeps it looking fresh. For showers, routine sealing of grout and checking for leaks can prevent water damage and mold growth. Applying a quality silicone sealant annually around niches and corners is a simple task that preserves the integrity of your shower system.
How do I maintain [Topic] over time?
In the case of baseboards, regular inspections for gaps or damage should be part of your maintenance routine. Applying a fresh coat of paint or touch-up with wood filler can restore their appearance and prevent drafts or pests from entering. For flooring, monitoring humidity levels is crucial, especially with hardwood or vinyl plank installations. Using a dehumidifier or humidifier based on your climate helps balance moisture, reducing expansion or contraction issues.
Another tip I swear by is keeping a small library of essential repair supplies—such as wood glue, filler, and touch-up paint. Having these on hand allows you to address minor issues immediately, preventing them from escalating into costly repairs—this principle is highlighted in our guide to durable flooring.
Trend Predictions for Home Maintenance
Looking ahead, I believe technology will play an increasing role in maintenance routines. Smart sensors embedded in flooring or walls could detect moisture or structural shifts early, alerting homeowners before damage becomes extensive. Automation tools, like robotic vacuum cleaners integrated with maintenance schedules, will become more sophisticated, making upkeeping less of a chore and more of an integrated part of daily life.
To truly keep your renovation work in top shape, I highly recommend trying the advanced technique of scheduling regular inspections for your installations. Simple, proactive checks save money and time in the long run. Start by setting reminders to verify grout seals or test for loose baseboards—these small acts compound into long-lasting results. If you’re interested, explore our shower maintenance tips for advanced strategies to keep your bathroom’s features pristine.
Remember, a little upkeep now prevents big repairs later. Stay ahead of the curve by integrating these tools and habits into your renovation routine—your home will thank you for it.
,
The Hidden Lessons That Transformed My Home Projects
One of the most eye-opening realizations I had was that even small details—a tiny gap in baseboard corners or a subtle unevenness in the shower niche—can impact the entire aesthetic and longevity of my renovations. I learned that patience, meticulous measurement, and craftsmanship matter more than just having the right tools. For instance, the cardboard template trick I shared earlier revolutionized my approach, teaching me to anticipate complexities before cutting. The biggest lesson? Never underestimate how much careful prep and attention to detail can prevent costly repairs down the line. These insights have saved me time, money, and frustration, and I hope they do the same for you.»**
Tools and Resources That Elevate Your Craft
Over time, I’ve curated a toolkit that makes every project smoother. My favorite carpet installation tools, like the high-quality knee kicker and seamless seam roller, ensure flawless results. For flooring, a laser level and a moisture meter are indispensable—they help me catch issues early and avoid future problems. I also rely on trusted resources like comprehensive guides that break down complex techniques into manageable steps. Investing in the right tools and knowledge has been key to elevating my work from average to professional-grade.»**
Fuel Your Passion and Embrace the Journey
Taking on projects like installing showers, baseboards, or flooring isn’t just about aesthetics—it’s about crafting a space where you feel proud and comfortable. Remember, every mistake is a learning opportunity, bringing you closer to mastery. No matter where you are in your renovation journey, trust in your ability to improve and innovate. Keep experimenting, stay patient, and celebrate small wins along the way. With dedication and the right mindset, you’re capable of transforming your home into a true masterpiece. So, are you ready to tackle your next project with confidence? Your home improvement story begins now—believe in the process and enjoy every step.