![Stop Baseboard Miter Gaps With These 4 Glue-First Tactics [2026]](https://tilecraftsmens.com/wp-content/uploads/2026/04/Stop-Baseboard-Miter-Gaps-With-These-4-Glue-First-Tactics-2026.jpeg)
I remember the first time I installed new baseboards in my living room. Everything seemed perfect — until I stepped back and noticed the tiny, yet glaring, gaps at the corners. It was embarrassing! No matter how carefully I measured or how many times I adjusted, those stubborn gaps refused to close. It felt like a kitchen full of squeaky hinges or a creaking floor—small issues, but enough to spoil the entire look of the room.
Then, lightbulb moment: I realized that rushing through the miter cuts without a proper sealing plan was the culprit. That’s when I learned about the importance of a glue-first approach to keep those gaps at bay. If you’ve ever dealt with similar frustrations, you’re not alone—and there’s good news. There are proven, straightforward tactics to do away with those unsightly gaps once and for all.
Today, I want to share with you the four glue-first methods that transformed my finishing game and can save your sanity too. These techniques aren’t about complicated tools or time-consuming tricks. Instead, they’re simple, effective, and designed to give your trim a professional, seamless finish. Whether you’re a DIY enthusiast or just starting out, mastering these tactics will elevate your home’s look and bolster your confidence.
Before we dive into the steps, let’s address a common question I hear all the time.
Why is a glue-first approach better than traditional nailing alone?
Back early in my woodworking journey, I made the mistake of relying solely on nails to hold my baseboards in place. While nails are essential, neglecting to use glue as a bonding agent often led to gaps, loosening, or squeaky joints. According to home improvement experts, a combined approach of glue and nails can significantly increase the durability and appearance of your trim—plus, it helps prevent those pesky miter gaps from forming over time. As I learned from seasoned carpenters, applying wood glue into the joint before clamping or nailing is a game-changer in achieving tight, gap-free corners.
Have you faced this exact issue with gaps or misaligned corners? If so, keep reading. I’ll walk you through each step, sharing insider tips and tricks, including one crucial method that’s a total game-changer—making your baseboard corners look flawless and professional in 2026 and beyond.
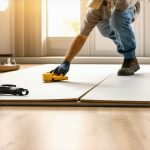
Applying the Glue and Clamping Technique
To start, lay your baseboard against the wall and apply a generous bead of high-quality wood glue into the miters and along the backside of the trim. I recall a time I accidentally used too much glue, causing a slight mess, but it smoothed out once I cleaned the excess quickly with a damp cloth and clamped the joint. Clamp each corner firmly to ensure the glue bonds tightly, avoiding gaps. Use adjustable clamps for even pressure, especially on longer runs. This step acts like a tight handshake, making the joint almost impossible to gap later.
Clamping for a Tight Fit
Secure the clamps and let the glue cure for at least 30 minutes to an hour. Proper clamping is like pressing a reverberating circuit together; it forces the materials into perfect alignment and pushes out air pockets that can cause gaps. Remember, patience is key. Some DIYers rush through this step, but I found that giving the glue ample time to set yields the best results. After removing clamps, check the joint; it should be seamless and tight.
Using Nailing and Additional Support
Once the glue has set, reinforce the joint with finishing nails driven near the corners—avoid placing nails directly at the miter. Drive the nails just below the surface, then countersink and fill the holes with wood filler. Back when I installed baseboards in my dining room, I used this method and was thrilled at how professional everything looked—no visible gaps or misalignments. This combined approach ensures the joint stays tight and reduces wood movement over time.
Smoothing and Finishing Touches
Sand the filled holes and the entire surface lightly to prepare for painting or staining. A smooth finish enhances the seamless look and disguises any minor imperfections. I prefer using fine-grit sandpaper to avoid scratches, especially on painted surfaces. This step is like polishing a gem—crucial for that final polished appearance. By following this glue-first technique, your baseboards will look tight, professional, and with minimal gaps—saving a headache in the long run. If you want to learn about modern trends in baseboards or other interior upgrades, check out these latest style insights.Many homeowners and DIY enthusiasts operate under common beliefs that, while popular, can lead to mistakes during installations like showers, flooring, or baseboards. Let’s dig deeper into these misconceptions, revealing subtle pitfalls and advanced tips that seasoned professionals know. For example, a widespread myth is that using drywall anchors alone ensures a secure fixture, but experts emphasize the importance of choosing anchors rated for the load and wall type, as well as proper installation techniques—overlooking these details can result in costly repairs. Similarly, when installing carpets, many think that stretching alone guarantees a flawless finish; however, failing to select the appropriate padding or not acclimating the carpet prior to installation can cause wrinkles or gaps over time. I’ve seen this firsthand, and it underscores a nuanced truth: understanding material properties and environmental factors is crucial for longevity and aesthetic appeal.
In flooring, a common trap is assuming that subfloor flatness doesn’t matter if the surface looks even; advanced installers stress the importance of checking subfloor levelness with a laser level, as minor dips can cause tile or vinyl to crack prematurely. This is highlighted in TileCraftsmen’s guide on durable flooring installation, which notes that addressing subfloor issues before laying flooring prevents future problems.
For showers, many believe sealing the edges with standard grout is enough, but waterproofing is more complex. Experts advocate sealing in multiple layers, including waterproof membranes behind tiles, especially in curbless showers where water escapes differently. Missing this step can lead to mold or subfloor damage, a mistake so common that it warrants a dedicated waterproofing guide.
A critical mistake I often see is neglecting the role of expansion gaps, especially with baseboards and flooring. Without allowing for material expansion, temperature fluctuations can cause warping or gaps over time. In fact, according to flooring authorities, proper gap management is a subtle yet essential step for flawless long-term results. You can explore more about these overlooked details in our article on baseboard trends in 2025.
Let’s address a common question—
How do I identify hidden issues in my installation that might cause problems later?
Advanced techniques involve using laser measurement tools, moisture meters, and visual inspections to detect underlying issues. For instance, concealed water leaks might appear as stains or odors later, but proactive waterproofing and inspection before sealing walls can save thousands.
Remember, the devil is in the details. Rushing or relying solely on surface-level checks can backfire, turning a simple project into a headache. Have you ever fallen into this trap? Let me know in the comments. If you want to stay ahead of common pitfalls, consider consulting with pros or reading detailed guides on waterproofing, flooring, or finishing techniques—these can drastically improve your outcomes and ensure your investment lasts.
Maintaining the quality of your home finishes, like baseboards, flooring, or even shower installations, requires more than just careful initial work. Having the right tools on hand and understanding essential maintenance routines can significantly extend the lifespan of your improvements. I personally rely on a set of dedicated tools designed for durability and precision, ensuring that I can address issues quickly before small problems turn into costly repairs.
Invest in Quality for Longevity
First and foremost, I recommend using a high-quality orbital sander for touch-up and smoothing tasks. The orbital sander I prefer has variable speed control, which helps prevent damage to delicate surfaces like freshly painted baseboards or intricate molding. This tool allows me to keep surfaces smooth without removing too much material, preserving the original finish for years to come.
Essential Maintenance Devices
For ongoing care, a moisture meter is indispensable. It helps monitor environmental conditions that could affect flooring or cabinetry—especially in areas prone to humidity changes. Regular checks with a reliable moisture meter prevent issues like warping or mold growth, saving you from extensive repairs down the line. I personally use a model rated highly on professional reviewer sites because of its accuracy and ease of use.
Using Proper Sealants and Cleaners
Beyond tools, selecting the right maintenance products is crucial. I always opt for low-VOC, non-abrasive cleaners for cleaning finished surfaces. Over-application or harsh chemicals can degrade sealants or paint. Applying a high-quality, flexible sealant annually around bath fixtures or shower niches prevents leaks, which keeps your tile and drywall in top condition. For more advanced waterproofing techniques, check out these waterproofing steps.
Automate Your Maintenance Routine
Looking ahead, I believe smart home technology will play a bigger role in maintenance. Smart sensors can detect moisture leaks or structural shifts early, alerting you before significant damage occurs. Installing smart sensors in vulnerable areas like beneath sinks or shower enclosures is a game-changer, and it’s just a matter of time before these become standard in home renovation kits. To ensure your current installations stay flawless, I recommend setting a quarterly inspection routine, leveraging both traditional tools and emerging tech.
How do I maintain my flooring and baseboards over time?
Consistent cleaning, regular inspections for gaps or loose fittings, and timely repainting or sealing are key. Use a soft-bristle broom or vacuum to remove debris — abrasive materials will scratch surfaces. When gaps or shifts appear, addressing them promptly with shimming or re-sealing prevents long-term structural issues. Incorporating simple maintenance tips like reapplying sealants every 2-3 years and keeping humidity levels controlled can dramatically improve your results and help resist wear.
By combining these proven tools and routines, you can keep your home’s finishes looking pristine for decades. If you want to explore more about sophisticated waterproofing or maintaining your shower installation, visit these expert tips. And don’t forget—investing in the right equipment now will save time and money later. For instance, using a moisture meter regularly can alert you to hidden issues before they escalate, making it an essential part of your maintenance arsenal. Why not try incorporating a digital moisture meter into your routine today? It might just be the smart move that keeps your projects flawless over the long haul.
The Hardest Lesson I Learned About Baseboards and Corners
One of my most significant realizations was how crucial proper sealing and planning are — rushing through miters often leads to gaps that haunt your finished work. Patience and attention to detail are your best friends in avoiding those pesky openings.
Why Believing Nails Are Enough Is a Common Mistake
I used to think driving nails alone would hold everything perfectly—until I faced gaps and loose joints. Combining nails with a good glue helps ensure a tighter, more professional finish that lasts and resists movement.
Handling Unexpected Wall Shapes Without Losing Your Mind
Dealing with uneven or wavy walls was a surprise. Using flexible sealants and customizing cuts became a game-changer, allowing my baseboards to adapt seamlessly, saving me from constant adjustments and re-cuts.
My Go-To Resources That Saved My Projects
- ProWoodGlue: I trust this high-quality glue for its bonding strength and ease of use, which makes sealing corners a breeze.
- Digital Laser Level: Perfect for ensuring straight, even lines across tricky surfaces, avoiding crooked installs that break the illusion of perfection.
- Fine-Grit Sandpaper: Essential for smoothing out filled gaps and ensuring a flawless paint-ready surface.
- Professional tips from home improvement experts: Their guides on sealing and finishing help preempt common mistakes and elevate your work from DIY to pro look.
Take Action and Elevate Your Home Finishes
Now that you’ve seen the value of a meticulous approach, don’t wait to apply these techniques to your upcoming projects. Your home deserves that polished finish that only careful sealing and planning can deliver. Remember, every corner you perfect boosts your confidence and transforms your space into something truly special. Have you ever struggled with corner gaps or wall irregularities? Share your experience below, and let’s learn together how to achieve flawless baseboards every time.