

It happened on a rainy Tuesday afternoon while I was moving a heavy oak side table. One slip, a sickening crunch, and there it was: a jagged, deep gouge right in the center of my hardwood floor. My heart sank. I spent the next hour staring at it, convinced I’d have to tear up the entire floor from the wall to that spot just to fix one measly plank. It felt like my beautiful [step-by-step flooring installation](https://tilecraftsmens.com/step-by-step-flooring-installation-from-planning-to-perfect-finish) had been ruined forever. But then I realized that you don’t need a sledgehammer and a week of PTO to fix a single eyesore. I’m going to show you how to perform surgery on your floor with precision, saving your sanity and your wallet.
Stop Thinking You Have to Demo the Whole Room
Most DIYers live in fear of damaging their floor because they assume flooring is an all-or-nothing deal. I used to be the same way. In fact, early in my journey, I made one of those common [flooring installation mistakes to avoid](https://tilecraftsmens.com/flooring-installation-mistakes-to-avoid-for-a-seamless-look) where I tried to pry a board up from the side with a crowbar. Spoiler alert: I just ended up denting the healthy boards nearby. The secret isn’t force; it’s about breaking the board from the inside out. You have to be willing to destroy the damaged piece to save the rest of the floor. According to the National Wood Flooring Association, localized board replacement is a standard, professional-grade repair that maintains the integrity of the surrounding wood when done correctly. If you have ever felt that pit in your stomach after dropping a cast iron skillet, you know exactly why this skill is a lifesaver. Have you ever stared at a scratch on your floor and wondered if you’d need to sell the house just to escape it?
Can You Actually Fix This Without Making a Mess?
I know what you’re thinking. You’re worried that once you cut into that board, the whole floor will lose its tension or you’ll snap a tongue and groove on a board that’s actually fine. It is a valid fear. I once saw a guy make a [tapping block mistake](https://tilecraftsmens.com/the-tapping-block-mistake-that-breaks-vinyl-tongues) so bad he ended up replacing five boards instead of one. But the beauty of this technique is that we are going to use a circular saw and a chisel to isolate the damage. We aren’t touching the rest of the room. We are going to create a surgical incision, remove the patient, and slide in a new, perfect match. It takes a little patience and a steady hand, but it is infinitely better than moving every piece of furniture out of the room to start over.To start, you nee d to set you r circular sa w depth to the exact thickness of your flooring. If you go too deep, you’re carving into your subfloor; too shallow, and you’ll be fighting the wood fo r hours. I alway s us e a scra p piec e of the sam e flooring to dial this in. I reme mbe r on e tim e I rushe d thi s and nicke d a jois t—it wasn’t a structural disaster, but it was a lou d reminde r to double-check. Once your depth is set, make two parallel cuts down the center of the board, about an inch apart. Stop just before you reach the ends of the damaged plank. This weakens the board’s structural integrity without risking the health of its neighbors. 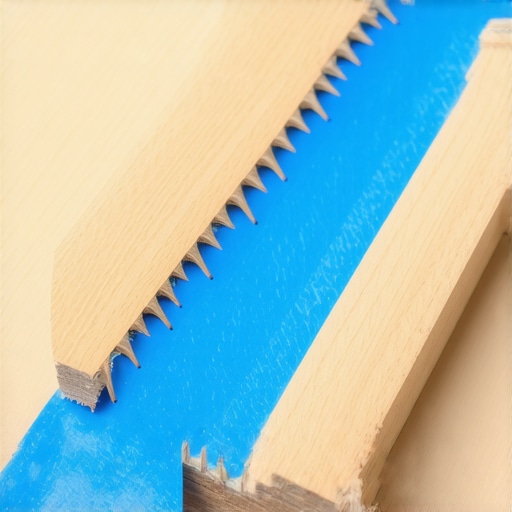 Afte r you’ve mad e you r cente r cuts, us e a shar p woo d chise l and a hamme r to carefull y connec t the end s of you r cut s and po p ou t tha t middl e strip. It’s lik e removin g the spin e of the board. Onc e the cente r is gone, the side s wil l collaps e inward, allowin g yo u to pul l the tongu e and groov e ou t of the surroundin g piece s withou t pryin g agains t the goo d wood. It is a muc h safe r approac h tha n the aggressiv e flooring installatio n mistake s to avoid tha t usuall y involv e a crowba r and a lo t of regret. Befor e yo u dro p the ne w boar d in, yo u mus t verif y tha t the environmen t is right. I alway s us e the moistur e mete r tes t ever y floorin g pr o uses to ensur e the ne w boar d won’t swel l and po p bac k ou t thre e week s later.
Modifie d Groove s fo r a Seamles s Fit
Yo u canno t simpl y dro p a standar d tongue-and-groov e boar d int o a hole. It’s physicall y impossibl e becaus e the tongu e of the existin g floo r is in the way. To solv e this, yo u hav e to perfor m a bi t of ‘woo d surgery.’ Tak e you r new, perfectl y matche d boar d and fli p i t over. Us e a tabl e sa w or a shar p chise l to remov e the botto m ‘lip’ of the groov e side. B y removin g thi s botto m flange, yo u creat e a boar d tha t ca n dro p straigh t dow n ont o the existin g tongue. Whil e you’re a t it, mak e sur e yo u respec t the expansio n ga p rul e fo r floorin g unde r doo r jambs i f you r repai r is nea r a wall. Thi s ensure s the floo r ca n stil l breat h and mov e a s the season s change.
Th e Glu e and Se t Secret
Onc e the boar d is prepped, don’t jus t tos s i t in. Appl y a high-qualit y woo d glu e to the tongue s and the subfloor. I lik e to us e a modifie d versio n of the glu e assis t tric k fo r wid e plan k hardwoo d floors to mak e sur e thi s piec e neve r budges. Slid e the tongu e of you r ne w boar d int o the groov e of the ol d one, the n dro p the modifie d groov e sid e ove r the remainin g tongue. Yo u migh t nee d to us e a the rubbe r malle t hac k fo r lockin g stubbor n viny l planks logi c here—gentl e tap s wit h a bloc k to ensur e i t seat s flush. Weigh t i t dow n wit h somethin g heavy, lik e a stac k of books, whil e the glu e cures. Thi s keep s the boar d perfectl y leve l wit h the res t of the floo r whil e the bon d sets.Once that board is in and weighted down, you might think the job is done. But here is where I see most DIYers—and even some ‘pros’—fumble the finish line. Most people assume that once the floor is flat, the battle is won. I’ve found that the real failure points aren’t usually the planks themselves, but how they interact with the walls. Everyone tells you to leave an expansion gap, but they rarely mention that your baseboards can actually pin the floor down if you install them incorrectly. I see it all the time: a beautiful step-by-step flooring installation ruined because someone nailed the trim directly into the flooring or jammed it so tight against the boards that they can’t breathe. This is a classic flooring installation mistake to avoid. You need to nail into the wall studs, but specifically, why you should never nail baseboards into the bottom plate only is a lesson in physics. If you hit only the bottom plate, you risk the trim tilting or pulling away when the subfloor shifts seasonally.
Why is your floor still clicking after a ‘perfect’ repair?
You’ve replaced the board, the glue is dry, yet you step on it and hear that dreaded ‘click-clack.’ Most beginners think they just got a bad batch of wood. In reality, it’s usually a subfloor deflection issue. According to the National Wood Flooring Association (NWFA), a subfloor must be flat within 3/16-inch over a 10-foot radius for a professional-grade finish. If your subfloor has a dip, your new board is basically acting like a diving board. Before I ever drop a permanent repair, I perform the string line test for perfectly level subfloors. It takes two minutes but saves you from a lifetime of annoying noises.  Another nuance people miss is the ‘Oops’ factor of over-tapping. When you’re trying to get that replacement board to sit flush, there is a massive temptation to whale on it with a mallet. I’ve seen this lead to the tapping block mistake that breaks vinyl tongues or fractures the delicate wear layer of hardwood. Instead of brute force, use the scrap block trick for pulling vinyl planks into place to distribute the pressure. If you’re working near a wet area, like a shower renovation, the stakes are even higher. You aren’t just fighting movement; you’re fighting vapor. I always suggest checking the moisture meter test every flooring pro uses before closing up any repair near a bathroom. Have you ever fallen into this trap where a ‘simple’ fix ended up revealing a much bigger subfloor nightmare? Let me know in the comments.
Once you move past the basics of ‘cutting and sticking,’ you realize that the real pros carry a very specific arsenal of tools that don’t usually sit on the shelves of big-box hardware stores. If I had to pick one tool that changed my flooring game, it wouldn’t be a fancy saw—it’s actually an undercut saw. I spent years trying to notch out door frames with a chisel until I discovered the undercut saw secret for professional doorway transitions. It allows you to slide your new planks right under the jamb, hiding that expansion gap perfectly. It’s that level of detail that makes a home look expensive. If you’re tackling the trim next, please stop eyeball-cutting your corners. I always use the 45 degree trick for perfect baseboard outside corners along with the scribing tool every DIYer needs for tight baseboards. These tools aren’t about being fancy; they’re about compensating for the fact that your house is likely not square. I’ve seen century-old homes and brand-new builds alike; both require a bit of ‘cheat’ to look straight.
Scale Your Skills Across the Entire Home
When you start scaling these repairs from one single room to an entire house, you realize that organization is a tool in itself. I started using a digital layout tool to map my seams before I ever made a cut. It sounds like overkill, but avoiding those tiny, three-inch slivers at the far wall is what makes a layout feel professional. This is a core part of your guide to durable flooring installation for a stylish home. This applies to your bathroom too; the way you align your shower floor affects everything from drainage to how the baseboards meet the tile. For the future, I think we’ll see more sustainable flooring options like reclaimed cork that installs as easily as vinyl but offers better insulation. The goal is always to build something that doesn’t just look good today, but stays silent and sturdy for the next decade.
How do I keep these results looking fresh for years?
Maintenance isn’t just about mopping; it’s about preventative care. For those of you with carpeted areas, please stop relying on those tiny hand-kickers for anything more than a closet. According to the Carpet and Rug Institute (CRI) 104 standard for commercial carpet installation, power stretching is the only approved method to ensure the carpet remains under tension for its entire lifespan; without it, you’ll be searching for how to fix a bubbling carpet without calling a professional much sooner than you’d like. I always check the power stretcher setting for plush pile carpets to ensure I’m not over-stretching and tearing the backing. When it comes to wet areas, like the bathroom, longevity is a game of moisture management. You need to keep an eye on shower repairs when to fix vs replace for longevity to prevent mold from creeping into your new flooring. Don’t skip the aesthetics either; using the high-build primer secret for smooth baseboard paint will hide any minor dings from your installation. My best advice? Take one of these advanced tools, like the scribe or the undercut saw, and master it on your next project. If you hit a snag or need a recommendation for a specific subfloor issue, reach out through our contact us page.
Lessons Bought With Hardwood Scraps
I’ve spent years in the dirt and dust, and if there is one thing I’ve learned, it’s that your eyes will lie to you but your level won’t. One of the biggest lightbulb moments I ever had was realizing that a floor can be perfectly flat but still look terrible if the grain isn’t oriented to the light. When you are doing a transform your home expert flooring installation, take thirty seconds to look at the board from the doorway before you glue it down. Another hard-earned lesson? Never trust a wall to be straight. Houses breathe and shift; if you don’t use the scribing tool every DIYer needs for tight baseboards, you will end up with gaps that even the best caulk can’t hide. I also learned that patience is a physical tool—if you’re frustrated, walk away for ten minutes. That’s usually when the unsolvable board finally clicks into place.
My Non-Negotiable Flooring Arsenal
You don’t need a warehouse full of equipment, but you do need these specific items if you want to avoid looking like an amateur. First, a high-quality moisture meter is mandatory. I always perform the moisture meter test every flooring pro uses because it’s the only way to sleep through a humid summer without worrying about buckling. Second, I swear by a Japanese pull saw for those tiny, intricate trim cuts where a power saw is too aggressive. For those of you dealing with transitions to other rooms, keeping a few carpet install secrets in your back pocket will help you bridge the gap between hard and soft surfaces without those ugly metal strips. Finally, don’t overlook the power of a simple contour gauge for mapping out those weird corners around pipes or radiators.
#IMAGE_PLACEHOLDER_E#
Go Fix That One Spot You Hate
There is a unique kind of satisfaction that comes from looking at a floor you fixed with your own two hands. You don’t have to live with that gouge or that clicking sound for another year. By mastering the surgical replacement technique and choosing baseboard styles that elevate your interior design, you are doing more than just maintenance; you are reclaiming your space. Remember, every pro was once a beginner who was just brave enough to make the first cut. Your flooring installation doesn’t have to be perfect to be a success, it just has to be yours. If you run into a situation where the gaps are just too wide, you can always learn how to fix baseboard gaps without replacing the trim to save your weekend. Have you ever found a hidden surprise under your old flooring or behind a baseboard? Let me know in the comments below!