

I remember the exact sound my heavy oak dresser made when I dropped the corner during a ‘quick’ bedroom rearrange. It wasn’t a crash; it was a sickening, compressed thud. When I looked down, there it was—a raw, crescent-shaped crater in the middle of my pristine floor. My heart sank. I’d spent weeks on the step-by-step flooring installation just the summer before. [image_placeholder_1]
Save Your Hardwood Without Reaching for the Sandpaper
Early in my DIY journey, I thought the only way to fix a dent was to sand it down until the floor was level again. Huge mistake. I ended up creating a dip in the wood that caught the light like a sore thumb and eventually required looking into flooring installation mistakes to avoid just to understand how I’d messed up the finish. You don’t need to do that. If the wood fibers are compressed but not actually torn or missing, we can breathe life back into them using heat. Today, I’m going to show you how a common household iron and a damp rag can literally pop those fibers back into place. It feels like magic, but it is just basic physics at work.
Does Steaming Wood Actually Work or Will I Warp the Floor?
It sounds counterintuitive to put water and heat on a floor you were told to keep dry, right? I was skeptical too until I saw it in action. According to wood science researchers at the Forest Products Laboratory, wood is a hygroscopic material, meaning its cells naturally expand when they absorb moisture. By applying localized steam, we are forcing those compressed cells to drink up and swell back to their original height. While it won’t fix a deep gouge where the wood is physically gone—for that, you might need to remove a single damaged floor board—it is a lifesaver for those annoying pressure dents. Have you ever stared at a fresh dent in your floor and felt that immediate wave of regret? Let me know in the comments if you’ve been there! This simple trick is the bridge between a ruined afternoon and a floor that looks like the accident never happened.
Gather Your Gear and Prep the Surface
Before you even plug in the iron, you need to clear the area of any dust or debris. If there is grit inside that dent, you are basically about to steam-cook dirt into your floor grain. Use a soft microfiber cloth to wipe the area clean. Think of this like prepping a wound before a bandage; you want a sterile environment so the wood can expand without trapping grime. I once tried to rush this on a project involving durable flooring installation and ended up with a permanent grey smudge because I didn’t vacuum the crevice first. Once it is clean, grab a clean, white cotton rag. Avoid colored towels, as the heat can actually cause the dye to bleed into your floor finish, creating a much bigger headache than a simple dent.
Wet the Rag Just Enough
You want the cloth damp, not dripping. If you use too much water, you risk the liquid seeping into the joints and causing the edges to swell, which is one of the most common flooring installation mistakes to avoid when dealing with moisture-sensitive wood. Wring it out until it feels like a cool, damp sponge. Lay the cloth flat directly over the dent. This rag acts as a buffer and a moisture delivery system, ensuring the heat doesn’t scorch the polyurethane while the water turns into the steam we need to penetrate those crushed wood cells.
Apply Heat and Watch the Magic Happen
Set your household iron to its highest steam setting or a medium-high cotton setting. You don’t need a specialized tool; the same iron you use for dress shirts works perfectly. Similar to how the heat iron trick works for seam tape, we are using temperature to change the physical state of the materials beneath. Place the iron on the damp cloth directly over the dent and move it in small, tight circles. Never let the iron sit still. I learned this the hard way during a renovation where I got distracted by a phone call; thirty seconds of stationary heat left a faint white ring that took a week of polishing to remove.
Listen for the Hiss
You should hear a gentle hissing sound as the water in the rag turns to steam. This steam is under pressure from the iron, forcing its way into the compressed wood fibers. After about 60 seconds, lift the rag and check your progress. You will likely see the dent has significantly shallowing. If it is a deep one, you might need to repeat this process three or four times. If the wood is physically splintered or the grain is snapped, you might find that you eventually have to remove a single damaged floor board, but for 90% of household furniture drops, this steam technique will bring the wood back to level.
Let the Wood Fibers Breathe and Dry
Once the dent is gone, resist the urge to immediately walk on it or apply a fresh coat of finish. The wood is currently saturated and slightly soft. It needs at least 24 hours to stabilize and for the moisture to evaporate naturally. If you rush it, you might trap moisture under a touch-up pen or sealer, leading to cloudiness. When I was finishing a step-by-step flooring installation last year, I found that patience in the drying phase was the difference between an invisible repair and a patchy one. Once it is dry, a light buff with a high-grit sandpaper and a dab of matching finish will make the repair completely disappear into the rest of the room.While the iron trick feels like a DIY miracle, there is a nuance most tutorials gloss over: the finish itself. Everyone assumes you can just steam away, but if you are working with a factory-sealed aluminum oxide finish or a hard-wax oil, you are playing with fire. In my experience, high-end factory finishes are often too brittle to handle the expansion and contraction of the wood cells beneath. You might pop the dent but end up with a ‘halo’ of cracked finish that looks far worse. This is one of the most common flooring installation mistakes to avoid when attempting repairs on modern pre-finished planks.
The Raised Grain Trap Most DIYers Ignore
Here is the ‘oops’ factor that separates the pros from the amateurs: over-saturation. When you apply steam, you aren’t just lifting the dent; you are often ‘raising the grain.’ This makes the wood feel fuzzy or rough to the touch. If you immediately try to sand that fuzz down while the wood is still damp, you will tear the fibers rather than cutting them. I’ve seen homeowners try to rush this during a durable flooring installation repair, only to end up with a permanent dark spot because the torn fibers absorbed too much stain later. Always wait for total dryness.
Is it Possible to Over-Steam and Ruin the Wood Structure Forever?
Yes, it actually is. While wood is resilient, according to technical guidelines from the National Wood Flooring Association (NWFA), excessive localized heat and moisture can lead to ‘cell collapse’ if the temperature exceeds the glass transition point of the lignin. Basically, you can cook the ‘glue’ that holds the wood fibers together. If you notice the wood turning a dark, charcoal-like brown during the process, stop immediately. You’ve gone beyond steaming and started scorching the organic compounds. This is why I always suggest checking for underlying issues first; for instance, if your floor feels soft or you’re wondering why your new floor is bouncing, a surface dent repair won’t solve the structural problem.
Check the Perimeter Before You Finish
Before you call the job done, look at the transition to your walls. If the dent was near the edge, the steam might have traveled under the trim. I always take a second to ensure my baseboards makeover isn’t being compromised by trapped humidity. If you see moisture beads forming on the trim, wipe them off immediately to prevent the MDF or wood from swelling. Have you ever fallen into this trap or accidentally scorched a finish while trying to be helpful? Let me know in the comments! It is a steep learning curve, but once you master the balance of heat and moisture, you’ll handle floor mishaps with the confidence of a seasoned pro. If the damage is truly catastrophic, such as after a major pipe burst, you’ll need to look at how to save a floor after an ice maker leak instead of reaching for the iron.Once you have conquered the immediate panic of a dent or a scratch, you need to transition into a proactive maintenance mindset. This is not just about cleaning; it is about having the right kit ready before the next disaster strikes. I used to rely on a basic pencil and a prayer for my trim work, but everything changed when I invested in a dedicated scribing tool. It is the scribing tool every diyer needs for tight baseboards because it accounts for wonky walls that a standard ruler simply cannot see. When I am pursuing carpet install secrets achieving flawless results every time, I never skip using a power stretcher. Most DIYers use a knee kicker and wonder why their carpet wrinkles in two years. I have learned that if you are not putting significant tension on that backing, you are just setting yourself up for future failure. 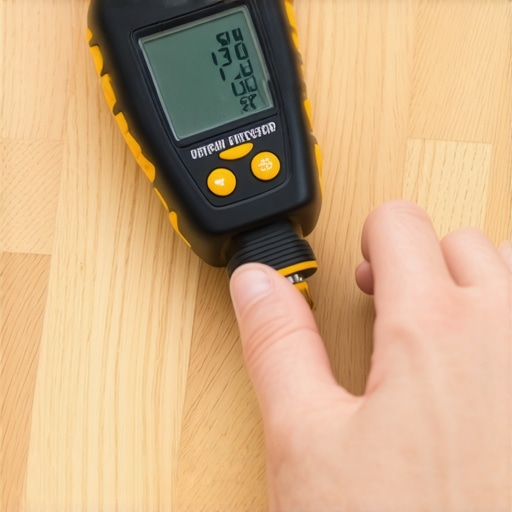
How do I maintain my floor and shower finish over time?
Longevity is a game of moisture control. For my wood floors, I carry a professional pinless moisture meter everywhere. The National Wood Flooring Association (NWFA) states in their technical guidelines that maintaining a consistent Equilibrium Moisture Content (EMC) is critical for preventing gaps and buckling. If you do not know your floor’s baseline number, you will not know when a slow leak is starting behind the drywall. In the bathroom, it is about the small stuff. I use the blue tape secret for professional shower silicone lines every time to ensure my seals remain watertight. If you see even a pinhole in your caulk, do not wait. Check shower repairs when to fix vs replace for longevity to see if you can still save the subfloor or if the damage has gone too deep. Looking ahead, I predict that within the next few years we will see ‘smart’ baseboards with integrated moisture sensors that alert your phone the second a pipe begins to weep. Until then, we have to be the sensors. If you want to take your skills to the next level, I challenge you to go buy a high-quality moisture meter today and map out the dry baseline of every room in your house. It is the ultimate defense against catastrophic floor failure.
What I’ve Learned After a Decade of Scratched Planks
The biggest ‘lightbulb moment’ I ever had was realizing that wood isn’t a static object; it is a living, breathing component of your home. If you treat a dent as a permanent scar, you will always be disappointed. But if you see it as a compressed fiber waiting to be invited back to its original shape, the whole process becomes less stressful. One hard truth is that texture matters more than color. You can match a stain perfectly, but if the light hits a flat spot where the grain should be, the repair will fail the ‘eye test.’ I also learned that if you notice your baseboard caulk is cracking while you are working on a floor repair, it usually means your home’s humidity is swinging too wildly for the steam trick to stay stable long-term. Always check the environment before the repair.
The Gear That Actually Lives in My Tool Bag
I do not believe in buying every gadget on the shelf, but a few specific items have saved my sanity across dozens of projects. First, stop guessing about wall gaps and get the scribing tool every diyer needs for tight baseboards; it is the only way to get a professional fit against wavy drywall that often accompanies new floors. For moisture control, a pinless meter is non-negotiable to prevent future buckling. I also keep a roll of painters tape handy for more than just paint—it is part of the blue tape secret for professional shower silicone lines every time, and it works just as well for marking the exact boundaries of a floor dent so you do not accidentally over-sand the surrounding finish. If you find yourself transitioning into other rooms, keep your carpet install secrets achieving flawless results every time in mind, especially regarding maintaining tension at the thresholds.
[image_placeholder_1]
Building Your Confidence One Board at a Time
DIY home maintenance is not about being perfect the first time; it is about having the right recovery plan when things go wrong. Whether you are tackling a minor furniture dent or looking for expert flooring installation tips for 2025 to start a whole-room project, remember that every pro started with a dropped hammer and a bit of panic. You now have the physics-based magic of steam in your repertoire, which is a massive head start toward a flawless flooring installation. Don’t be afraid to test this on a scrap piece of wood first to get a feel for the heat. Have you ever tried the steam trick and been shocked by the results, or did the finish react in a way you did not expect? Let me know your experiences in the comments below!