

I remember creeping toward the nursery at 2 AM, holding my breath and trying not to wake my six-month-old, when the floorboard beneath me screamed like a banshee. It was that one specific spot right in front of the door—a high-pitched, wooden groan that seemed to vibrate through the very soles of my feet. My first instinct back then was to grab a hammer and some standard finish nails, a classic ‘beginner’ mistake that left me with a permanent snagged loop in my Berber and a nail head that caught every wool sock I owned for the next three years. It was a mess, and honestly, I felt like I had ruined my house. I learned the hard way that you cannot just ‘brute force’ a solution through finished flooring without a plan. But the good news? You do not have to live with that annoying haunted-house soundtrack anymore, and you definitely do not have to rip everything out to get some peace and quiet. Today, I am walking you through the ‘stealth’ method for silencing your home without leaving a single scar on your carpet or your sanity.
Stop the Squeak Without Pulling Up Your Carpet
[image_placeholder] Most homeowners assume a noisy floor is a structural death sentence that requires a full step-by-step flooring installation or a massive professional renovation bill. I am here to tell you that is simply a myth born from fear. Over the years, I have picked up several carpet install secrets that most pros keep under wraps: specifically, the fact that you can anchor a loose subfloor directly to the floor joists right through the existing carpet pile. My own ‘lightbulb moment’ came when I watched a veteran floor installer use a specialized tripod-based screw system. He did not even move the heavy oak dresser; he just found the joist, drove a screw through the carpet, and *snap*—the noise was gone instantly. The secret lies in using breakaway screws that are designed to snap off below the surface of the subfloor, leaving absolutely nothing behind but silence. We are aiming for that rock-solid stability you expected when you first decided to choose the right carpet for a cozy living space, minus the annoying friction that inevitably comes as a house settles over the decades.
Can you really drive screws through carpet without leaving a scar?
It sounds like a total recipe for disaster, does it not? You likely spent a small fortune on your flooring, and the idea of poking holes in it feels like sacrilege. However, the National Association of Home Builders (NAHB) points out that most floor squeaks are caused by the friction of wood rubbing against nails or other wood components—meaning the problem is happening deep beneath your feet, not in the carpet fibers themselves. By using a specialized depth-control tool, we can ensure the screw head never actually grabs or twists the carpet fibers, preventing that nightmare scenario where you ‘run’ a thread through the whole room. Have you ever tried one of those ‘quick fixes’ you saw on a late-night infomercial only to end up with a bigger mess than you started with? I have been there, and that is exactly why we are doing this the right way. We are going to find those joists with precision, secure the subfloor once and for all, and keep your carpet looking pristine. It is about working smarter, not harder, to reclaim the quiet in your own home.
Locate the Joists with Surgical Precision
Driving blindly into your floor is how you end up with a ‘pincushion’ effect—dozens of holes and still no silence. I learned this lesson the hard way when I tried to fix a squeak in my hallway by ‘feeling’ for the joist with a hammer. After twenty minutes, I had eight visible nail holes and a floor that still groaned every time the cat walked over it. Instead, use a high-density stud finder or the ‘bounce test’ with a heavy rubber mallet. You are looking for that dull thud that signals solid wood, rather than the hollow echo of empty space. This is a foundational step, much like how you would how to reinforce a subfloor for heavy stone tiles to ensure zero movement. Once you mark your joist path with a few pieces of painter’s tape, you are ready for the actual surgery. 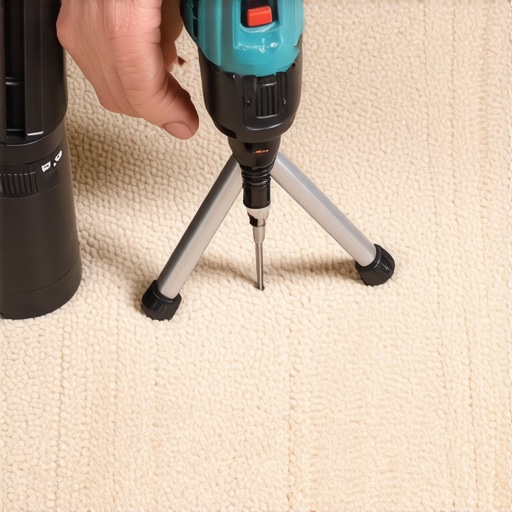
Thread the Needle with a Depth-Control Tripod
The biggest fear is catching a carpet loop and pulling a ‘run’ through the entire room. Think of your carpet like a knitted sweater; if you snag one thread with a spinning drill bit, the whole thing unspools. To avoid this, we use a specialized tripod-style guide tool. You place the tripod over your mark, and it acts as a protective shield for the carpet fibers. The screw passes through the center of the tripod without ever touching the surrounding yarn. This is one of those carpet install secrets that saves the aesthetic of the room while fixing the structural annoyance. If you have ever seen flooring installation mistakes to avoid for a seamless look, you know that rushing this part is the fastest way to ruin a beautiful high-traffic area.
Snap the Screw for a Finish You Can’t See
Once the screw is driven in, it clamps the subfloor tight against the joist, eliminating the gap that causes the friction. But now you have a screw head sticking out, right? Not with this method. These screws are manufactured with a ‘weak point’ about an inch down the shaft. Using the same tripod tool as a lever, you simply rock the tool back and forth. The screw head snaps off cleanly below the surface of the wood. It is a satisfying ‘clack’ that signifies the end of the noise. I remember doing this in a rental unit once where the landlord was convinced I would have to rip up the floor; when I showed him the silent, unmarked carpet afterward, he thought it was magic. This level of precision is similar to the care needed when you how to fix a loose stair tread without tearing it off. You get all the structural integrity without the visual evidence of a repair.That satisfying ‘clack’ of a breakaway screw is a huge win, but it is only one piece of the puzzle. Let us dig deeper into the nuances that separate a simple fix from a professional-grade restoration. Many homeowners operate under the contrarian myth that thicker carpet padding is always superior. In my experience, choosing a pad solely for its ‘squish’ factor is a recipe for disaster. If you choose a low-density, overly thick cushion, you will soon wonder [why-your-carpet-pad-is-crushing-down-too-fast] in high-traffic zones. This leads to the carpet fibers losing their tension, which eventually creates ripples that no amount of re-stretching can fully cure. 
What if the Noise Persists Even After You’ve Driven the Screws?
Sometimes, the squeak is not just a loose nail; it is a structural cry for help. If you have secured the subfloor to the joist and the groan remains, you are likely dealing with ‘joist rub’ or excessive deflection. This is where you need to look below the surface and understand [why-your-floor-joists-need-blocking-before-tile-installation] or carpeted areas alike. Research from the Journal of Light Construction confirms that over 70% of floor-related callbacks are caused by improper subfloor preparation rather than the finish material itself. Adding solid bridging or X-bracing between the joists provides the lateral stability needed to stop the wood from twisting under your weight.
Stop the ‘Speed Bump’ Before it Ruins Your Layout
One of the biggest ‘oops’ factors I see occurs during the transition phase. You might have the subfloor silent, but if your seams are not handled with surgical precision, you will end up with a visible ridge. Understanding [why-your-carpet-seam-looks-like-a-speed-bump] often comes down to the temperature of the seaming iron and the direction of the carpet nap. If the heat is too high, you melt the backing; too low, and the bond fails. Similarly, many people forget to account for the height of their trim. If you do not master [the-carpet-tucker-move-for-clean-baseboard-edges], you will be left with a messy, frayed gap where the floor meets the wall. It is these small, technical details—like knowing the [the-power-stretcher-vs-knee-kicker-debate]—that determine whether your floor stays silent and beautiful for five years or twenty. Have you ever fallen into the ‘more padding equals better quality’ trap? Let me know in the comments.Moving past the initial fix requires a shift in mindset from just ‘stopping a sound’ to ensuring your entire floor system remains structurally sound for the next twenty years. If you are still relying on a knee kicker for anything larger than a small closet, you are setting yourself up for future failure. I personally made the switch to a power stretcher after seeing a client’s hallway look like a series of ocean waves just eighteen months after a ‘professional’ install. Understanding the power stretcher vs knee kicker debate is essential because the latter simply cannot provide the uniform tension needed to prevent the carpet from relaxing and eventually rubbing against the subfloor again. When the carpet stays taut, it acts as a secondary stabilizing layer, keeping the pressure even over those breakaway screws we just installed.
How do I keep my renovations looking fresh for a decade?
Maintenance is not just about vacuuming; it is about monitoring the ‘invisible’ factors like humidity and structural shifting. I always keep a high-quality moisture meter in my toolkit, and I recommend you do the same. Before you even think about laying down material, you must perform the moisture meter test for concrete subfloors or wooden joists. According to the ASTM F2170 standard, which is the industry benchmark for in-situ relative humidity testing, ignoring the moisture levels in your subfloor is the number one cause of adhesive failure and wood warping. If your wood expands because of seasonal humidity, those silent floors will start screaming again, no matter how many screws you use. This same attention to detail applies to your walls; if you notice why your caulked baseboards are cracking within weeks, it is usually a sign of structural movement or improper product choice, not just ‘bad luck.’ For long-term aesthetics, I am a huge fan of wire-brushed textures. I have found that why wire-brushed finishes hide scratches better than smooth finishes is simply due to the varied grain pattern, which masks the inevitable dings of daily life. 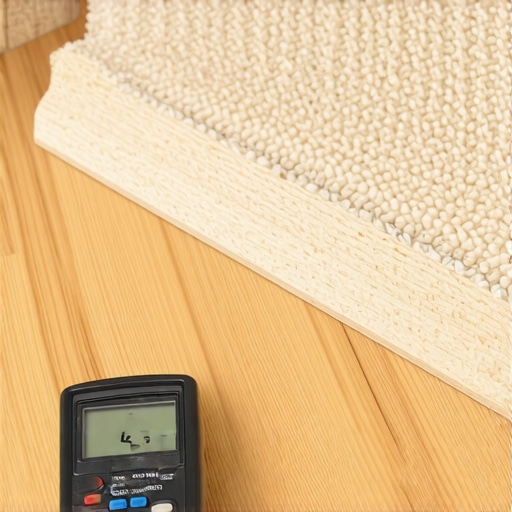 Looking toward the future, I predict we will see a massive surge in ‘smart subfloors’ equipped with embedded moisture sensors that alert homeowners to leaks before they become catastrophic. Until then, we rely on our tools and our eyes. If you are dealing with a bathroom space, don’t wait for a leak to decide between shower repairs: when to fix vs replace for longevity. Proactive maintenance on your silicone joints and grout lines will save you from a full tear-out later. My advanced tip for you this week: grab a professional-grade moisture meter and check the perimeter of your shower and the center of your living room. You might be surprised at what the numbers tell you about the health of your home. If you catch a rising humidity trend now, you can adjust your HVAC settings before the floor boards start to cup or the carpet starts to ripple.
What Professionals Keep Quiet About Carpet Longevity
After years of fixing “haunted” floors, I realized that a squeak is often just the symptom, not the primary disease. One lightbulb moment for me was discovering that no matter how many screws you drive into the subfloor, if your indoor environment is too dry, the wood will shrink and pull away from those very anchors. I have seen perfectly installed floors develop gaps because the homeowner did not realize that winter air was sucking the life out of their joists. Another hard truth? Most people prioritize the wrong things when they how to choose the perfect baseboards for your homes style without checking if the floor is actually level enough to support them. If you skip the subfloor prep, those beautiful boards will just highlight every dip and curve in your room.
- High-traffic areas need density, not just thickness. I have seen homeowners regret their choice when they realize best carpet types for high traffic areas in 2025 are those that resist crushing, rather than the ones that feel softest for the first week.
- Silence is a system. You cannot just fix one board and expect the rest of the room to stay quiet if the subfloor was not primed correctly during the initial build.
- Don’t be afraid to pull up a small corner of the carpet if the noise is deep and structural. Sometimes you need to see the joists to understand why they are shifting.
The Toolkit That Saves My Back and My Floors
If you are serious about DIY flooring, there are three items I never leave the truck without. First, a professional-grade moisture meter; it is the only way to know if your house is ready for a permanent repair. Second, a power stretcher. While some still argue about it, carpet install secrets like these are the difference between a floor that lasts and one that ripples in two years. Finally, a specialized breakaway screw kit is non-negotiable for through-carpet repairs. I trust these tools because they take the guesswork out of the equation and prevent the kind of expensive errors that lead to a full step-by-step flooring installation when you were not planning on one. If you are ever in doubt about a structural issue, it is always better to contact us for a professional opinion before you start drilling into mystery spots.
Reclaiming Your Peace One Room at a Time
Living in a house that groans with every step is exhausting, but it is not a permanent sentence. By taking these surgical steps to secure your subfloor and ensuring you have the right tension in your carpet, you can finally enjoy that quiet coffee at 5 AM without waking the whole household. It starts with one squeaky board and a little bit of patience. Your home is your sanctuary, and it deserves to be a place of silence and stability. Whether you are adding baseboard styles that elevate your interior design or just silencing a hallway, do it with the confidence that you are building something meant to last. Have you ever tried to fix a floor noise only to have it pop up again just six inches away? Let me know in the comments below!