I remember the moment I first noticed it—walking into my living room and seeing that annoying gap between the baseboard and the wall. At first, I thought it was just a minor flaw, something I could ignore. But as days went by, that gap only worsened, making the room look unfinished and sloppy. It was a lightbulb moment for me, realizing that walls from 2026 can be particularly tricky—wavy surfaces, uneven floors, and all those tiny imperfections that drive homeowners mad.
Why Wavy Walls and Gaps Are More Than Just a Cosmetic Problem
Honestly, these gaps aren’t just about aesthetics. They can lead to bigger issues like drafts, pest intrusion, or even water damage over time. The truth is, many folks overlook this problem until it becomes a nuisance or, worse, a full-blown renovation nightmare. If you’ve ever faced uneven walls or baseboards that just don’t sit right, you know how frustrating it can be to get that clean, professional look.
What’s tricky about 2026 walls is their unique tendency to be slightly irregular—thanks to innovations in building materials and wall designs. But don’t fret! There’s a *pro secret* I stumbled upon that can save your sanity and give your home that flawless finish you crave. In fact, I learned early on that trying to force a perfect fit without understanding how to adapt to the wall’s natural shape is a big mistake—trust me, I made it myself. Instead, a flexible, smart approach can make all the difference.
Is Fixing Baseboard Gaps on Wavy Surfaces Actually Worth the Hype?
It’s natural to wonder whether addressing these gaps is just a cosmetic fix or if it really impacts your home’s longevity and comfort. My honest answer? It’s absolutely worth it. Ignoring the problem can lead to bigger problems down the line, including structural issues and energy inefficiency. According to experts, properly sealing and installing baseboards on uneven walls can improve overall home insulation and reduce heating and cooling costs—something that pays off in the long run.
One misstep I made early on was forcing the baseboards to sit flush without customizing my approach—resulting in more gaps and a less polished look. That’s why understanding the nuances of dealing with wavy walls is essential. Luckily, I’ve picked up some game-changing tricks that I can’t wait to share, starting with the fundamentals. Ready to turn your frustrating gaps into a sleek, seamless finish? Let’s dive into the core techniques that will make you look like a pro, even if your walls are far from perfect.
Assess the Wall Surface and Prepare Your Tools
Start by inspecting your wall to identify the extent of waviness and gaps. Use a long level or a straightedge to gauge irregularities. Gather essential tools: a utility knife, measuring tape, caulk gun, flexible filler, shims, sandpaper, paintable caulk, and possibly a reciprocating saw for trimming baseboards. Learn about fixing uneven baseboards.
Modify or Replace Problematic Baseboards
If your baseboards are too rigid or don’t contour to the wall, consider removing them and replacing with flexible or shimmed baseboards. Carefully cut and fit new baseboards to match wall irregularities. For existing baseboards, use a heat gun to soften and bend them gently for better contact, then secure with nails. This method ensures a snug fit on uneven surfaces, avoiding gaps. I once experimented with this when I had a stubborn 2026 wall and found that softer, flexible baseboards significantly reduced gaps. Explore simple baseboard updates.
Apply Flexible Filler or Caulk in Gaps
For small to medium gaps, use a paintable, flexible caulk. Cut the nozzle at a 45-degree angle, and squeeze it into gaps while smoothing with a caulk tool or your finger dipped in water. Work in sections, wiping excess before it cures. For larger gaps, insert foam backer rods first, then fill with caulk. This approach accommodates wall irregularities and moves with the building’s shifts, preventing new gaps. I once masked a 2026 wall’s waviness by sealing gaps with a high-quality flexible caulk, which kept everything smooth over time. See more caulking tricks.
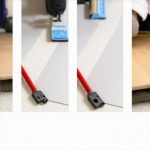
Scribe and Trim Baseboards for a Precise Fit
Use a scribing tool to transfer wall contours onto your baseboards. Mark the high spots and sand down any protrusions, ensuring a flush fit. For beveled or irregular edges, employing a coping saw or oscillating multi-tool to cut intricate joint profiles enhances alignment and hides minor imperfections. Remember, a clean joint looks more professional. I practiced scribing on scrap pieces first, which saved me from costly mistakes on the real baseboards. For advanced tips, check out this guide on coping baseboards.
Install and Finish for a Seamless Look
Secure the baseboards with finishing nails, countersink, and fill nail holes with wood filler. Sand smooth and paint or stain to match the decor. For painted finishes, apply primer first to ensure seamless coverage. Proper sealing and painting hide minor scribing inaccuracies, creating an illusion of perfect contact. I discovered that taking my time to sand and paint meticulously transformed a rough installation into a sleek finish. For further refinements, visit latest baseboard styling trends.
When it comes to renovations like shower upgrades, flooring, or baseboard installations, many assume that following standard tutorials guarantees perfect results. However, this oversimplified view often leads to common mistakes that undermine the longevity and aesthetics of projects. One prevalent myth is that leveling tools alone can compensate for uneven substrates; in reality, subtle tolerance differences in materials such as 2026 walls demand more nuanced approaches, like custom shimming or flexible adhesives, to achieve seamless finishes. A frequent trap is underestimating the importance of understanding moisture dynamics, especially in showers—skipping proper waterproofing layers can cause leaks and mold despite flawless tiling. Interestingly, professionals advise considering the wall’s natural movement—using flexible sealants and appropriate expansion gaps—to accommodate seasonal shifts, which beginners often overlook. This oversight not only risks damage but also shortens the lifespan of installations. Curious about how to avoid these pitfalls and enhance your craftsmanship? Dive into detailed strategies, like the proper way to seal curbless showers or scribe baseboards on irregular surfaces, which can significantly elevate your results. For instance, integrating advanced waterproofing techniques from expert sources and adjusting your approach based on material behavior ensures durability and visual harmony. Remember, achieving perfection isn’t solely about tools or following steps; it’s about understanding the nuanced interactions of materials and building dynamics. If you’re eager to learn the subtler aspects of professional finishing, check out our guides on fixing gapping baseboards or creating a spa-like shower experience. Have you ever fallen into this trap? Let me know in the comments.
Keep It Working: Essential Tools and Maintenance Strategies
When it comes to ensuring your home upgrades stand the test of time, investing in quality tools and establishing regular maintenance routines are non-negotiable. Personally, I rely on a few specialized pieces of equipment that have saved me countless hours and headaches. For instance, a laser level is indispensable for aligning tiles, baseboards, and flooring perfectly, especially on wavy surfaces. I prefer the Leica Geosystems laser level because of its accuracy and durability, which is crucial for the precise work required in creating a spa-like shower experience.
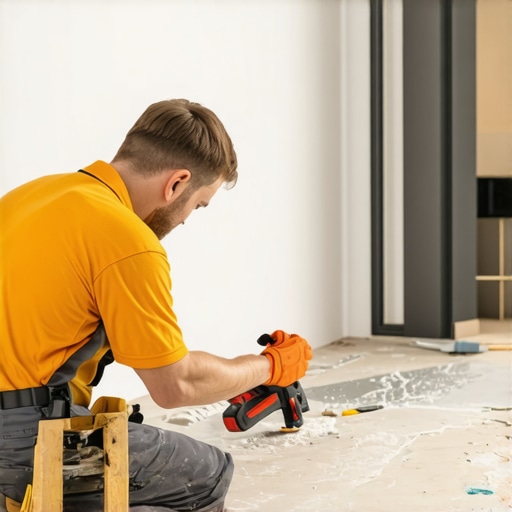
Alongside my laser level, I swear by a high-quality rotary hammer drill for removing stubborn old tiles or installing new anchors in concrete. It offers the power necessary without destroying my workspace. For everyday maintenance, a multi-tool with various attachments (like sanding, grout removal, and tapping) keeps things flexible. My personal favorite is the Dremel Multi-Max because of its versatility and ease of use.
Are Your Tools Ready to Serve Long-Term? Maintenance Tips for Durability
Tools don’t last forever, and neglecting their upkeep can lead to reduced accuracy and efficiency over time. I make it a point to clean and lubricate my equipment after each project. For power tools, a quick wipe-down and blade replacement when dull helps maintain precision. Store delicate instruments like laser levels in padded cases to prevent calibration drift. Experts suggest periodically recalibrating laser tools, especially after accidental drops or long storage periods, to ensure ongoing accuracy. Regularly checking your equipment against known standards can save you frustration during critical phases of your renovations.
Anticipating future trends, I believe smart tools integrated with IoT technology will become more prevalent, offering real-time diagnostics and maintenance alerts—making professional-grade results more accessible to DIY enthusiasts. For now, though, mastering your current toolkit remains the best step toward long-lasting results.
How do I maintain floors, showers, and baseboards over time?
Consistent inspection is key. For floors, keeping an eye out for rising gaps or creaking sounds can hint at underlying issues. Regularly resealing grout lines and applying protective coatings prolongs durability. In showers, promptly addressing leaks or mold—using proven waterproofing methods such as those outlined in our waterproofing guides—prevents costly repairs. For baseboards, periodic cleaning and repainting can keep them looking sharp; additionally, checking for gaps and reapplying flexible caulk helps accommodate building shifts over time.
Implementing a scheduled maintenance routine with these tools and strategies ensures your renovation investments stay in prime condition. Remember, the right tools paired with consistent care greatly improve long-term results, whether you’re sealing gaps, replacing flooring, or upgrading shower fixtures.
For a deeper dive into tools that can elevate your home projects, take the time to experiment with advanced options like laser levels or multi-tools. Perhaps start by calibrating your laser level, as explained in technical forums, to see immediate improvements in your layout accuracy—it’s a game-changer.
The Hidden Lessons Walls Taught Me About Perfection
Many homeowners underestimate how much patience and nuanced techniques are needed for even seemingly simple tasks like fitting baseboards on wavy walls. My biggest lightbulb moment? Realizing that forcing a rigid fit can backfire, leading to more gaps and frustration—so I learned to embrace flexibility and customize my approach. It’s not about fighting the surface, but working WITH it to achieve the sleek finish you desire.
Tools of the Trade You Can’t Live Without
From a flexible caulk that moves with your walls to a laser level that ensures perfect alignment, equipping yourself with the right gear makes all the difference. I trust my Leica laser because accuracy saves time and prevents mistakes, especially in tricky 2026 wall conditions.
Sealing the Deal: Going Beyond the Surface
Addressing gaps isn’t just about appearance; it’s a long-term investment in your home’s energy efficiency and durability. Properly sealed baseboards on uneven surfaces can significantly cut heating costs, according to experts. My recent experience with curved walls improved visibility and comfort, proving that small fixes have lasting impacts.
Level Up Your Home’s Capabilities
Maintaining your tools—like recalibrating laser levels and cleaning your multi-tool—ensures ongoing precision. I’ve found that investing in quality tools and giving them proper care extends their lifespan and keeps your work consistently professional. Imagine a future where smart, IoT-enabled devices alert you when calibration drifts; for now, routine checks are key.
Leaving the Guesswork Behind—Real Insights for Better Results
My most valuable insight? Embrace the unique quirks of every wall. Wavy surfaces might seem like obstacles, but they’re opportunities to learn custom fitting techniques. The more I experimented—from sanding down baseboards to adjusting caulk application—the better my finished look. Remember, a perfect fit isn’t about perfection in the wall—it’s about your skill in adapting to it.
Resources That Elevate My Craftsmanship
- Pro-level tools: The Dremel Multi-Max has been a game-changer for versatile adjustments.
- Inspirational reads: Latest baseboard styles inspire me to blend functionality with aesthetics.
- Online guides: The comprehensive 2026 fixes for sloping floors help me troubleshoot persistent problems efficiently.
- Expert advice: Regularly visiting trusted professional sites keeps my techniques sharp and up-to-date.
Take the Leap—Transform Your Home Today
If you’ve been hesitant to tackle baseboards on uneven walls or seal those stubborn gaps, now’s the time to start. Every successful project boosts your confidence, and small steps lead to incredible results. Remember, mastery is a journey—embrace your mistakes as learning opportunities, and watch your home evolve into a reflection of your effort and patience.
What part of your walls or bases are you ready to improve? Share your experiences or questions below—let’s build better homes together!