

I remember kneeling on a cold subfloor at 2 AM, pride swelling because my first large-format tile job looked perfect under my work lights. But then the morning sun hit. That floor looked like a choppy sea. Every single edge threw a tiny, mocking shadow. My wife walked in, stubbed her toe on a corner that was only a fraction of an inch high, and that was the end of my ego. It was lippage—the silent killer of DIY dreams and the reason I spent the next three days with a pry bar and a lot of regret. We have all been there, staring at a finished floor that feels like a trip hazard. Today, I am going to show you the exact leveling system move that changed my life, so you do not have to live with a floor that bites back.
Stop the Toe-Stubbing Shadows Once and for All
Lippage is not just about aesthetics; it is about the integrity of your home. When I first started out, I thought I could eye it. I figured if I was careful with my trowel, the tiles would naturally lay flat. Boy, was I wrong. I did not realize that even a bouncy subfloor or a slightly too-thick bed of mortar could ruin the entire look. If you have ever felt that frustrating click of a vacuum head hitting a raised tile edge, you know exactly what I am talking about. To get that professional, mirror-flat finish, you need more than just luck. You need a system that forces the tiles into a single plane through consistent mechanical tension. It is the only way to ensure the step-by-step flooring installation you worked so hard on actually stays flat as the thinset cures and shrinks.
Are these plastic clips actually worth the extra money?
I used to be a skeptic. I thought leveling systems were just a way for big-box stores to squeeze an extra fifty bucks out of me. But after that disastrous first project, I learned the hard way that precision is impossible by feel alone. The truth is, modern tiles—especially porcelain—are rarely perfectly flat; most have a slight crown or bow from the kiln. According to the Tile Council of North America (TCNA), allowable lippage for large-format tile is often less than 1/32 of an inch, which is about the thickness of a credit card. Trying to achieve that level of accuracy without clips is a fool’s errand. The mistake I made early on was neglecting my mortar consistency. I would mix it too dry, thinking it would hold the tile better, but it just created voids. Now, I always use the finger test for thinset moisture to make sure I have the right tack. Combining that with the specific wedge-placing move I am about to show you is what separates the pros from the weekend warriors. Have you ever finished a tile job only to realize later that one corner was sticking up just enough to catch your socks? My lightbulb moment came when I realized that most people use leveling clips to hold the tile, but the real secret is using them to pull the adjacent tiles into alignment. If you get the tension wrong, you end up with the wrong thinset bond and a tile that pops up anyway six months later. Let us dive into the mechanics of the double-click move that will save your knees and your sanity.
Stop Winging Your Thinset Depth
The most common reason for a lippy floor isn’t actually the tile—it is what is underneath it. You cannot expect a leveling system to fix a mountain of mortar. I learned this the hard way during a guest bathroom remodel where I got lazy with my trowel. I figured the clips would just squash the extra thinset down to the right height. Instead, the excess mortar squeezed up into the grout lines, making a four-hour nightmare of a cleanup job the next day. To do this right, you need consistent ridges. Use a 1/2-inch square-notched trowel for large format tiles and always comb in one direction. This allows air to escape, ensuring you stop shower floor tiles from popping with the proper thinset coverage. If you swirl your thinset like you are frosting a cake, you are trapping air pockets that will eventually cause the tile to shift or crack under pressure.
Drop Your Clips Where They Matter Most
Placement is everything when you are fighting gravity. If you put a clip right at the intersection where four tiles meet, you are asking for trouble because that specific point is the hardest to keep level across multiple planes. Instead, place your clips about two inches in from every corner along the edges. Think of the clips as little anchors that are constantly fighting the natural slump of the setting mortar. For massive planks, I usually add a third clip in the center of the long edge. This prevents that frustrating “belly” or bow that most porcelain tiles have right out of the kiln. I remember a job where I only used two clips per side on a 48-inch plank; by the time I came back the next morning, the center of the tile had slumped just enough to catch the morning light. It was a subtle flaw, but once you see it, you cannot unsee it. Using the chalk line move for keeping long tile rows perfectly straight helps you visualize exactly where those clips need to live before the thinset starts to skin over. 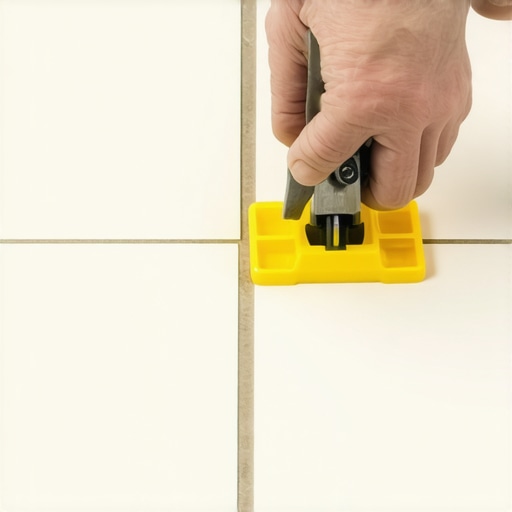
The Final Click That Locks Everything Level
Now comes the “double-click” move. When you slide the wedge into the clip, do not just jam it in as hard as you can with your thumb. You want to feel a distinct resistance, then apply pressure until you hear one more click. That second click is what provides the mechanical tension needed to pull the low tile up to the level of the high tile. If you over-tighten, you will snap the plastic clip prematurely, and if you are too gentle, the tile will sag as the moisture leaves the thinset and the bed shrinks. I always keep a pair of leveling pliers handy for this. My hands used to be cramped and raw after a few hours of manual wedging until I realized the pliers provide the exact same PSI every single time. This consistency is vital when you are trying to learn how to align tile patterns across a shower floor and wall without losing your mind to fatigue.
Clean Your Grout Lines as You Go
Here is a pro tip that will save you hours of scraping: use a small spacer or a utility knife to rake out the thinset around each clip while it is still wet. I once spent an entire Saturday with a dental pick chipping out dried mortar because I let it build up around the clips. If you do not clear that space, the clip will not snap off cleanly below the tile surface. You will be left with a jagged piece of plastic sticking up through your grout, which is basically the DIY version of a permanent splinter. This attention to detail is what prevents flooring installation mistakes to avoid for a seamless look. Treat every clip like a precision instrument, not just a piece of disposable plastic, and your feet will thank you every time you walk across that floor in the dark.Most people think those little plastic clips are a magic wand that fixes a bad subfloor, but that is the biggest myth in the industry. In my experience, if your floor is out of level by more than an eighth of an inch, the leveling system is actually your worst enemy. It creates a ‘false flat’ where the tiles look perfect on the surface but are suspended over a void because the tension has pulled them away from the mortar bed. This is why you need to understand why your self-leveling compound is cracking before the floor goes down; if the foundation is brittle, the clips are just putting lipstick on a pig. I have seen countless DIYers spend a fortune on porcelain only to have it sound like a drum when they walk on it because they relied on clips instead of proper trowel techniques.
Stop Relying on Clips to Hide a Bad Subfloor
The truth is, mechanical leveling systems are designed to correct ‘bow’ in the tile, not ‘dips’ in the house. The National Tile Contractors Association (NTCA) is very clear on this: mechanical aids are meant to maintain the plane, but the substrate must be flat within 1/8 inch over 10 feet for large-format tiles. If you try to bridge a half-inch valley with a clip, you are creating a structural weakness. When I am tackling a project that requires perfection, I look at the whole room as a system. This applies whether you are tiling a bathroom or learning carpet install secrets for achieving flawless results every time. Preparation is 90% of the win. If you ignore a bouncy floor, you are just waiting for a crack. I always tell my clients to reinforce a bouncy subfloor before tiling, or no amount of plastic wedges will save their investment. 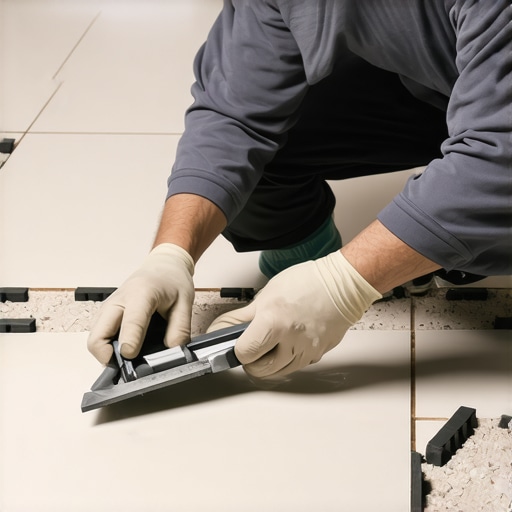
Do mechanical leveling systems create hollow spots under your tile?
This is the advanced question that separates the pros from the amateurs. The answer is a resounding yes—if you don’t back-butter your tiles. When you ratchet down a wedge, it pulls the tile upward. If there isn’t enough thinset to fill that movement, you get a hollow spot. This is the ‘oops’ factor that leads to cracked grout and popped tiles three years down the line. It is a similar principle to the tension required when stretching a rug; if you do not understand the knee kicker mistake that ruins luxury carpets, you end up with ripples. In tiling, that lack of tension or over-tensioning results in a floor that looks good but performs poorly. Have you ever fallen into this trap where everything looked great until you tapped on the tile and heard that dreaded ‘clack’ of a hollow bond? Let me know in the comments.
The Transition Secret Most Pros Hide
Once the floor is flat, the battle moves to the perimeter. This is where most people get lazy. They finish the floor and then just slap some trim over it. But if your floor is truly flat, your baseboards should reflect that precision. I’ve started using the back-bevel secret for inside baseboard corners to ensure that even if the walls are wonky, the joints look airtight. It is all about how different materials meet. Whether you are looking for baseboard trends in 2025 or just trying to finish a simple baseboards makeover to elevate your interior, the intersection of the floor and the wall is the ultimate test of your craftsmanship. Don’t let a 1/32-inch lippage ruin the look of your custom shower renovation ideas. Treat every layer of the build—from the joists to the grout—with the same respect, and you will never have to worry about a toe-stubbing shadow again.
Ditch the Cheap Stuff and Invest in Real Steel
I have spent thousands of dollars on tools over the years, and if I am being honest, half of them were a waste of garage space. But there are three things I never step onto a job site without if I want that high-end look. First is a high-quality scribe. If you want that custom-home feel, using the scribing tool every diyer needs for tight baseboards is the absolute difference between a gap filled with messy caulk and a joint that looks like it naturally grew out of the wall. Second, if you are tackling a bedroom or living area, stop using a knee kicker for every single stretch. It is a recipe for back pain and uneven tension. Instead, you need to follow the power stretcher rule for large living room carpets to ensure the backing stays taut for decades. Finally, a self-leveling cross-line laser. It is far more accurate than any bubble level I have ever owned for keeping your shower rows straight and your layout balanced.
How do I maintain my new flooring for the long haul?
The biggest mistake I see homeowners make is thinking the job is finished once the last nail is driven or the grout is dry. Maintenance is where you protect your investment. For those of you who just finished a carpet project, do not freak out when you see a mountain of fibers in your vacuum bag. You just need to understand why your new carpet is shedding so much—it is usually just loose staples from the manufacturing process that will subside after a few good passes. According to technical documentation from the Carpet and Rug Institute (CRI), consistent vacuuming and professional steam cleaning every 12 to 18 months is the industry standard to preserve your warranty and keep the fibers resilient. For tile and stone, stay away from harsh chemicals. Using acidic cleaners like vinegar will eventually eat away at your sealant, leading to the kind of shower repairs that cost a fortune later on. 
Smart Tech is Taking Over the Jobsite
Looking ahead to 2025 and beyond, I predict the flooring industry is moving toward “smart layouts” and augmented reality. We are already seeing the emergence of self-leveling compounds that are lighter and more flexible, but the real change will be in how we visualize the space. Imagine putting on a pair of glasses and seeing the exact pattern of your tiles or the most efficient carpet install secrets projected directly onto the floor before you even make a single cut. This type of technology will make following your guide to durable flooring installation feel like a guided video game rather than a stressful weekend chore. I want you to try one specific advanced tip on your next project: go buy a professional-grade scribing tool and use it on a single piece of baseboard where your wall is wavy or uneven. Once you see that perfect, tight fit, you will never go back to ‘good enough’ ever again.
The Hard Truths About What Really Happens Under Your Tile
Looking back at years of flooring installation, the most painful lessons weren’t taught in a manual; they were learned on my knees at 2 AM. First, if you find yourself fighting a clip to force a tile down, stop immediately. You aren’t leveling anymore; you’re creating a structural void that will haunt you. I’ve seen countless DIYers try to bridge a massive dip in the subfloor, only to end up needing to know how to fix a hollow sound under your vinyl plank floor or tile later when the bond fails. Second, the mortar bed is your foundation, not the plastic clip. I always go back to the finger test for checking thinset moisture in a shower or bathroom floor because if the thinset has skinned over, the clip is just holding a loose piece of rock in place. Finally, remember that your time has value. Taking five extra seconds to rake out thinset from around a clip while it’s wet saves you an hour of painful scraping with a utility knife the next morning. It is the difference between a project that feels like a triumph and one that feels like a chore.
The Three Tools I Refuse to Step on a Jobsite Without
If you want to move beyond basic DIY and achieve that luxury-hotel look, you need a kit that supports precision over guesswork. I personally trust the RTC Spin Doctor or the Raimondi Leveling System because their clips are engineered to snap cleanly below the tile surface 100% of the time. For those tricky transitions where your new tile meets a fireplace or a wonky wall, I always keep a specialized scribe tool handy; using the scribe tool trick for baseboards against stone walls or tile edges ensures your finish work looks like it was done by a master carpenter. I also highly recommend keeping a digital copy of the TCNA Handbook on your phone. It is the ‘bible’ of the industry and provides the technical specifications you need when a subfloor gets complicated. Lastly, never underestimate a high-quality cross-line laser. It is far more reliable than any bubble level I’ve ever owned for keeping your layout balanced from the first tile to the very last row.
Your Home Deserves a Floor That Feels Like Art
You have the knowledge now to move past the “good enough” phase and into the realm of professional-grade craftsmanship. Don’t let the fear of a few broken clips or a messy trowel stop you from starting your next project. Every master was once a beginner who refused to quit after their first toe-stubbing shadow. By following these expert flooring installation tips for 2025, you aren’t just laying down surface material; you are building a lasting foundation for your home. Take your time, trust the mechanical tension of your leveling system, and enjoy the process of creating something truly flat, durable, and beautiful. Have you ever had a specific tile edge that just refused to stay down no matter how many clips you used? Let me know in the comments below!