

I’ll never forget the sound of my first laminate floor ‘crunching’ every time I walked toward the kitchen. It wasn’t a satisfying wood-crackly sound; it was the sickening squish of trapped moisture turning my subfloor into a secret petri dish. I had spent days carefully laying out the planks, thinking I was a total pro, only to realize I’d treated the underlayment seams like a complete afterthought. That ‘lightbulb moment’ didn’t happen until I saw a tiny, dark stain appearing near the wall, and by then, the damage was already done. Today, I’m going to show you how to pull off the ‘underlayment-tape’ move perfectly so you never have to smell that musty failure in your own home.
Don’t Let Your New Floor Turn Into a Giant Sponge
When we talk about a step-by-step flooring installation, we often focus on the pretty stuff—the textures, the colors, and the way the light hits the grain. But the real MVP is hidden underneath. The moisture barrier is your floor’s only defense against the dampness rising from your subfloor. If you leave even a tiny gap in those seams, you’re basically leaving the front door open for mold. According to the National Wood Flooring Association, moisture-related issues are the leading cause of floor failure in residential settings, often due to improper vapor retarder installation and sealing. Sealing your underlayment properly isn’t just a suggestion; it’s the insurance policy for your bank account.
Is Underlayment Tape Really That Critical for a Floating Floor?
You might be thinking, ‘Can’t I just overlap the edges and call it a day?’ I used to think so too. I once tried to save twenty bucks by using some generic duct tape I found in the back of the garage. Huge mistake. Within six months, the adhesive failed, the vapor barrier shifted, and I started seeing the exact bubbling in one specific spot that every homeowner dreads. Genuine underlayment tape is engineered to withstand the alkaline environment of concrete and the constant friction of foot traffic. It’s not just tape; it’s a structural seal that keeps the environment under your planks stable for decades.
The Afternoon I Realized I’d Ruined My Living Room
I learned the hard way that you simply cannot cut corners on the foundation. I was so focused on avoiding common installation mistakes like bad plank staggering that I completely ignored the manufacturer’s specs for sealing moisture seams. I thought the weight of the floor would hold everything down tight enough. It didn’t. Have you ever felt that sinking feeling in your gut when you realize a ‘simple’ DIY project just became a $2,000 repair job? Tell me in the comments if you’ve ever had a ‘close enough’ moment come back to haunt you. Before you even think about laying your first plank, you need to ensure your concrete subfloor is actually dry enough for the job, and then you need to tape those seams like your life depends on it. Now, let’s get into the nitty-gritty of the tools you’ll need to get this right.
Clean Every Inch Before You Even Touch the Tape
Think of your subfloor like a surgical site. If there is even a dusting of drywall powder or a stray wood shaving, that expensive underlayment tape won’t stick. I learned this the hard way on a basement job in 2019. I thought a quick sweep was enough, but as I rolled out the vapor barrier, the tape started curling up like a dried leaf. I had to pull up two whole rows and start over. Now, I use a shop vac with a brush attachment and literally wipe the floor down. If your subfloor isn’t pristine, you might find why your rigid core floor sounds hollow when you walk is actually due to the underlayment shifting because the tape failed. Use the feather edge tactic for smoothing subfloor seams if you have any ridges that might puncture the barrier before you even get the tape down.
The Three-Inch Rule for Overlapping Seams
Most high-quality underlayment comes with a built-in adhesive strip and a plastic overlap flap. But here is the secret: don’t trust the factory adhesive alone. You need to overlap the edges by at least three inches—think of it like shingles on a roof. Water (or vapor) should always have to fight an uphill battle to get through. I always run a secondary line of seam tape over the factory edge. It’s like wearing a belt and suspenders; it might seem overkill until you realize your subfloor is breathing moisture 24/7. When you lay the second row, make sure the overlap is completely flat. If you get a wrinkle, it creates a tiny tunnel for air. I use a plastic putty knife to burnish the tape down, ensuring 100% contact with the material.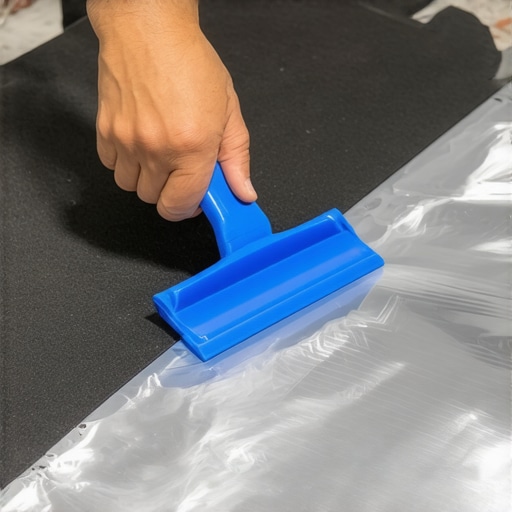
How to Handle Corners and Wall Perimeters Without the Mess
The corners are where most DIYers throw in the towel. You’ve got this bulky material and a sticky roll of tape that seems to want to stick to everything except the floor. When I hit a corner, I cut a small ‘V’ into the excess material that runs up the wall. This allows it to lay flat against the 90-degree angle. You want the underlayment to go up the wall by about two inches—this is your ‘bathtub’ protection. Later, your baseboards will hide this, but for now, it’s your best friend. If you’re worried about the look, remember that choosing the perfect baseboards for your home style will cover these functional overlaps perfectly. I once tried to cut the underlayment perfectly flush with the floor-to-wall transition, and a week later, I could feel a draft coming from the expansion gap. Never again.
Seal Every Single Puncture
During the step-by-step flooring installation, you will inevitably drop a tool or nick the barrier with a plank. Don’t ignore it. Even a hole the size of a ballpoint pen can let in enough moisture to cause problems over a decade. I keep a ‘patch kit’ (just a small roll of tape and some scraps) in my back pocket. If I see a scratch, I ‘X’ it with tape immediately. This is especially vital when you start using the rubber mallet rule for locking vinyl planks, as the vibration can sometimes cause the underlayment to shift over sharp bits of the subfloor you might have missed. For larger areas, like around islands, remember that your kitchen island needs a specialized floor layout that often requires extra attention to how the moisture barrier wraps around the cabinetry legs. If you are working with tile elsewhere, don’t forget the expansion joint rule for large tile floors applies to your underlayment logic too—give the house room to breathe, but keep the water out.
Why Tight Joints Are Actually Your Floor’s Worst Enemy
The biggest mistake I see pros-in-training make is chasing a ‘zero-gap’ finish. It sounds counterintuitive, but if you install your flooring or baseboards with zero room for movement, you’re fighting the laws of physics. Wood and vinyl are living, breathing entities—they expand and contract with the seasons. Most DIYers think the goal is to wedge the planks as tight as possible against the drywall, but that is a recipe for a ‘tented’ floor. According to the National Wood Flooring Association (NWFA), a 1/2-inch expansion gap is the industry standard for most floating installs, yet I see people ignore this daily. Have you ever fallen into this trap of over-tightening your work? Let me know in the comments.
Why do your baseboard miters keep gapping every winter?
It’s the classic homeowner frustration: you spend hours on perfect 45-degree cuts, only to see them pull apart when the heater kicks on in December. This happens because the house itself is shrinking. To combat this, I’ve moved away from standard butt joints. I now exclusively use the scarf joint rule for long baseboard runs. By overlapping two 45-degree angles instead of meeting two flat ends, any minor shrinkage remains invisible. If you’re just starting out, you might want to try the inside cope method for beginners rather than mitered inside corners; it’s far more forgiving when walls aren’t perfectly square.
The Hidden Trap of the Plush Carpet Feel
We all want that cloud-like feeling under our feet, but here is a nuance most people miss: a pad that is too thick is actually a liability. If you choose a 1/2-inch thick, low-density foam for a high-traffic hallway, you’ll eventually find why your carpet pad is too thick for the tack strip. When the pad is too tall, the carpet can’t properly ‘bite’ onto the wooden pins of the tack strip, leading to those unsightly ripples and bubbles six months later. It’s better to go with a thinner, denser 8-lb rebond pad for longevity. This is the same logic we use in showers; it’s not about the thickness of the material, but the integrity of the seal. When I’m tackling a bathroom, I never trust a single layer of waterproofing. I always utilize the overlap trick for waterproofing shower corners to ensure that even if the house settles, the ‘wet zone’ remains a tank. Even if you follow a step-by-step flooring installation guide, these small nuances—like using the painter caulk vs silicone guide for baseboards—are what separate a ‘nice weekend project’ from a professional-grade renovation that lasts thirty years.After twenty years of doing this, I’ve realized that the ‘maintenance’ talk usually happens too late—usually when someone calls me because their expensive floor looks ten years old after just one winter. The secret to longevity isn’t just a fancy mop; it’s the chemistry of what you use on the surface. I always tell my clients to adopt the microfiber mist rule for cleaning matte floors because saturating a floor with water is the quickest way to kill the adhesive bond and warp your planks.
Three tools I will never walk onto a job site without
Let’s talk about the gear that actually makes a difference in the finish. I don’t care if you’re a pro or a weekend warrior, you need a high-quality oscillating multi-tool for your door jambs. I’ve seen so many people try to use a handsaw, and it’s a disaster—the angle is almost always off, and you end up realizing why your door jamb undercuts are too high the second you try to slide a plank under and see a glaring gap. My go-to is a brushless model with vibration dampening to save my wrists. Also, never underestimate the block and hammer hack for tight tongue and groove joints. If you use a cheap plastic tapping block from a big-box kit, you’ll mar the edges of your vinyl or laminate before the row is even finished. I prefer a heavy-duty nylon block that can take a real hit without shattering.
How do I maintain my flooring and showers for the long haul?
Consistency always beats intensity. For showers, don’t wait for a leak to start thinking about the integrity of your tile. I perform a ‘mini’ version of the flood test secret for guaranteed leak-proof showers every few years by checking the drain seals and re-upping the silicone beads. If you see even a hairline crack in your grout, you need to evaluate shower repairs: when to fix vs replace for longevity. According to the TCNA (Tile Council of North America) Handbook, specifically the EJ171 standards, movement joints must be filled with a flexible sealant rather than rigid grout. This is a rule I see broken daily, and it’s the primary cause of corner leaks.
Why real chemistry beats a supermarket spray every time
Looking ahead toward 2025, I see the industry moving toward ‘smart’ underlayments that can detect moisture spikes before they reach the surface. But until that technology is affordable for every homeowner, your best bet is a simple moisture meter and a pH-neutral cleaning routine. Most ‘glow-enhancing’ sprays leave a waxy buildup that eventually turns your floor into a magnet for pet hair and dust. I want you to try this specific tip: tomorrow, ditch the generic sprays and switch to a professional-grade pH-neutral cleaner. If you’re serious about your home’s value, your floor deserves real chemistry, not a temporary shine that hides a failing finish.
Hard Lessons from My Subfloor Nightmares
One of the biggest ‘lightbulb moments’ I had was realizing that a quiet floor starts long before the first plank is even unboxed. If you skip the subfloor screw routine for stopping floor squeaks, no amount of expensive underlayment will hide that annoying chirp every time you walk to the fridge. I also learned that patience is a tool in itself; rushing the acclimation process is the fastest way to watch your hard work buckle under a summer humidity spike. I used to think I could cheat the clock, but moisture doesn’t care about your schedule.
Another critical realization: your transition pieces aren’t just decorative. They are the ‘safety valves’ of your floor. When you’re following a step-by-step flooring installation, pay extra attention to how your planks meet other rooms. Giving your home the room to expand and contract naturally is the difference between a floor that lasts five years and one that lasts fifty. Don’t be the person who jams the wood tight against the door frame—you’ll regret it when the seasons change.
The Gear That Separates Amateurs from Pros
If you want to move beyond basic DIY, you need to invest in a few specialized items that I now consider non-negotiable. First, get a professional-grade moisture meter; don’t guess if your subfloor is dry. Second, I always keep the TCNA Handbook nearby for any tile-related questions—it’s the literal industry bible. For finishing touches, I swear by the blue tape trick for cleaning up silicone beads; it keeps your expansion joints looking surgical rather than sloppy. Finally, take a look at expert flooring installation tips for 2025 to stay ahead of the latest material trends and high-performance adhesives. #IMAGE_PLACEHOLDER_E#
Your Home Deserves a Solid Foundation
Standing back and looking at a floor you laid with your own two hands is one of the most rewarding feelings in home improvement. It’s more than just wood or vinyl; it’s the stage where your life happens. By mastering these hidden details, you aren’t just ‘doing it yourself’—you’re doing it better than many pros who rush the job to get to the next site. Once the floor is down, don’t forget that learning how to choose the perfect baseboards for your home’s style is the final frame for your masterpiece. Now, grab your mallet, trust your measurements, and get started!
Have you ever encountered a subfloor surprise that nearly derailed your project? Let me know in the comments below!